• Skip to primary navigation
  • Skip to main content
  • Skip to primary sidebar

Nourished

  • Home
  • Recipes
  • Book Reviews
  • Restaurants
    • 3 Michelin Stars
    • 2 Michelin Stars
    • 1 Michelin Star
  • Journal
    • Art Journal
    • The Renaissance Diary
  • About
    • Contact Me
    • Instagram
    • Loves
    • Suppliers
    • Masterchef Links

Baking

April 18, 2015 Baking

Churros, with Pistachio and Cardamom Sugar

Every so often, I think ‘I must make the kids churros for breakfast’, and I very rarely do!!  Perhaps with four of them, Saturday is already too chaotic?  However today they were all a pre-occupied, so I jumped out of bed, and raced into the kitchen.  Inevitably Scarlett followed me, so she helped me make the dough, and find all of the ingredients.  I often have flavoured sugars to hand, and we all know that I love my cardamom and pistachio –  no surprise then that I keep a stash of that in my cold store!  I did also make normal cinnamon and sugar, but honestly, do try it with cardamom – it’s amazing!

This recipe is Nieves Barragán Mohacho’s, and my only comments would be that it’s pretty firm to use in a piping bag – if you have a biscuit press, definitely make sure you use that – I nearly ended up wearing mine!

Ingredients:

Serves 4-6
For the churros:
plain flour 250g
salt 1 pinch
unsalted butter 50g
water 200ml
caster sugar (for dusting the churros) 50g
vegetable oil 300ml

For the chocolate:
dark chocolate (70 % cacao) 150g
double cream 300ml
vanilla pod 1
cinnamon stick 1
whipping cream 100ml

For the pistachio and cardamom sugar:
100g caster sugar
1tsp good ground green cardamom
2 Tbsp good pistachios, ground with the sugar in a spice grinder


Method:

  • To make the churros, mix the flour and salt together in a mixing bowl. Heat the butter and water in a pan and bring to the boil. Pour into the flour mixing constantly with a spoon. Mix well and then refrigerate for 30 minutes.
  • Meanwhile, grate the chocolate into a bowl. Heat the double cream with the vanilla pod and cinnamon stick and bring to the boil. Remove the vanilla pod and cinnamon stick and remove the cream from the heat, and stir in the grated chocolate until the chocolate has entirely melted. Meanwhile, whisk the whipping cream until firm.
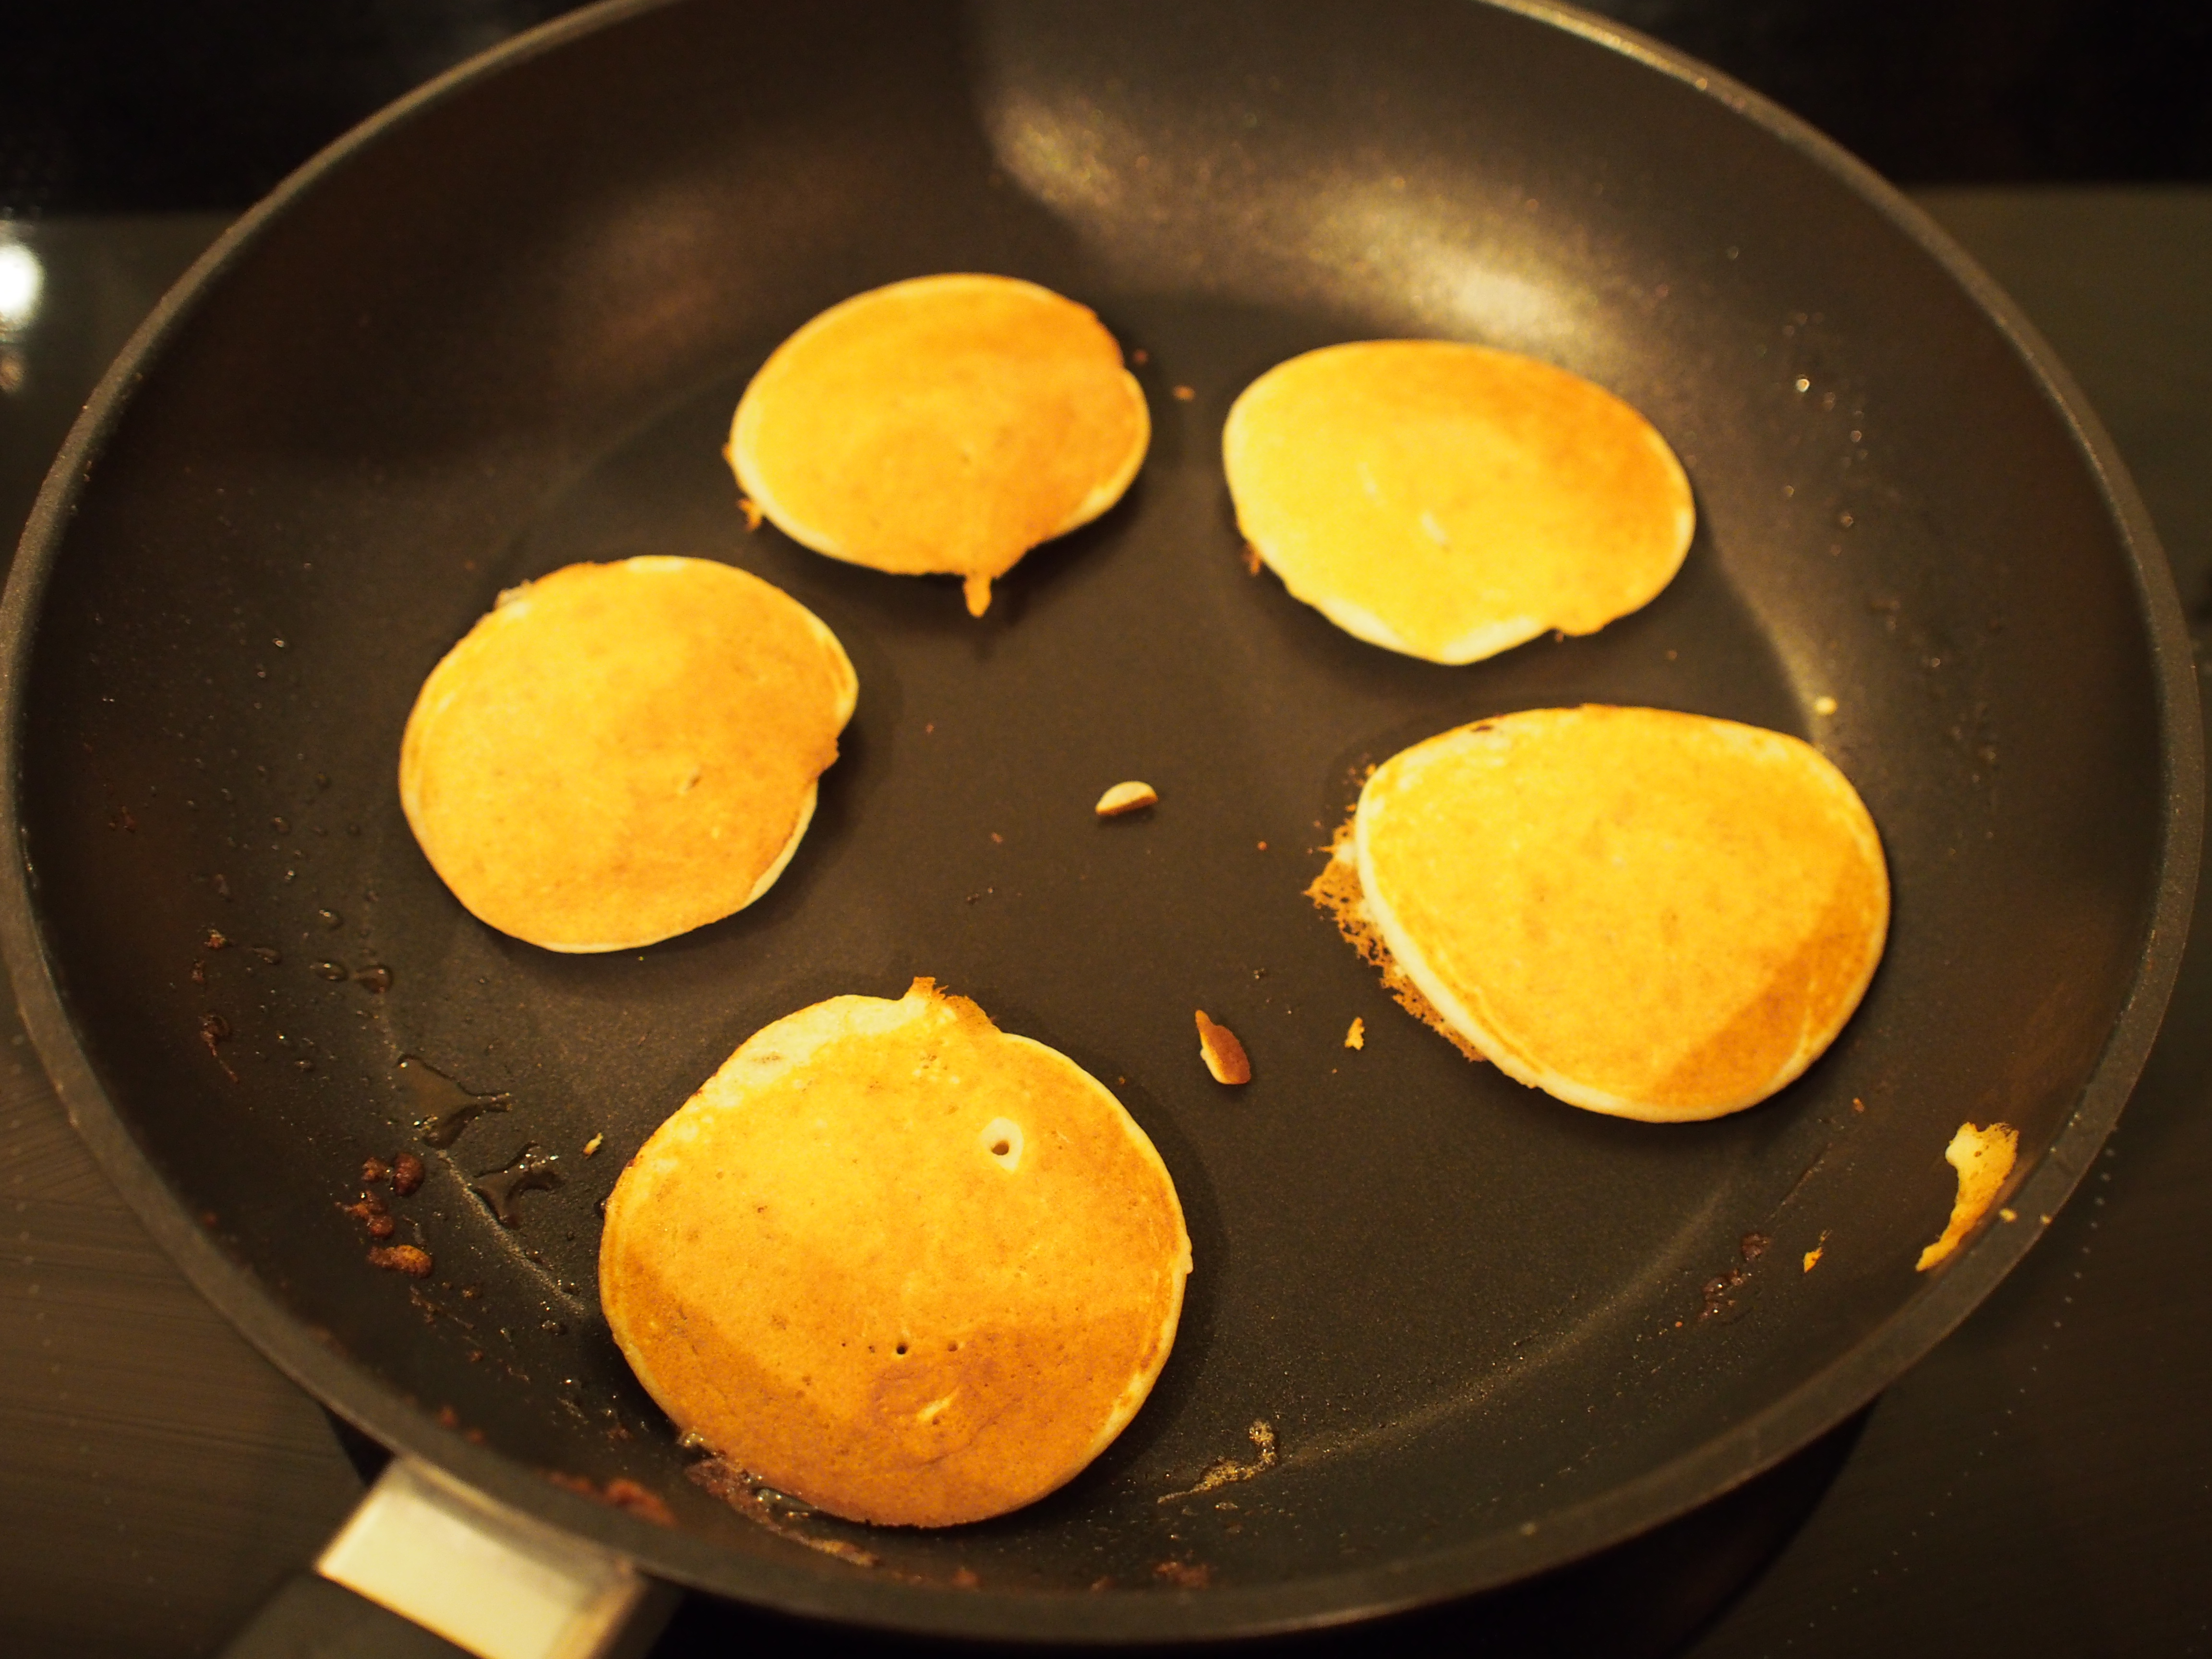
  • Heat 300ml of vegetable oil to 160C-180C. Fill the churrera/piping bag with your mix and squeeze just a small amount out to check the flow. Pipe out 15cm lengths of churro mix into the hot oil (these can be piped into spirals or loops for aesthetic purposes), and cook for between 7-10 minutes until golden brown. Remove from the oil and place on absorbent kitchen paper and dust with the caster sugar. Serve piping hot with the chocolate.
  • When your churros are ready, divide the chocolate, while still hot, into glasses and dollop a spoon of whipped cream on top. If you have prepared the chocolate in advance and wish to reheat it at the last minute, be careful not to bring to the boil as the mix will curdle.
Churros

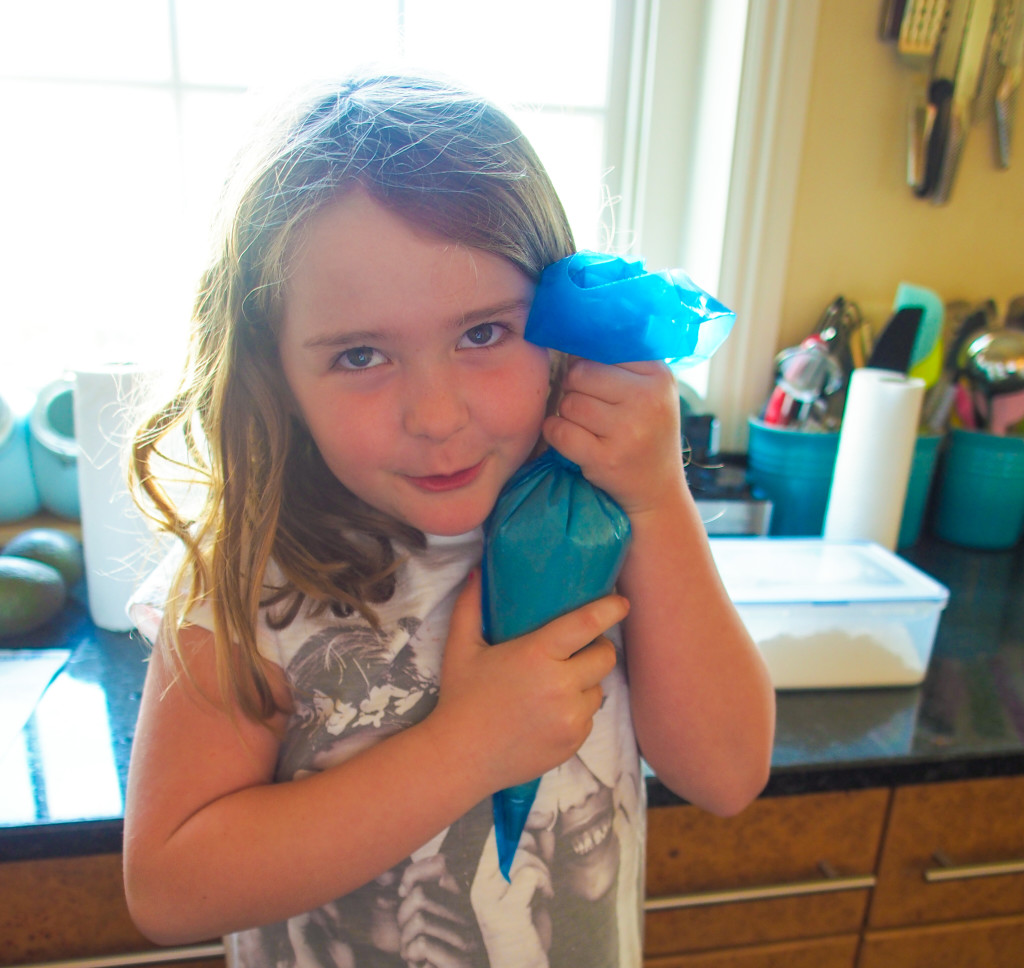
Scarlett hugging the warmed dough!

Churros

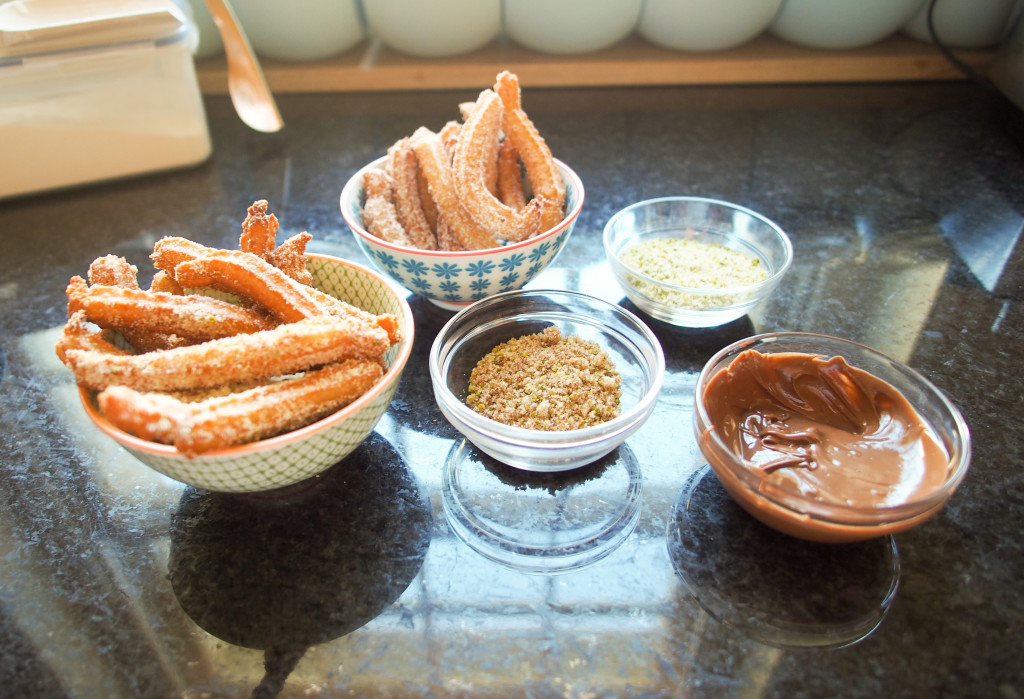
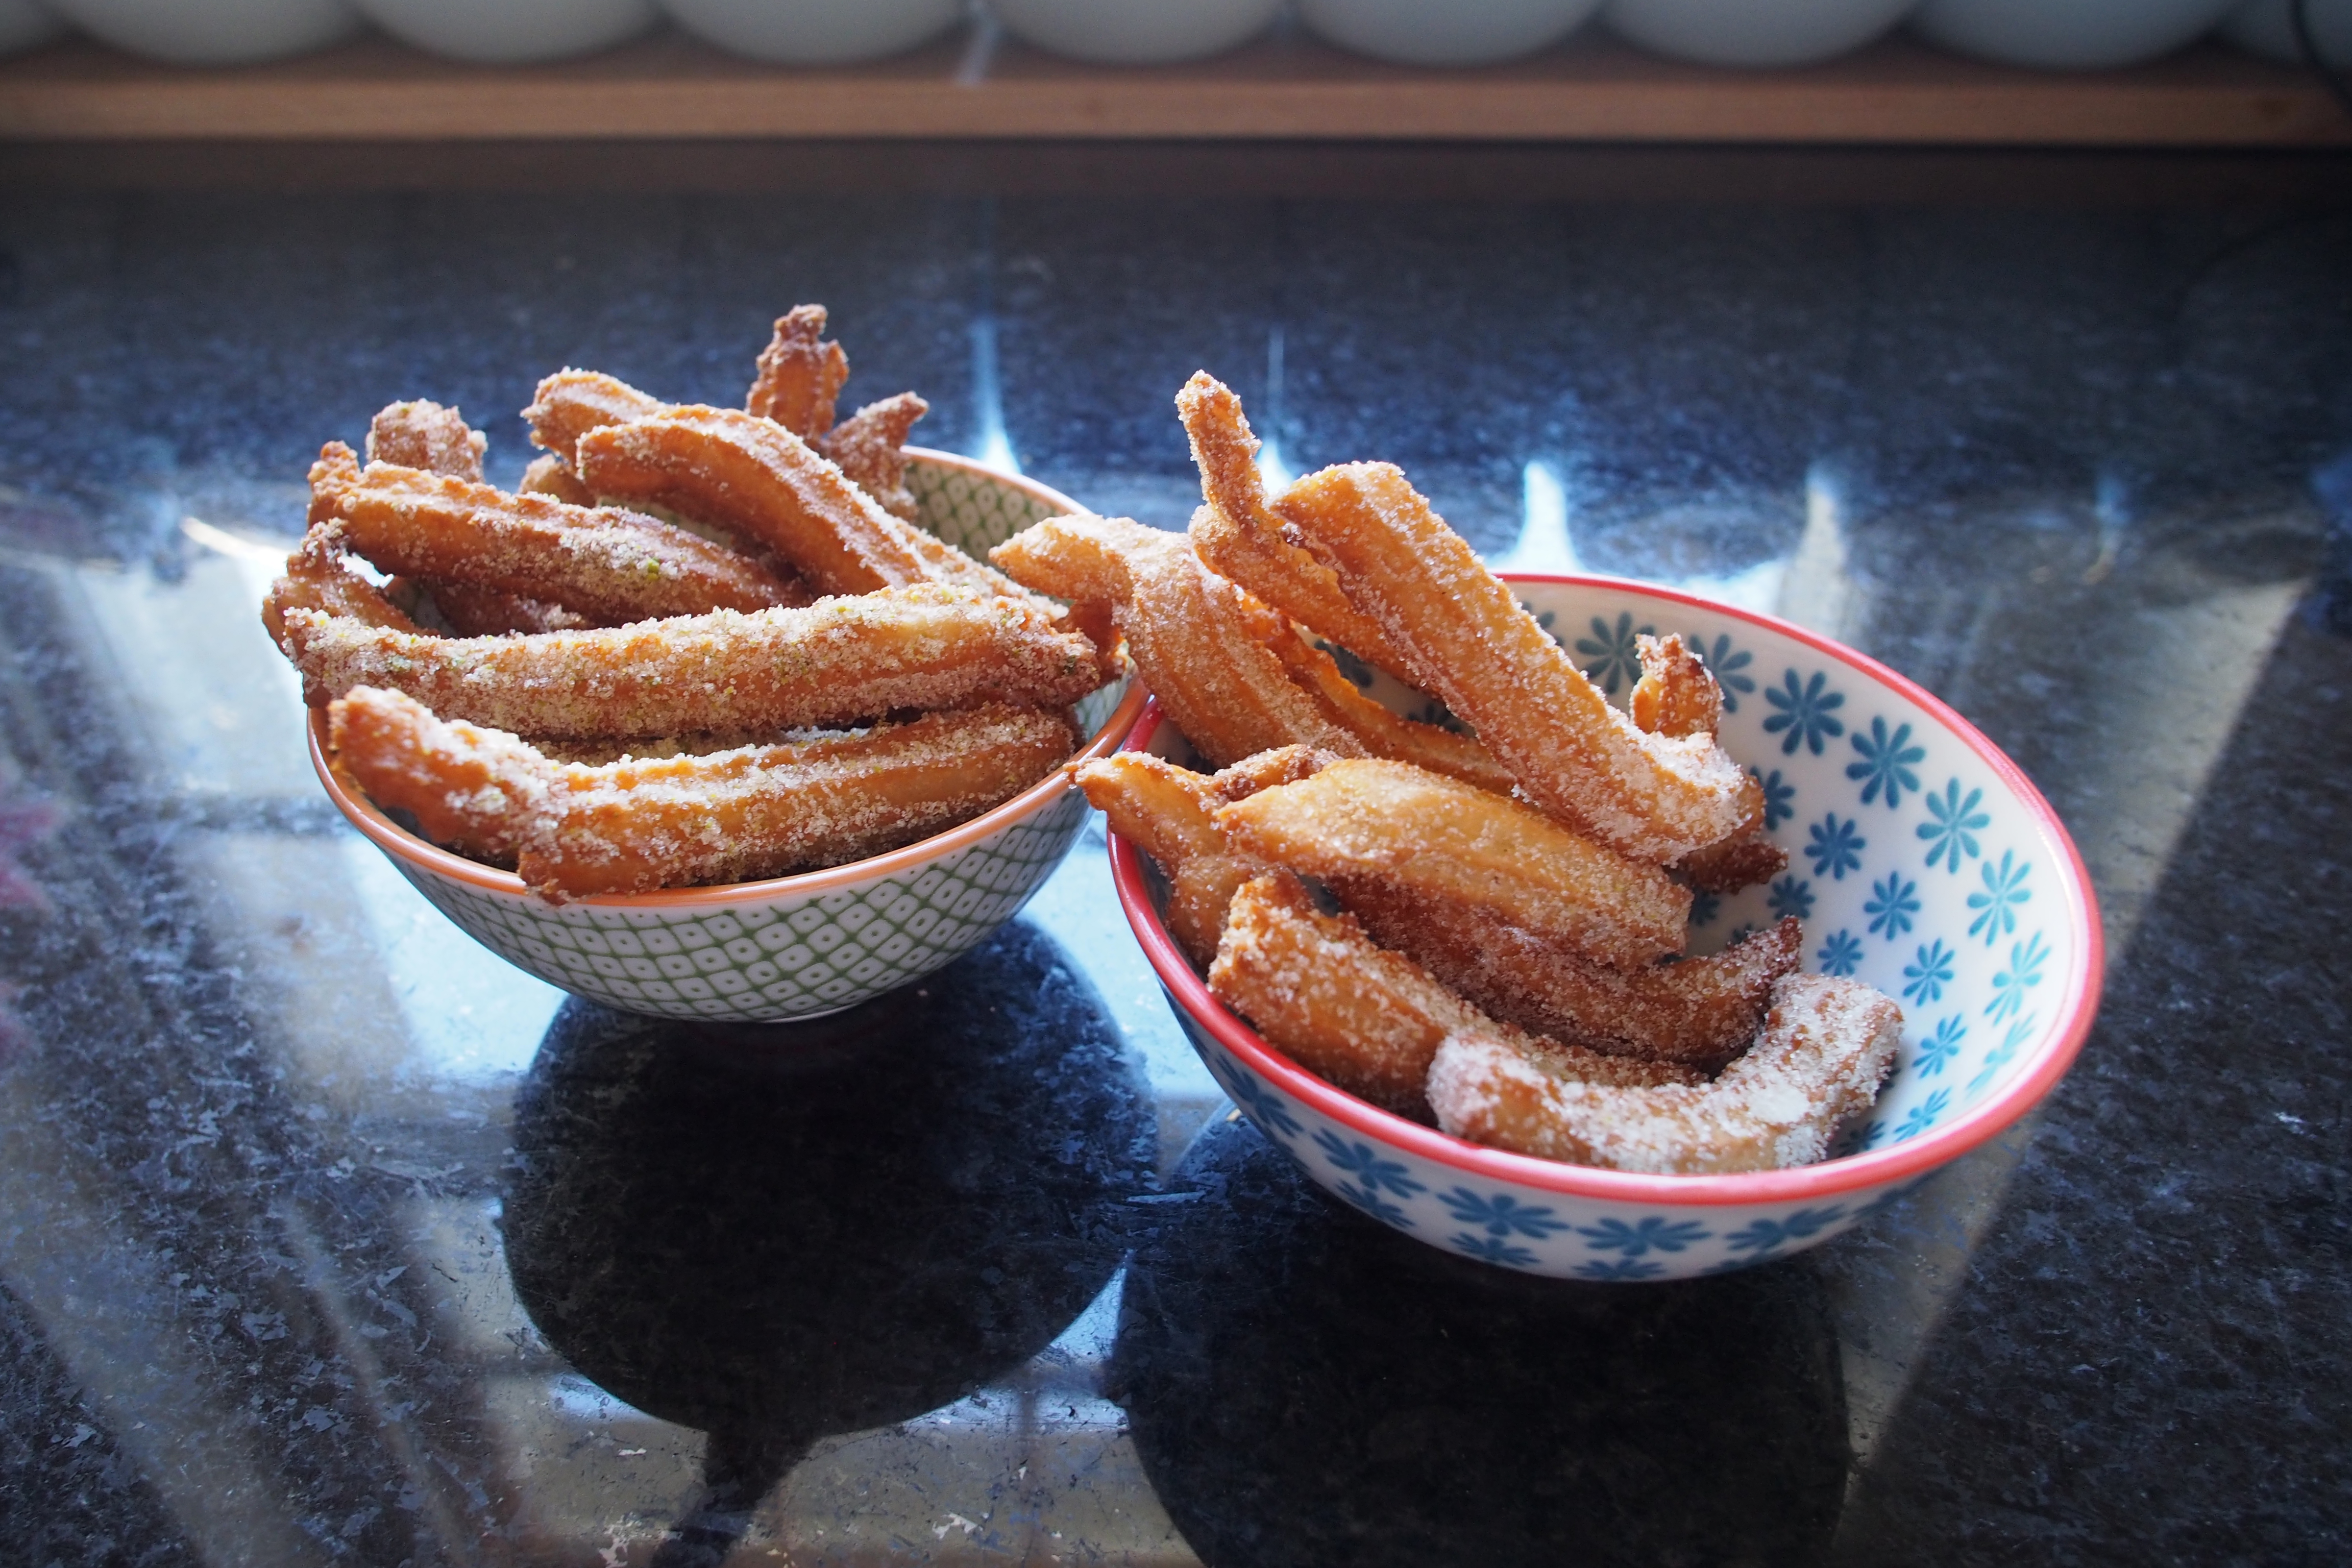
The churros on the left have the cardamom and pistachio sugar, those on the right, the cinnamon sugar

Churros

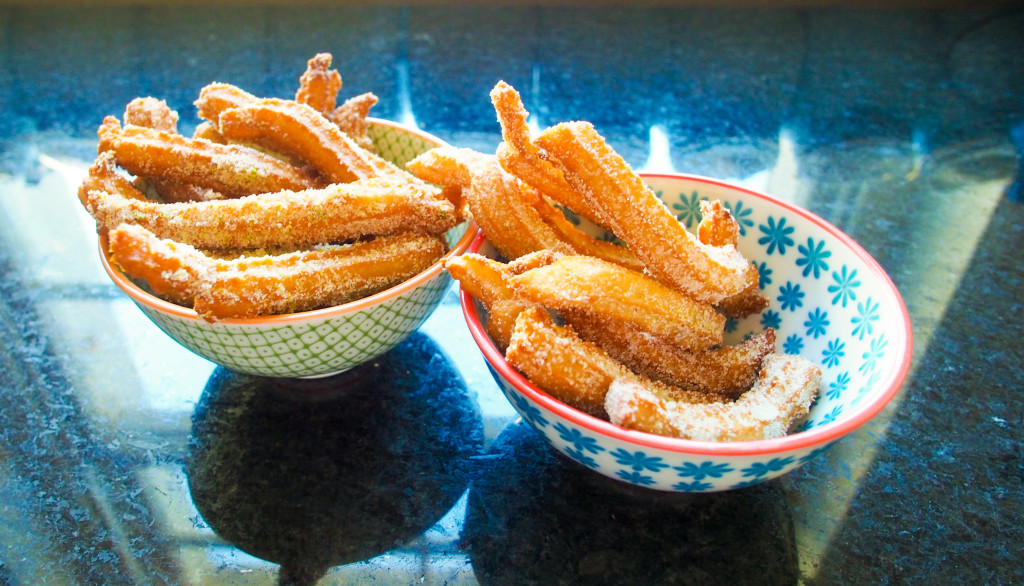
On the left, pistachio and cardamom, on the right, cinnamon


October 12, 2014 Baking

French Apple Tart…

Another weekend, another tart.  This time Ina Garten‘s apple tart.  Another incredibly simple recipe, this one is a combination of apple slices and puff pastry.  If the quantity of sugar looks a little daunting, I have to say, it did all absorb into the apples, and didn’t taste too sweet.  Total prep time is minimal if you use shop bought puff pastry – I think I had the whole thing in the oven within ten minutes!

Ingredients

for the pastry
300g plain flour
½ teaspoon kosher salt
1 tablespoon sugar
170g cold unsalted butter, diced
150g ice water

for the apples

4 Granny Smith apples
150g sugar
55g cold unsalted butter, small-diced
½ cup apricot jelly or warm sieved apricot jam (see note)
2 tablespoons Calvados, rum, or water

Method:

  • For the pastry, place the flour, salt, and sugar in the bowl of a food processor fitted with the steel blade. Pulse for a few seconds to combine. Add the butter and pulse 10 to 12 times, until the butter is in small bits the size of peas. With the motor running, pour the ice water down the feed tube and pulse just until the dough starts to come together. Dump onto a floured board and knead quickly into a ball. Wrap in plastic and refrigerate for at least 1 hour.
  • Preheat the oven to 200ºC  and line a baking tray with parchment paper.
  • Roll the dough slightly larger than 10 x 14 inches. Using a ruler and a small knife, trim the edges. Place the dough on the prepared sheet pan and refrigerate while you prepare the apples.
  • Peel the apples and cut them in half through the stem. Remove the stems and cores with a sharp knife and a melon baller. Slice the apples crosswise in ¼-inch-thick slices. Place overlapping slices of apples diagonally down the middle of the tart and continue making diagonal rows on both sides of the first row until the pastry is covered with apple slices. (I tend not to use the apple ends in order to make the arrangement beautiful.) Sprinkle with the full ½ cup sugar and dot with the butter.
  • Bake for 45 minutes to 1 hour, until the pastry is browned and the edges of the apples start to brown. Rotate the pan once during cooking. If the pastry puffs up in one area, cut a little slit with a knife to let the air out. Don’t worry! The apple juices will burn in the pan but the tart will be fine! When the tart’s done, heat the apricot jelly together with the Calvados and brush the apples and the pastry completely with the preserve mixture. Loosen the tart with a metal spatula so it doesn’t stick to the paper. Allow to cool and serve warm or at room temperature.

Notes:
  • Judging the diagonal line is a little harder than it appears – I score a faint line along the edge of the chopping board to ensure you get the first line in correctly.  The others are then a little easier to judge…
  • Even if you’re not keen on Calvados, do use if for the glaze – the smell is ridiculous, your kitchen will smell fantastic!  You could also scent some creme fraiche with Calvados too…
  • Ina is keen to point out more than once that you should take the apples to the point of slightly blackening them – it’s this additional caramelisation with adds to the flavour – don’t be afraid – keep an keen eye on them, but push it a tiny bit further than you think.  I did rotate mine several times, but the colour was still darker on one side than on the other – looking at my photo, it’s possible that I had more butter on one side of the tart than on the other – try to ensure it’s evenly spread
Core the apples with a melon baller, and nick out the root
Scatter the apples slices with sugar and butter
The tart, glazed with apricot preserve and calvados

October 12, 2014 Baking

Tamarillo Tart Tatin

OLYMPUS DIGITAL CAMERA

I’m crazy about tamarillos, but since I’ve tried them cooked, I’m coming up with all manner of ways of using them…  Their high glutamate content particularly suits the roasting or caramelisation process, which makes me think of tart tatins.  I’m not crazy about the apple version, which can be very sweet, but I have made plum and tomato versions quite often.  Tamarillos seem like the perfect variation, especially as their tartness lends itself to the process.

…

Read More

September 13, 2014 Baking

Pain Perdu, Pineapple and Coconut

We haven’t been to Marcus Wareing’s eponymous restaurant since it was re-branded.  It’s a little art-deco jewel-box of a restaurant, but the atmosphere seemed just as hushed at lunchtime as before… Still.  The food was good, and I was particularly enamoured with this dish – a little chef’s joke…  The pineapple tastes of coconut, which initially confuses the senses, especially as you try to work out how… I pressed the waitress, it’s clearly compressed, because of the texture, but what with? And then of course it struck me – Malibu – the scent led me by my nose to my teenage years.  Malibu.  When was the last time you tasted Malibu?  Well, rest assured, in this dish it’s absolutely delicious, as long as you like coconut and pineapple.

The plate comprised Malibu compressed pineapple, a coconut ice-cream, coconut curd, toasted brioche cubes, and coconut meringue.  I wasn’t terribly fond of the coconut curd, so I thought I would experiment with a coconut-milk creme patisserie (in the Thermomix)…  For the coconut meringues I used the Meringue Girls recipe, which I’ve made often before. It’s a very clever little dessert – you can prepare all the elements well in advance (perhaps with the exception of toasting the brioche), and then assemble when you’re ready.  You see.  I make sweeping statements like that.  Yes, it’s a clever dessert, and easy,  if you own a chamber vacuum sealer and a Thermomix.  I’m still posting it, because someone out there will…

As the recipes are quite long, you can find them listed in the Plating section.  The pineapple was cubed (as accurately as your patience will allow), and popped into a vacuum pack bag – I included 40ml of Malibu, and compressed under full pressure.  I left it in the fridge for 48 hours to absorb the flavour.  The compression will also change the texture of the pineapple, making it denser, and less fibrous (it effectively changes the cell structure of the fruit – it’s also an amazing technique to use on watermelon, for example).

To Plate:

Malibu compressed pineapple
Coconut meringues
Coconut-milk creme patisserie
Coconut cream ice-cream
Brioche cubes, dipped in egg and fried in a little butter

Notes:

  • The coconut version of the creme patisserie worked incredibly well – I used 300g of coconut milk, and upped the flour to 45g, but that was because I included 20g of Malibu, and also wanted to be able to pipe the cream into quite firm ‘peaks’…  The coconut flavour was subtle, but discernible, and the texture was exactly like the normal version.  I didn’t refrigerate it, but did whisk through some more malibu before piping onto the plates.

OLYMPUS DIGITAL CAMERA

September 13, 2014 Baking

The Meringue Girls Meringue Kisses…

OLYMPUS DIGITAL CAMERAI love the Meringue Girls on many, many levels – they’re cute, and they’re cute! They’ve taken something basic and created a niche market – good for them… In addition, their cookbook has brilliant little video clips which can be accessed via the cookbook by scanning a special code on your iPhone. They’re fun, informative, simple, and definitely give you a sense of their personalities: that’s often difficult to achieve in a cookbook.

I’m particularly fond of their meringue kisses, because they’re easy to make, they look fabulous, and you can flavour them in all manner of ways.  They’re the perfect little gift, and make a great item for a charity bake sale.  My most popular flavour are the passion fruit, though the cocoa, raspberry and coconut are popular too.  (The coconut variety taste like a Bounty bar, without the additional calories.) I use Aromes, which are professional patisserie flavours, and these do make a difference.  If you’re going to make a large quantity of a particular flavour, an investment in them is well worth while – they also have the advantage of not adding too much liquid into your recipe.

The Meringue Girls technique is a little different to French Meringue (whisked with cold sugar), or Italian (whisked with a hot sugar syrup, and therefore cooked), or even Swiss (which is whisked over a bain marie to cook, then taken off the heat and whisked until cool).  In this method the sugar is heated in the oven while you’re preparing the whites… It does actually work well, so don’t feel it’s necessary to opt for a different technique.

I’m giving you their basic recipe – do look at their book for different flavour ideas…  Although the method section may seem quite long, do watch the videos included below the instructions – I promise you the Meringue Girls will make it all perfectly obvious in those videos

Ingredients:
150g free-range egg whites (5 medium eggs)
300g caster sugar
For flavourings, see Notes

Method:

  • Start by lining a large baking sheet with baking paper (this is the tray onto which you will pipe the meringues.  In reality this volume of ingredients will certainly fill two normal sized baking sheets, and at least one double oven sheet).
  • Pre-heat the oven to 200ºC.  Line a roasting tray with baking paper, pour in the caster sugar and put it in the oven for about 5 minutes until the edges are just beginning to melt. Heating the sugar will help it dissolve in the egg which more quickly to create a glossy stable mixture.
  • Meanwhile, weigh your egg whites in the free-standing mixer bowl, or a non-plastic bowl.  Make sure your bowl and whisk are free from grease.  Whisk slowly at first, allowing small stabilising bubbles to form, then increase the speed until the egg whites form stiff peaks, and the bowl can be tipped upside down without the egg falling out.
  • Keep an eye on the mixture and stop whisking just before it turns into a cotton woolly appearance, at which point the mixture will be over-whisked and will have lost some of the elasticity in the egg white protein
  • At this point, the sugar should be ready to take out of the oven.  Turn down your oven to 100ºC.  Leave the door ajar to speed up the cooling.
  • With the whites stiff and while whisking again at full speed, add one big tablespoon of the hot sugar ager another to the meringue mixture, ensure that it comes back yup to stiff peaks after each spoonful of sugars. Don’t worry about any small clumps of sugar, but avoid any larger chunks of caramelised sugars from the edges of the roasting tray.
  • Once you have added all of the sugar, continue to whisk on full speed for about 5-7 minutes.  Feel a bit of the mitre between your fingers, and if you can still feel the gritty star, keep whisking at full speed until the sugar has dissolved and the mixture is smooth, and the bowl is a little cooler to the touch.  The mixture will continue to thicken up during this stage.  You know when it’s read to use as it will form a nice smooth, shiny peak on the tip of your upturned finger.
  • To pipe the meringue kisses, turn a piping bag inside out, and place it over a jug or bottle, so that it stays in place.  Using natural good colouring and a clean paintbrush, paint 5 thick strips from the tip of your piping bag to halfway down the bag.
  • Then carefully spoon your stiff meringue mixture into the piping back, and turn the bag back the right way around.  You need to pack the meringue mixture in tightly, ensuring there are no air bubbles.
  • With sharp scissors, cut the tip of the piping bag to the size of a 20p coin.
  • To get the piping bag flowing, use some of the mixture to pipe small dollops onto the four corners of your baking sheets, and use like glue to stick your baking paper to the sheet.
  • Hold the piping bag with both hands, placing your dominant hand at the top of the piping bag and your other hand halfway down the bag.  Use the top hand to apply pressure and the lower hand to control the flow of the kisses.  Squeeze the bag (like and udder!) to form the kisses.  They should have a 5cm diameter and a big peak at the top.  You can use different nozzles for different effects.  For example a star nozzle will give you beautiful little star-like kisses.
  • Once you have assembled your meringues into the desired shapes on your lined baking sheet (leaving a couple of centimetres between each shape), bake for approximately 30-40 minutes.  Take them out of the oven as soon as they lift off the baking paper with their bases intact.
  • Leave them to cool on the baking sheet.

Notes:

  • It’s easier to use a liquid egg white, such as Two Chicks, rather than separating and measuring eggs
  • The Meringue Girls use a ratio of 1:2, egg whites to sugar.  I have seen other ratios, but for meringue kisses, this ratio works fine
  • Room temperature whites achieve more volume than cold whites, so once you’ve measured them, allow them to come to room temperature – usually around 30 minutes
  • Your equipment must be clean of grease – if necessary wipe a cut lemon around the inside of the mixing bowl
  • Flavourings can be added by including an ingredient directly into the mixture (for coconut, you stir 25g desiccated coconut into one batch, and sprinkle 25g over the batch – but I also included a few drops of coconut Arome; for chocolate you take 3 Tbsp of cocoa, including half into the mixture, and scattering the remainder over the meringues before cooking (though I did include a little chocolate flavouring in them too).
  • I don’t take my meringues out of the oven straight away, as I found they had a tendency to crack, from being cooled down too quickly.  I turn off the oven, and stick a wooden spoon into the top of the oven door, propping it ajar…
  • Any extra meringues will keep for two weeks in an air-tight container, though I doubt they’ll last that long, particularly if you have children!
You can watch the Meringue Girls in the following clips:
With Paul Hollywood
How to make the mixture
Colouring and piping the mixture
Giant meringues
The Rainbow Cake
Tips and techniques
You can get the Meringue Girls book here – and it’s well worth having a look – there’s much more in there than just the kisses…
I’ve used coconut kisses as an element in a pineapple and coconut dessert:
Coconut meringues, coconut creme pattisserie,
brioche pain perdu, compressed pineapple, lime sorbet
They are also an intrinsic part of my petit-four collection, along with pâte de fruit, marshmallows, peanut butter fudge, macarons, and truffles.
Huge close up of coconut kisses…
A little bit of a joke, deliberately coloured and squat,
to look a little like little hats for some sugar work I was making
Production line for the school Christmas Fayre, along with
pâte de fruit – there are passion fruit, raspberry, cocoa, and blackberry there
Cocoa and chocolate flavoured meringues 

August 25, 2014 Baking

Orange and Cranberry Scones

The 9 year old’s on-going quest for the perfect bake has turned to scones.  So far we’ve made conventional scones, cheese, raisin, and this variation from a recipe by Ina Garten (aka The Barefoot Contessa).  Ina’s version includes cream and is made in the kitchen aid – I’ve included it because the ingredients and technique varied a great deal from the English versions I saw.

Some recipes included buttermilk, but that’s often because the acidity in the buttermilk acts on the raising agents, causing a better rise in the scone.  This is one of the few scone recipes I found however that included double cream – and it does make for a rich scone.  The higher fat content also ensures a more consistent scone.

For the scone:

560g plain flour, plus 35g extra
50g caster sugar, plus extra for sprinkling
2 tbsp baking powder
2 tsp salt
5g grated orange zest
340g cold unsalted butter, diced
4 large eggs, lightly beaten
240ml cold double cream
165g dried cranberries
1 egg beaten with 2 tbsp water or milk, for egg wash
For the Icing:
75g icing sugar
20ml freshly squeezed orange juice
Method:
  • Preheat the oven to 200C/Gas 6. In the bowl of an electric mixer fitted with a paddle attachment, mix 560g of the flour, 50g caster sugar, the baking powder, salt and orange zest. Add the cold butter and mix at the lowest speed until the butter is the size of peas.
  • Combine the eggs and double cream and, with the mixer on low speed, slowly pour into the flour and butter mixture. Mix until just blended. The dough will look lumpy! Combine the dried cranberries and 35g of flour, add to the dough, and mix on low speed until blended.
  • Dump the dough onto a well-floured surface and knead it into a ball. Flour your hands and a rolling pin and roll the dough 1.5cm thick. You should see small bits of butter in the dough. Keep moving the dough on the floured board so it doesn’t stick.
  • Flour a 7.5cm round plain or fluted cutter and cut circles of dough. Place the scones on a baking pan lined with parchment paper. Collect the scraps neatly, roll them out, and cut more circles. At this point you can transfer to a freezer-safe container to cook from frozen later. Please note, cooking times will increase when cooking from frozen and you may need to lower your oven temperature slightly.
  • Brush the tops of the scones with egg wash, sprinkle with the remaining caster sugar, and bake for 20 to 25 mins, until the tops are browned and the insides are fully baked. The scones will be firm to the touch.
  • Allow the scones to cool for 15 mins and then whisk together the icing sugar and orange juice, and drizzle over the top.
Notes:
  • I didn’t cover my scones in the glaze, it seemed a little too sweet for my more puritanical tastes – since I’ve given up sugar, anything covered in glaze seems a little extreme…
  • I did however top my scones in a little grated lime zest, which added perfume and a little more acidity to the scone
  • Yes, the picture shows it served “Devon” style, rather than “Cornish” – that is with the cream first, and then topped with the jam…  Personally I have absolutely no preference!
  • For purists, the fluted cutter is used for scones that include fruit, and the smooth cutter for plain scones.

July 13, 2014 Baking

Coconut Milk Creme Patisserie

231d6-p1010309I use the standard Creme Patisserie recipe on the blog a lot, but in a recent recipe (which contained a coconut curd), I thought I might make a coconut milk variation – after all the fat content of coconut milk is quite high, and the consistency can be similar to milk.  I altered the recipe slightly, but that was because I included 30ml of Malibu, and an increased quantity of flour – I wanted to be able to pipe the creme pat into quite stiff peaks on the plate, for a specific dessert.
Ingredients:

300g coconut milk 60g unrefined caster sugar
30g unsalted good quality butter
30 ml Malibu 45g plain flour
3 free range egg yolks
the seeds from 1 vanilla pod
pinch of salt

Method:

Put all the ingredients into the Thermomix bowl and cook for 7 minutes at 90C, speed 4.

Give it a quick whizz at the end to ensure it’s smooth, then pour into a bowl and cover with cling film until it’s cool.
 
Yes – that’s it!  Keep it in your fridge until you require it.

Oh. And if you’re stupid enough to stick in a block of quite cool butter, do put the lid on properly and start the machine quite slowly.

March 18, 2013 Baking

Caraway Blini

I happened to have some smoked salmon which needed using up – you know, like you do – and I wanted a new blini recipe.  The problem with blini is that by about the third, you’re feeling their leaden grip in your stomach.  They stop being a vehicle for the topping and become a hindrance.  I’d had my eye on Felicity Cloake’s recipe for a while now, as it’s a variation on Richard Bertinet’s, and I think we all know I love Richard’s gallic charm (and his excellent online baking shop).

Felicity trialled a number of batters, and gives her verdict – go have a look – it’s an interesting article and it may well be that the beer batter she mentions appeals more to you…
I liked this one because of the inclusion of the egg whites, which I thought would add an airy lightness to the batter, and it does.  Felicity also includes caraway seeds: I’m a definite fan – there are a few recipes on here which include caraway.  The batter does take a little longer to make than some variations, but the steps really do require the minimum of work, so it’s really not onerous!
Ingredients:
150ml milk
70g buckwheat flour
70g strong white flour
1 tsp salt
2 tsp caraway seeds
2 free-range eggs, separated
4g dried yeast
100g sour cream
25g butter
Makes about 35

Method:
  • Heat the milk in a small pan until it just boils. While it heats, put the flours, the salt and the caraway seeds in a large bowl and separate the eggs.
  • When the milk begins to boil, take it off the heat and stir in the yeast, followed by the egg yolks and the sour cream – you’ll need to stir vigorously with each addition.
  • Pour the contents of the pan slowly into the bowl of flour, stirring as you do so. When you have a smooth paste, cover and leave in a warm place for an hour, or until spongy – it won’t rise dramatically, but it should have expanded slightly, and have developed a few bubbles on the surface.
  • Whisk the egg whites to soft peaks and then very gently fold them into the mixture using a rubber spatula or metal spoon. Once thoroughly mixed, cover, and leave for another 2 hours.
  • When ready to cook, melt the butter in a large frying pan over a medium high heat, then add the batter in teaspoonfuls to the pan and cook until bubbles rise to the top, then flip them over and cook for another minute or so on the other side, until golden brown. You’ll probably need to do this in batches, so keep them warm while you cook the rest – these are best hot from the pan.
 
Notes:
  • I only left the second rise for an hour, but it was in a warming drawer.  The results were fine, but when I came back later to tidy up, the remaining batter in the bowl was even lighter and more voluminous.  Do try to leave it for the full rise if you have the time
  • I have a Staub crepe pan, which I should have used, but it’s a heavy beast to dig out late on a Sunday night… These actually worked just as well in a non-stick pan
  • I slightly whisked my egg whites at stage one – stop – they go in at stage two!  They were fine take on from there though…
  • The caraway worked perfectly with the salmon, but it’s not necessary if you don’t like it


March 16, 2013 Baking

Frangipane Tarts

Pistachio frangipane, with figs

There’s something about the scent of frangipane which has haunted me for decades. We have relatives on the French side of the Swiss-France border, and on our very first visit, we had a plum and frangipane tart. The memory has stuck with me for twenty years – served at room temperature – the tart was luscious, creamy, delicately scented – just adorable.

Spotting some nectarines which needed using up, I thought it would make a delicious variation.  A quick trawl through some of my favourite chefs revealed a recipe on the BBC site by Angela Hartnett…

That first tart was consumed by the multitudes in my household within twenty-four hours.

Luckily, the quantity of frangipane in the recipe allowed me to make two tarts – so the second tart was a plum and frangipane one…  The plums hold up better than the nectarines, though surprisingly they do make the mixture more moist (I would have assumed the nectarines would offer up more water).  The scent load is also greater with the plums.

Having everything to hand, the second tart only took about 10 minutes to prepare, so well worth keeping some frangipane in your fridge (bring it back to room temperature, and give it a quick re-fluffing with a fork – et voila – instant tart…).

The next time I made a bakewell tart, and then another for my chum Sarah… And then we moved on to pistachio and fig tarts, with a further tart for another chum, Nicole…

Once you have the basic frangipane recipe in your back-pocket, the possibilities are endless :0)

Ingredients:
For the pastry:
375g/13¼oz plain flour, plus extra for dusting
15g/½oz sugar
225g/8oz unsalted butter, cut into cubes, plus extra for greasing
1 free-range egg
4 tbsp ice-cold water
For the frangipane:
200g/7¼oz unsalted butter
200g/7¼oz caster sugar
2 free-range eggs
200g/7¼oz ground almonds
For the tart filling:
5-6 ripe plums, each cut into eighths, stones removed
To serve:
icing sugar, for dusting
whipped cream or crème fraîche

Method:
  • For the pastry, sieve the flour and sugar into a large mixing bowl. Tip the cubed butter into the bowl. Rub the butter and the flour between your thumb and fingertips until the mixture resembles fine breadcrumbs.
  • In a jug or small bowl, beat the egg together with four tablespoons of ice-cold water. Pour into the flour mixture.
  • Slowly bring the ingredients together with your hands to form a dough, being careful not to overwork it.
  • Knead the dough lightly on a clean, floured work surface, then wrap it in cling film and refrigerate until firm, at least 30 minutes.
  • For the frangipane, beat the butter and sugar together in a bowl until light and fluffy. Crack the eggs into the bowl one at a time, beating well after each addition. Add the ground almonds and mix well until combined. Set aside.
  • Preheat the oven to 180C/350F/Gas 4. Dust the work surface with flour and roll the chilled dough out thinly. Use it to line one large 25cm/10in tart ring or 6-8 individual tartlet rings 8cm/3¼in in diameter. Trim away any excess.
  • Spoon the frangipane into the tart case so that it comes about halfway up the sides. Smooth over the surface with a spatula and cover the frangipane evenly with the plums.
  • Bake for 30-40 minutes (15-25 minutes for the tartlets), or until the pastry is crisp and golden-brown and the fruit is tender.
  • Remove the tart(s) from the oven. Dust with icing sugar and serve warm with whipped cream or crème fraîche.
Notes:
  • I used a pre-rolled pastry sheet made by Marie – it’s the best I’ve used, comes in a circle, and is rolled super-fine!  Because it’s so fine, I always brush it with beaten egg and allow to dry in the fridge, before putting any filling in
  • Don’t push your figs too far into the batter, it will rise up around them.  For maximum visual effect, just lightly lodge them in

Lay the fruit in a pattern of your choosing – you can see from the plum chart that I chose a different layout that time

Fig and pistachio frangipane

Nectarine and frangipane

Plum and frangipane

Bakewell Tart: spread jam  spread a layer of frangipane, and top with almonds halfway through cooking #simples

March 2, 2013 Baking

Banana Bread [Thermomix]

c3885-p3020127I’m a mother of four – you have to be able to knock-up banana bread to use up all those mushy bananas.  I don’t know what happens – some weeks they go through many bunches, others none…  Still, banana bread is a favourite of the 11yo, so it’s never a wasted effort.

I’ve found that making cake batter in the Thermomix is speedy, but can result in too much gluten development, resulting in a leaden batter.  Here I’ve put everything else in together and blitzed, before adding the flour by hand at the last moment.   The Thermomix does give you a finer puree of bananas, but that’s not necessarily a bad thing from my point of view!

This recipe is based on the one on the BBC website…

Ingredients


285g/10oz plain flour
1 tsp bicarbonate of soda
½ tsp salt
110g/4oz butter, plus extra for greasing
225g/8oz caster sugar
2 free-range eggs
4 ripe bananas, mashed
85ml/3fl oz buttermilk (or normal milk mixed with 1½ tsp lemon juice or vinegar)
1 tsp vanilla extract

Thermomix Preparation Method:
  • Preheat the oven to 180C/350F/Gas 4.
  • In the thermomix bowl, cream the butter and sugar together until light and fluffy – I do this using the butterfly…  Bring it slowly up to Speed 4 / 5 minutes – this stops the sugar mixture from splashing all over the TM bowl.
  • Remove the butterfly, and add the eggs, mashed bananas, buttermilk, and vanilla extract to the butter and sugar mixture. Mix on Speed 4 / 2 minutes.
  • Sift the flour, bicarbonate of soda and salt into the TM bowl, and fold the wet ingredients into the dry by hand.  When mostly combined, pulse briefly for around ten seconds until more thoroughly mixed – try not to overwork the batter.  Once you have removed 90% of the batter, you can briefly pulse again for just a few seconds – this will spin the remaining batter out of the blade an onto the side of the TM bowl.
  • Grease a 20cm x 12.5cm/8in x 5in loaf tin and pour the cake mixture into the tin.
  • Transfer to the oven and bake for about an hour, or until well-risen and golden-brown.
  • Remove from the oven and cool in the tin for a few minutes, then turn out onto a wire rack to cool completely before serving.
 
Normal Preparation Method:

  • Preheat the oven to 180C/350F/Gas 4.
  • Sift the flour, bicarbonate of soda and salt into a large mixing bowl.
  • In a separate bowl, cream the butter and sugar together until light and fluffy.
  • Add the eggs, mashed bananas, buttermilk and vanilla extract to the butter and sugar mixture and mix well. Fold in the flour mixture.
  • Grease a 20cm x 12.5cm/8in x 5in loaf tin and pour the cake mixture into the tin.
  • Transfer to the oven and bake for about an hour, or until well-risen and golden-brown.
  • Remove from the oven and cool in the tin for a few minutes, then turn out onto a wire rack to cool completely before serving.

  • Go to page 1
  • Go to page 2
  • Go to Next Page »

Primary Sidebar

Categories

  • ▼Recipe
    • Baking
    • Breakfast
    • Cheese
    • Dessert
    • Eggs
    • Fish
    • Heston Blumenthal
    • Italian
    • Jamie Oliver
    • Marcus Wareing
    • Mediterranean
    • Pasta
    • Patisserie
    • Risotto
    • Smoothie
    • Sous Vide
    • Squash
    • Thermomix
    • Vegan
    • Vegetarian
    • Yotam Ottolenghi

Categories

  • ▼Book Review
    • ⭐️⭐️⭐️⭐️
    • ⭐️⭐️⭐️⭐️⭐️
    • Baking
    • Meat
    • Patisserie
    • Restaurant Cookbook
    • Vegetarian
    • Yotam Ottolenghi

Categories

  • ▼Restaurant
    • 1 Michelin Star
    • 2 Michelin Stars
    • 3 Michelin Stars
    • British
    • Fish
    • French
    • Italian
    • Japanese
    • Peruvian

Categories

  • 101 Cookbooks (1)
  • 3 Michelin Stars (1)
  • Advert (1)
  • Alan Murchison (2)
  • Alba Truffle (1)
  • Almond (1)
  • Angela Hartnett (1)
  • Angler (2)
  • Art Journal (2)
  • Artichokes (1)
  • Axis (1)
  • Azelia’s Kitchen (1)
  • Baking (9)
  • Baldwin (1)
  • Bara Brith (1)
  • Basics (1)
  • Beef (1)
  • Beetroot (2)
  • Ben Spalding (2)
  • Blackberry Soufflé (1)
  • Blackening Spice (1)
  • Blood Oranges (4)
  • ►Book Review (75)
    • Baking (10)
    • Meat (1)
    • Patisserie (6)
    • Restaurant Cookbook (3)
    • Vegetarian (3)
    • Yotam Ottolenghi (2)
    • ⭐️⭐️⭐️⭐️ (16)
    • ⭐️⭐️⭐️⭐️⭐️ (8)
  • Bread (3)
  • Breakfast (1)
  • Breakfast Tart (1)
  • brioche (1)
  • Brockhall Farm (1)
  • Bruschetta (1)
  • Bryn Williams (1)
  • Burrata (1)
  • Butter (1)
  • Buttercream (1)
  • Camembert (1)
  • Canapes (1)
  • caraway (2)
  • Casserole (2)
  • Chelsea Buns (1)
  • Chestnuts (1)
  • Chicken (3)
  • Chickpea (1)
  • Chocolate (4)
  • Chocolate Fondant (1)
  • Christmas (1)
  • Ciabatta (1)
  • Cinnamon (1)
  • Citrus (1)
  • Citrus Drizzle Cake (1)
  • Clams (1)
  • Coconut (2)
  • Coconut Milk (1)
  • Confectionary (1)
  • Creme Patisserie (1)
  • Dan Lepard (1)
  • Dessert (1)
  • detox (1)
  • Doughnuts (1)
  • Dried Fruit (1)
  • Drop Scones (1)
  • Ducasse (1)
  • Duck Egg (1)
  • Eggs (3)
  • El Bulli (1)
  • en Cocotte (1)
  • Epi (1)
  • Eric Treuille (1)
  • fennel (2)
  • Fettuccini (1)
  • Fish (1)
  • FrontPage (28)
  • Fruit Tea (1)
  • Glutamate (1)
  • Goat’s Cheese (1)
  • Gỏi Cuốn (1)
  • Granita (1)
  • Herbs (1)
  • Heritage Tomato (1)
  • Hibiscus Flower (1)
  • Hope and Greenwood (1)
  • Ice-Cream (3)
  • Iced Berry Souffle (1)
  • Icing (1)
  • Italian (1)
  • James Martin (1)
  • Jelly (1)
  • Journal (9)
  • Karen Scott (1)
  • King Oyster Mushroom (3)
  • Kummel (1)
  • L’Ortolan (1)
  • Lamb (1)
  • Lavender (1)
  • Laverstoke Park (1)
  • Lemon (3)
  • Lemon Drizzle Cake (1)
  • Lemon Grass (1)
  • Lemon Meringue Tart (1)
  • Lemon Poppy Seed Muffins (1)
  • Lentils (1)
  • Limewood (1)
  • Liquorice (1)
  • Liquorice Ice-Cream (1)
  • Lobster (3)
  • Lucas Hollweg (1)
  • Luke Holder (1)
  • Macarons (1)
  • Mango (1)
  • Marcus Wareing (1)
  • Mark Lloyd (1)
  • Market (1)
  • Mary Berry (1)
  • Meringue (1)
  • Michael Moore (1)
  • Michel Roux (3)
  • Mint (1)
  • Mister Truffle (2)
  • Modernist Cuisine at Home (1)
  • Moroccan (1)
  • Muffins (3)
  • Murano (1)
  • Mushroom (1)
  • Ollie Dabbous (1)
  • Ollie Fararr (1)
  • Ox cheek (1)
  • Palourde Clams (1)
  • Pancetta (1)
  • Panna Cotta (1)
  • Parmesan (1)
  • Passion Fruit (3)
  • Pasta (1)
  • Patisserie (1)
  • Paul Heathcote (1)
  • Pea (1)
  • Peter Reinhart (1)
  • Petit Fours (1)
  • Philip Howard (1)
  • Pierre Koffman (1)
  • Pierre Koffmann (1)
  • Pimms (1)
  • Pistachio (1)
  • Pistachio Soufflé (2)
  • Pistacho (1)
  • Pork (1)
  • Prawn (1)
  • Quiche (1)
  • Rachel Allen’s 30 Day Muffins (1)
  • Raspberry (2)
  • Ravioli (1)
  • Raymond Blanc (1)
  • ▼Recipe (192)
    • Baking (17)
    • Breakfast (2)
    • Cheese (1)
    • Dessert (7)
    • Eggs (3)
    • Fish (2)
    • Heston Blumenthal (5)
    • Italian (3)
    • Jamie Oliver (1)
    • Marcus Wareing (2)
    • Mediterranean (3)
    • Pasta (3)
    • Patisserie (7)
    • Risotto (1)
    • Smoothie (1)
    • Sous Vide (1)
    • Squash (1)
    • Thermomix (19)
    • Vegan (1)
    • Vegetarian (20)
    • Yotam Ottolenghi (2)
  • ►Restaurant (124)
    • 1 Michelin Star (17)
    • 2 Michelin Stars (9)
    • 3 Michelin Stars (3)
    • British (19)
    • Fish (4)
    • French (4)
    • Italian (3)
    • Japanese (1)
    • Peruvian (1)
  • Richard Bertinet (1)
  • Risotto (1)
  • Roganic (1)
  • Rolls (1)
  • Roux (3)
  • salad (2)
  • Salmon (2)
  • Sardinian Cookery (1)
  • Scandiliscious (1)
  • Sea Trout (1)
  • Sherbet Dab (1)
  • Signe Johansen (1)
  • Silvana de Soissons (1)
  • Simon Rogan (1)
  • Snail Caviar (1)
  • Soda Bread (1)
  • Sorbet (1)
  • Soufflé (11)
  • Soup (1)
  • Sous Vide (2)
  • Spice (1)
  • Stew (1)
  • Stuffing (1)
  • Sugar Baby (1)
  • Sugarwork (1)
  • Sumosan (1)
  • Supper (1)
  • Sweetcorn (1)
  • Sweetcorn Fritters (1)
  • Tamarillo’s (1)
  • Texturas Fizzy (1)
  • Thai (2)
  • The Bertinet Kitchen (1)
  • The Square (1)
  • Thermomix (10)
  • Toffe Fudge Muffins (1)
  • Tom Kitchin (1)
  • Tomato Bread (1)
  • Tony Fleming (4)
  • Tribute Dish (2)
  • Truffle (1)
  • Truffles (6)
  • Umami (1)
  • Uncategorized (1)
  • Vanilla (2)
  • Vegan (1)
  • Vegetables (1)
  • Vegetarian (3)
  • Verveine (1)
  • Vietname Summer Roll (1)
  • Watermelon (1)
  • William Curley (1)
  • yeasted dough (1)

I’m passionate about food, its provenance and its sustainability. As a technical cook, I like to see what’s happening in the kitchens of Michelin starred restaurants, but you’re just as likely to find me at home making sourdough. You can find some of my recipes in In The Mix 2, an award-winning Thermomix cookbook.

I’m also truly blessed – I can open my fridge at any time and know it’s crammed with all manner of loveliness – but that’s not the case for everyone. There are people all around me in the UK who rely on food banks to feed their kids, and themselves, and every box of cereal or teabag makes a difference. You can donate food to your local food bank, or time, or money, and if you want more information the best starting place is http://www.trusselltrust.org.

You can also find me here:

Foodies100 Index of UK Food BlogsFoodies100
The Renaissance Epicurean... London restaurants
Top Food BlogsUK Food Bloggers Association

The Eleven Madison Park Granola

Copyright © 2025 · Cookd Pro Theme On Genesis Framework · WordPress · Log in

Nourished
  • Home
  • Recipes
  • Book Reviews
  • Restaurants
  • Journal
  • About