• Skip to primary navigation
  • Skip to main content
  • Skip to primary sidebar

Nourished

  • Home
  • Recipes
  • Book Reviews
  • Restaurants
    • 3 Michelin Stars
    • 2 Michelin Stars
    • 1 Michelin Star
  • Journal
    • Art Journal
    • The Renaissance Diary
  • About
    • Contact Me
    • Instagram
    • Loves
    • Suppliers
    • Masterchef Links

Recipe

October 1, 2014 Recipe

Cumin spiced carrot salad

I thought it might be fun to make Indian food for our inaugural book club meeting. Being a handful of girls, it clearly had to include a salad – but I suddenly realised that actually, I’m not sure what an Indian salad looks like…  Having never been to India, I haven’t see any first-hand, and I’ve never seen anything beyond raita, or onion salad on an Indian restaurant menu.  {I even looked at the menu on the Benares website, just to make sure I hadn’t forgotten any} Most vegetarian dishes tend to be cooked rather than raw…

So the thought process began somewhat in reverse: which spices could I use to marry to the other Indian dishes, and which salad ingredients might marry to those spices.

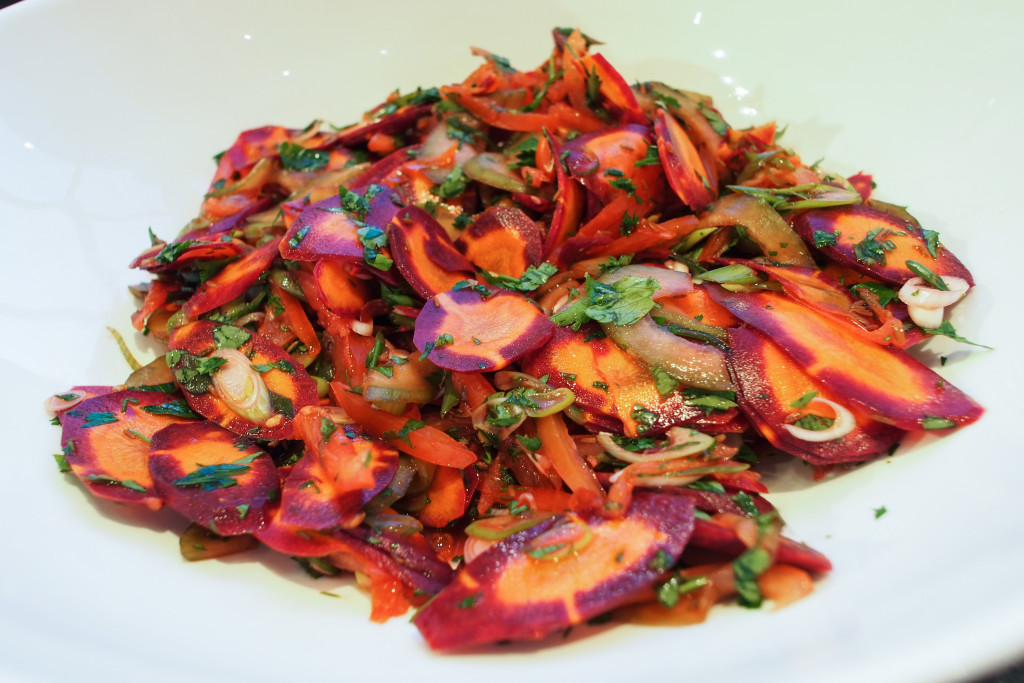
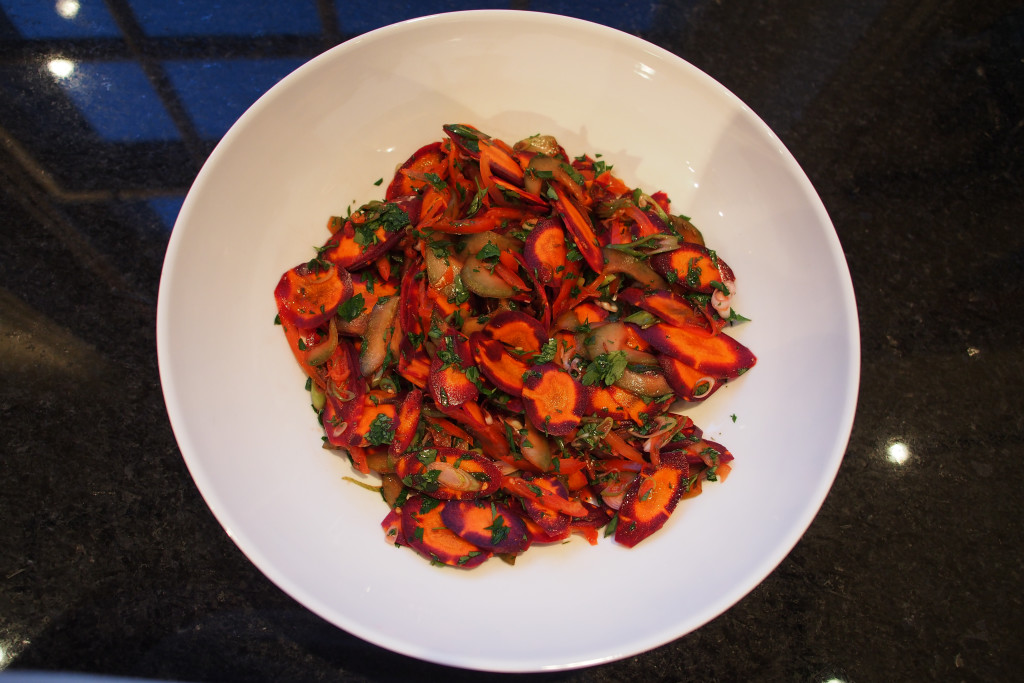
After my intense cardamom overload of late, I thought I’d switch to cumin seeds, which led me to combining them with carrots.  Cumin, caraway, parsley, and carrots are all members of the same Apiaceae family, and compliment each other well.  The rest, as they say, is history… I kept some in the fridge until the following day, and it was just as refreshing then…

Ingredients:
8 large carrots, sliced into shards (or lengthways)
1 tablespoon of cumin seeds
1 teaspoon of caraway seeds
3 tablespoons of white balsamic vinegar
8 spring onions, finely sliced
½ cucumber, peeled, deseeded, and cut into slices
handful of parsley, finely chopped
salt and pepper to season

Method:
Combine all of the ingredients together and leave to meld – you need to leave it for at least an hour to allow the cumin seeds and carrot to soften a little. You will see my bowl is only half full – I put some additional salad leaves into mine, but clearly not while it was ‘curing’, or it would have wilted the leaves

cumin carrot salad

cumin carrot salad

September 28, 2014 FrontPage

Tamarillo’s – a sheer delight!

 OLYMPUS DIGITAL CAMERA
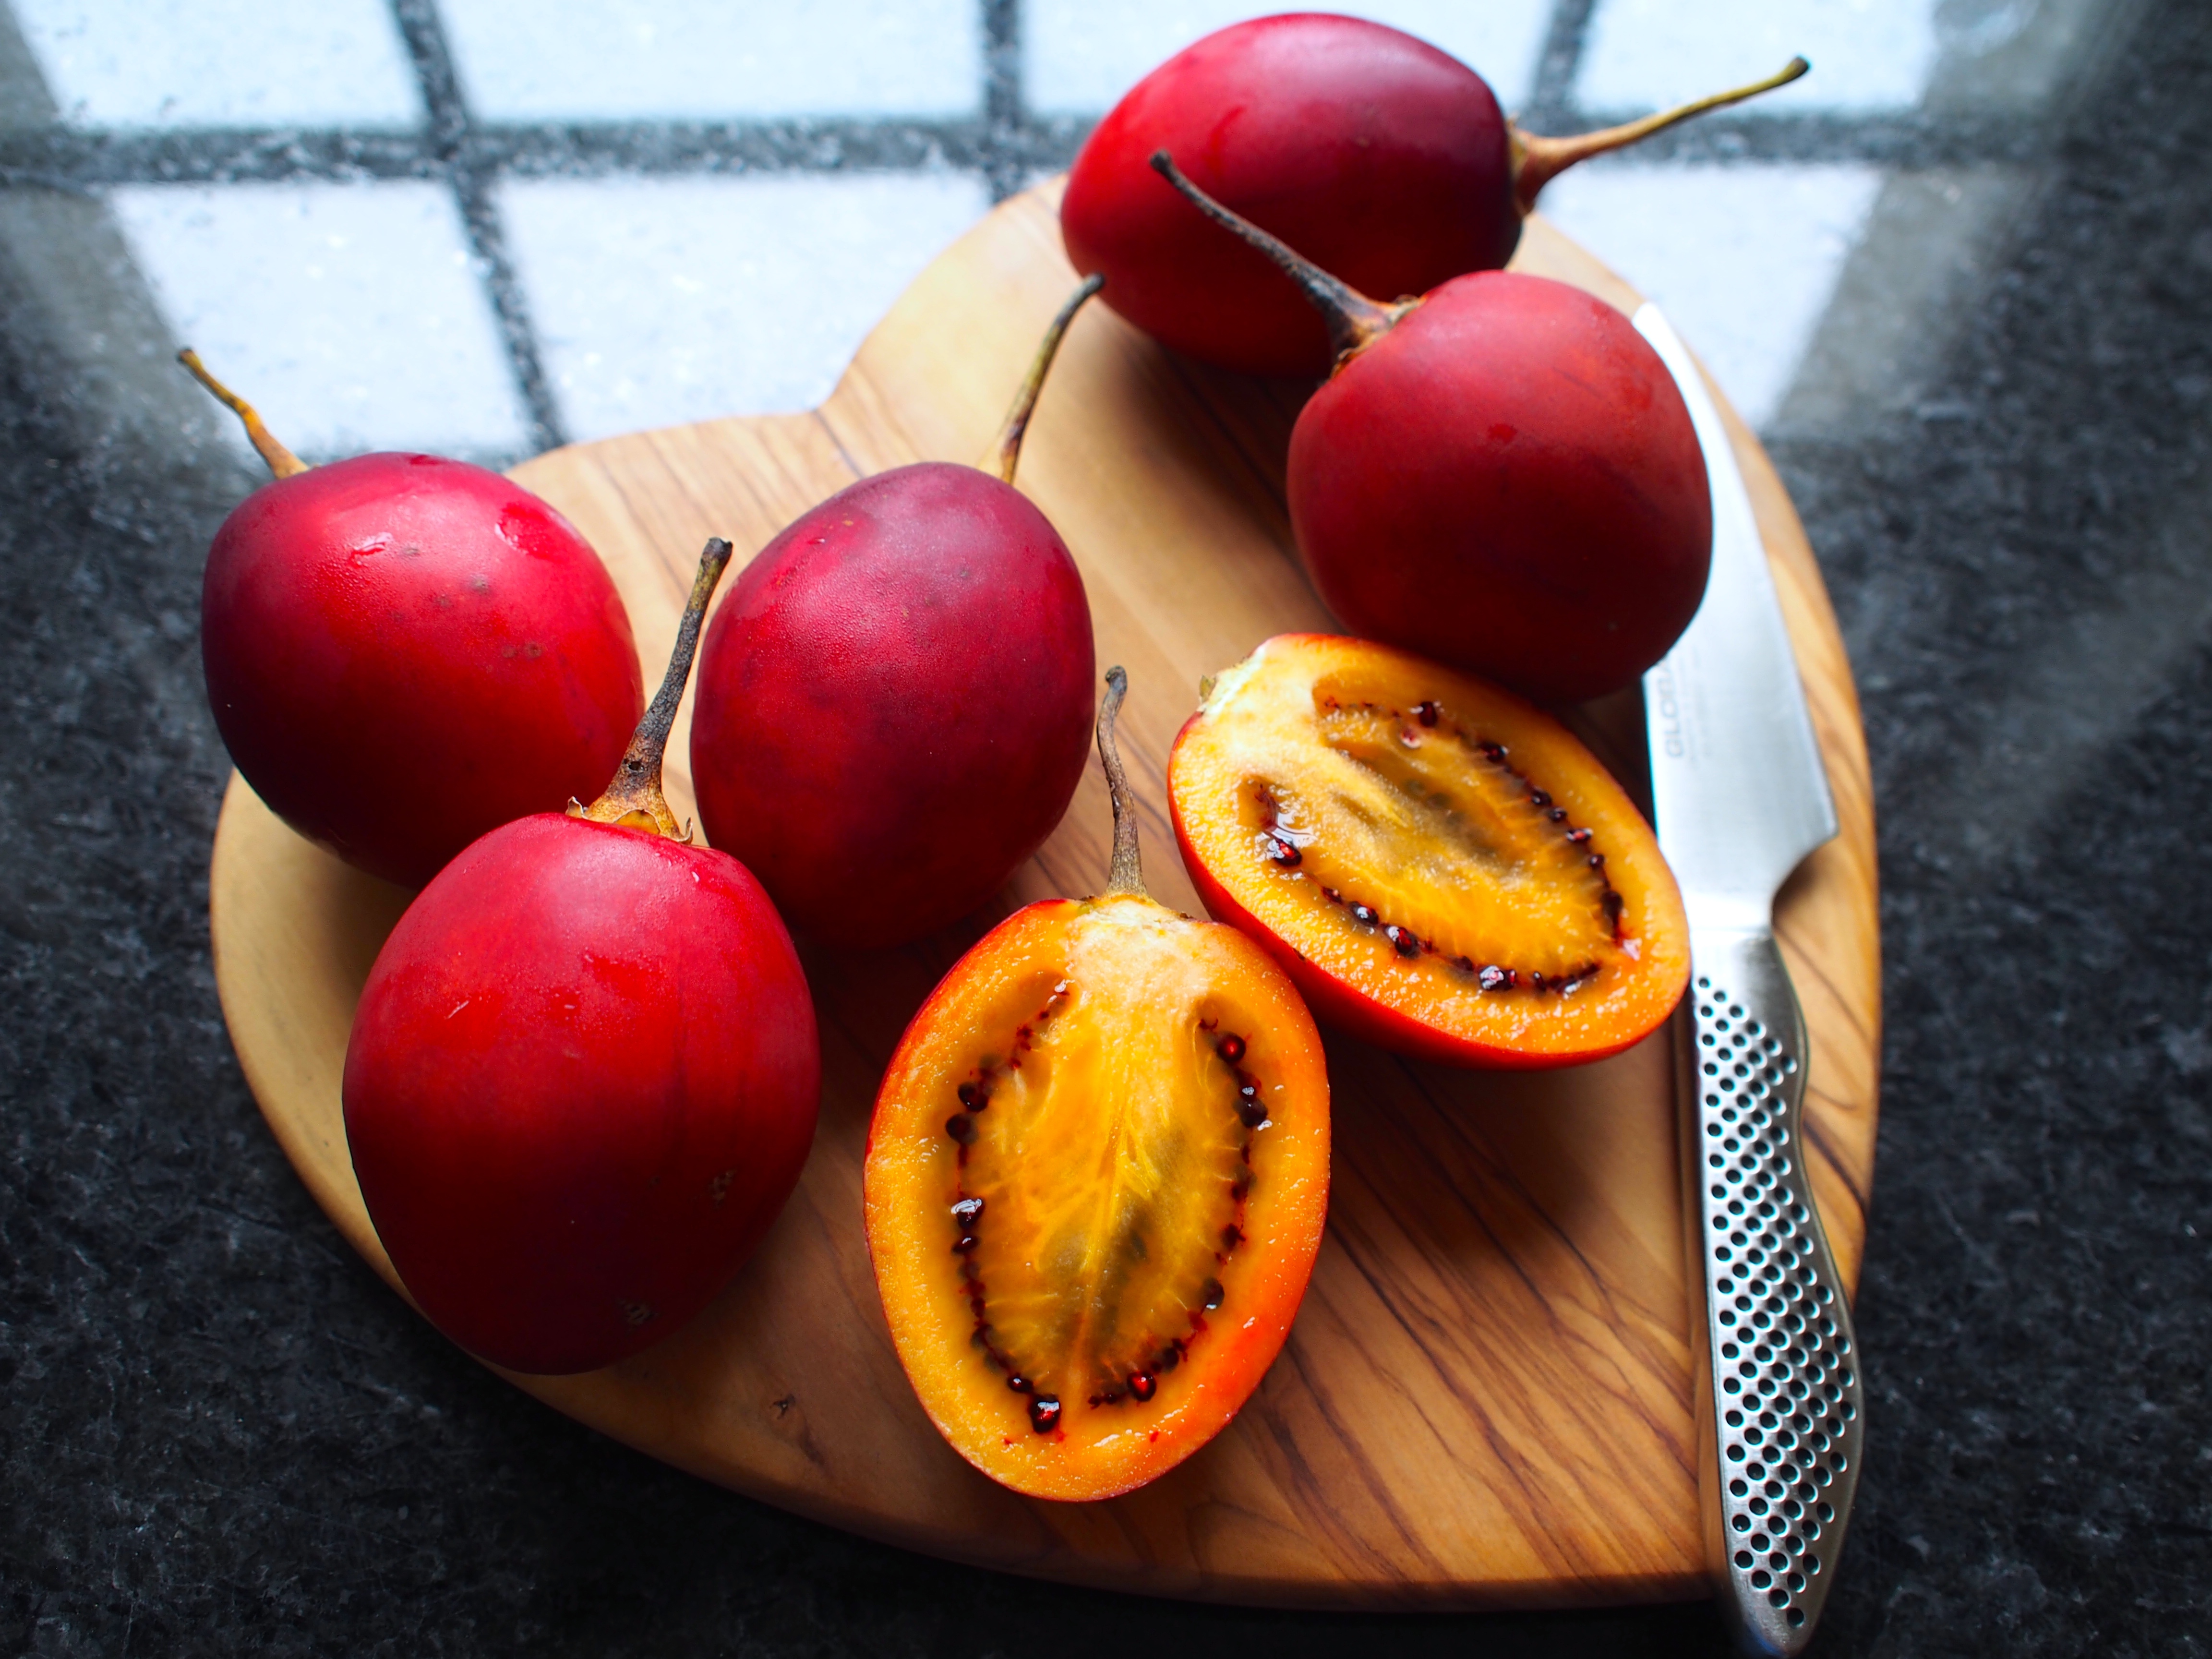
I’ve been madly in love with tamarillo’s since I first tasted them, about 14 years ago, in a fruit box at Ubon.  That was it – from that moment on I was hooked…  Ubon served them raw, with the skin cut virtually to the end, so that you slipped them off and into your mouth.  Delicious!  

As you might suspect, they’re a member of the tomato family, complete with seeds hidden in their silky depths.  The skin is typically considered inedible because it’s so bitter, and they have an incredibly sweet, but predominantly sour taste – probably quite unpalatable for most people, but there’s something else in there that’s a little more undefined…  It’s the marmite of fruit…

They can be difficult to track down, but over the years Harrods has usually supplied me with my fix, flown in either from South America, or New Zealand.  If you’ve never heard of them, or tried them, you’re in good company – in a conversation with two Michelin starred chefs recently, neither had ever tasted a tamarillo…

These days I get my fix from my lovely chums over at Oakleaf European, which necessitates me buying a whole tray at a time, but hurrah for that!  Though I’ve never cooked them, I came across a reference to them in Umami, a fantastic book which leads you through the various facets of that ‘fifth taste’.  It was an utter revelation to discover that tamarillos actually contain more glutamate (one element of umami) than tomatoes, and practically all fruit and vegetables – in fact up to five times the amount of tomatoes.  It also has several times the levels of glutamate of beef – suddenly I entirely understood exactly why I adored them so much – that undefined flavour in the background is one of the biggest hits of umami available…

These are the figures for some foods we often associate with umami:


Food Type

Tamarillo
Tomato
Green pea
Carrot
Beef
Venison
Egg yolk
Katsuobushi (dried bonito)
Niboshi (dried sardine)
Kombu (seaweed)
Nori (seaweed)
Shiitake
Anchovies
Cheese
Fish sauce

Glutamate (mg/100g)

470-1200
150-250
110
40-80
30
25-35
50
30-40
40-50
1200-3400
1380
70
630-1440
300-1680
620-1380

So, how do you develop the depth of the umami in something like tamarillos?  Although I’ve only ever eaten mine raw, it did occur to me that they would make a fantastic tart tatin – especially as they hold less liquid than tomatoes, so wouldn’t go soggy.

I also spotted a recipe in the new Dabbous cookbook, where Ollie confits them and pairs with burrata, a perfect dish to my mind.

The flavour of roasted tamarillos is just ridiculously good – the umami reaches new heights, and leaves you sucking your cheeks for hours after tasting them.  They’re even more addictive now than before, and I cannot imagine eating them raw very often again.  Please do give them a go – I’d almost say they’re the most delicious thing I’ve cooked – thank goodness I have half a tray left – I’m off now to make some tamarillo jam…

Check out Umami and Dabbous here:
  

September 28, 2014 Burrata

Burrata, Tamarillo and Fennel Pollen…

OLYMPUS DIGITAL CAMERAI have a whole post on the delights of tamarillo’s, so I shan’t bore you again, except to say that they must be in your top 100 foods to try before you die… Trust me – they’re stunning…  This particular dish makes the most of the tamarillo’s ridiculously high umami levels, and pairs it with silky smooth, creamy burrata.

For those who’ve not tried it, burrata is a combination of mozzarella and cream, and must be eaten as fresh as possible – make sure you buy when you intend to eat it.  The chef who created this dish is Ollie Dabbous, of the eponymous Dabbous restaurant, and is from his long-awaited cookbook.  If you can’t get a table at the restaurant, at least you can try his food at home…

With a dish this simple, it’s crucial that you buy the best possible ingredients.

Ingredients:
2 large tamarillos
25ml extra virgin olive oil
25g caster sugar

Method:

  • Score the base of each tamarillo with a cross
  • Blanch for 5 seconds in a pan of rapidly boiling water, then drain and plunge into a bowl of iced water
  • Peel, then cut lengthways into quarters
  • Pour the olive oil into a baking tray and sprinkle over half the sugar
  • Place the tamarillos in the tray cut-side down and scatter over the remaining sugar
  • Place in an oven on its lowest setting for about 30 minutes, basting regularly with the pan juices
  • Turn the tamarillos on to the other cut side and repeat the process
  • Finally, place on the exterior side and repeat the process once more
  • Remove from the oven and leave to cool

To assemble:
240ml extra virgin olive oil
32 basil leaves
2 burrata, sliced into 4 pieces each
fennel pollen

  • Divide the olive oil between 8 serving bowls
  • Place 4 basil leaves on the right-hand side of each bowl and top with a slice of burrata
  • Sprinkle a pinch of fennel pollen over each one
  • Place a wedge of confit tamarillo alongside

Notes:

  • Yes, that cooking temperature is a little vague.  I tried it first on 35ºC, and frankly I’d have been there all night.  I moved up to 60ºC, then 120ºC, in each instance I had to up the timing.  Given that this is something you can make ahead, just give yourself loads of time, keep them as low as you can, until you reach the desired colour.  By taking mine up to 120ºC I made them a little more candied than confit, and the second time I just took it really slowly
  • Do sprinkle a tiny bit of salt onto the tamarillo, it just sets it off
  • Do use the best olive oil you can for the plating process – I used one we bought cases of in Italy – you can read about it here
  • I’m not sure I’ll do the whole peeling thing in future, but will just whip of the skin with a knife, as I’ve always done
  • Ollie says raw tamarillos are inedible, actually that’s not true – try them – but the skin should be removed before you do
  • It’s worth making a batch – like confit tomatoes, or sun-blush tomatoes, you could keep these in the fridge until you wanted to use them (perhaps not in quarters, but maybe eighths?
OLYMPUS DIGITAL CAMERA
You can purchase Ollie’s book here:


September 13, 2014 Baking

Pain Perdu, Pineapple and Coconut

We haven’t been to Marcus Wareing’s eponymous restaurant since it was re-branded.  It’s a little art-deco jewel-box of a restaurant, but the atmosphere seemed just as hushed at lunchtime as before… Still.  The food was good, and I was particularly enamoured with this dish – a little chef’s joke…  The pineapple tastes of coconut, which initially confuses the senses, especially as you try to work out how… I pressed the waitress, it’s clearly compressed, because of the texture, but what with? And then of course it struck me – Malibu – the scent led me by my nose to my teenage years.  Malibu.  When was the last time you tasted Malibu?  Well, rest assured, in this dish it’s absolutely delicious, as long as you like coconut and pineapple.

The plate comprised Malibu compressed pineapple, a coconut ice-cream, coconut curd, toasted brioche cubes, and coconut meringue.  I wasn’t terribly fond of the coconut curd, so I thought I would experiment with a coconut-milk creme patisserie (in the Thermomix)…  For the coconut meringues I used the Meringue Girls recipe, which I’ve made often before. It’s a very clever little dessert – you can prepare all the elements well in advance (perhaps with the exception of toasting the brioche), and then assemble when you’re ready.  You see.  I make sweeping statements like that.  Yes, it’s a clever dessert, and easy,  if you own a chamber vacuum sealer and a Thermomix.  I’m still posting it, because someone out there will…

As the recipes are quite long, you can find them listed in the Plating section.  The pineapple was cubed (as accurately as your patience will allow), and popped into a vacuum pack bag – I included 40ml of Malibu, and compressed under full pressure.  I left it in the fridge for 48 hours to absorb the flavour.  The compression will also change the texture of the pineapple, making it denser, and less fibrous (it effectively changes the cell structure of the fruit – it’s also an amazing technique to use on watermelon, for example).

To Plate:

Malibu compressed pineapple
Coconut meringues
Coconut-milk creme patisserie
Coconut cream ice-cream
Brioche cubes, dipped in egg and fried in a little butter

Notes:

  • The coconut version of the creme patisserie worked incredibly well – I used 300g of coconut milk, and upped the flour to 45g, but that was because I included 20g of Malibu, and also wanted to be able to pipe the cream into quite firm ‘peaks’…  The coconut flavour was subtle, but discernible, and the texture was exactly like the normal version.  I didn’t refrigerate it, but did whisk through some more malibu before piping onto the plates.

OLYMPUS DIGITAL CAMERA

September 13, 2014 Dessert

Coconut Cream Ice-Cream, with Lime Zest [Thermomix]

OLYMPUS DIGITAL CAMERAThere are lots of recipes for coconut milk ice-cream, especially with the rise of the “raw” diner (where a dish is not cooked in any way), and the number of vegans (who can’t eat any dairy).  My own persuasion of ‘pescetarianism’ is supposed to mean that I don’t eat dairy (because of my osteo-arthritis), but the reality is that I will have the odd cappuccino, the odd ice-cream, and the occasional bit of chocolate.  Luckily I’ve was put-off cream for life whilst working for six months in a bakery on Saturdays – there’s nothing like free cream slices for your break to put-you-off forever!

I wanted to create a coconut milk ice-cream recipe, but I wasn’t particularly concerned with excluding dairy, so adapted an existing recipe, replacing part of the double cream with coconut cream.  Most of the recipes I’d seen that were dairy-free, didn’t seem as smooth as I wanted, often scooping unevenly, so at least this recipe gives you a velvety smooth finish without impacting on the flavour.  I was also making it for a specific dish, so included lots of grated lime zest into the recipe too.

Ingredients:
400ml whole milk
150g granulated sugar
4 large egg yolks
320ml coconut cream (2 small tins)
The peeled zest of two limes, and a further lime, zested finely
A squirt of Coconut Arome (into the cooled base)

Method:

  • The joy of a Thermomix recipe is that you can tip the whole thing in, and walk away.  First I thinly peeled two limes, and pulsed the zest with the sugar.
  • Put the remaining ingredients in the Thermomix bowl and set to 80ºC, speed 5, for around 11 minutes (or until the bases reaches temperature).  Do make sure the custard reaches 80ºC, as this is the pasteurisation point.
  • Strain it, preferably into a bowl over ice, and chill in the fridge.
  • When cool, churn in your ice-cream machine until the consistency is right, then set in the freezer.

Notes:

  • It’s important to strain the ice-cream base, as the zest will have discoloured in the high temperature.  The third lime should be zested into the cold base, to preserve its fresh brilliance.
  • I think I prefer the texture of the base to that of cream, but to be fair, I do love coconut! The texture was particularly creamy without having the buttery overload you get from double cream – you could take down the sugar quantity, if you wanted a sharper, more sorbet like flavour.
  • Don’t forget, homemade ice-cream really does have a short shelf life, eat it soon!
  • To improve the mouth feel of your ice-cream, you can add stabilisers, which delay the formation of ice crystals.  If you make industrial quantities of ice-cream, Oakleaf European can sell you 1kg bags of stabiliser, or Sous Chef can sell you smaller quantities – both use Louis Francis Stab 2000.
OLYMPUS DIGITAL CAMERA

This is my version of Macus’s Pain Perdu, Pineapple and Coconut

September 13, 2014 Baking

The Meringue Girls Meringue Kisses…

OLYMPUS DIGITAL CAMERAI love the Meringue Girls on many, many levels – they’re cute, and they’re cute! They’ve taken something basic and created a niche market – good for them… In addition, their cookbook has brilliant little video clips which can be accessed via the cookbook by scanning a special code on your iPhone. They’re fun, informative, simple, and definitely give you a sense of their personalities: that’s often difficult to achieve in a cookbook.

I’m particularly fond of their meringue kisses, because they’re easy to make, they look fabulous, and you can flavour them in all manner of ways.  They’re the perfect little gift, and make a great item for a charity bake sale.  My most popular flavour are the passion fruit, though the cocoa, raspberry and coconut are popular too.  (The coconut variety taste like a Bounty bar, without the additional calories.) I use Aromes, which are professional patisserie flavours, and these do make a difference.  If you’re going to make a large quantity of a particular flavour, an investment in them is well worth while – they also have the advantage of not adding too much liquid into your recipe.

The Meringue Girls technique is a little different to French Meringue (whisked with cold sugar), or Italian (whisked with a hot sugar syrup, and therefore cooked), or even Swiss (which is whisked over a bain marie to cook, then taken off the heat and whisked until cool).  In this method the sugar is heated in the oven while you’re preparing the whites… It does actually work well, so don’t feel it’s necessary to opt for a different technique.

I’m giving you their basic recipe – do look at their book for different flavour ideas…  Although the method section may seem quite long, do watch the videos included below the instructions – I promise you the Meringue Girls will make it all perfectly obvious in those videos

Ingredients:
150g free-range egg whites (5 medium eggs)
300g caster sugar
For flavourings, see Notes

Method:

  • Start by lining a large baking sheet with baking paper (this is the tray onto which you will pipe the meringues.  In reality this volume of ingredients will certainly fill two normal sized baking sheets, and at least one double oven sheet).
  • Pre-heat the oven to 200ºC.  Line a roasting tray with baking paper, pour in the caster sugar and put it in the oven for about 5 minutes until the edges are just beginning to melt. Heating the sugar will help it dissolve in the egg which more quickly to create a glossy stable mixture.
  • Meanwhile, weigh your egg whites in the free-standing mixer bowl, or a non-plastic bowl.  Make sure your bowl and whisk are free from grease.  Whisk slowly at first, allowing small stabilising bubbles to form, then increase the speed until the egg whites form stiff peaks, and the bowl can be tipped upside down without the egg falling out.
  • Keep an eye on the mixture and stop whisking just before it turns into a cotton woolly appearance, at which point the mixture will be over-whisked and will have lost some of the elasticity in the egg white protein
  • At this point, the sugar should be ready to take out of the oven.  Turn down your oven to 100ºC.  Leave the door ajar to speed up the cooling.
  • With the whites stiff and while whisking again at full speed, add one big tablespoon of the hot sugar ager another to the meringue mixture, ensure that it comes back yup to stiff peaks after each spoonful of sugars. Don’t worry about any small clumps of sugar, but avoid any larger chunks of caramelised sugars from the edges of the roasting tray.
  • Once you have added all of the sugar, continue to whisk on full speed for about 5-7 minutes.  Feel a bit of the mitre between your fingers, and if you can still feel the gritty star, keep whisking at full speed until the sugar has dissolved and the mixture is smooth, and the bowl is a little cooler to the touch.  The mixture will continue to thicken up during this stage.  You know when it’s read to use as it will form a nice smooth, shiny peak on the tip of your upturned finger.
  • To pipe the meringue kisses, turn a piping bag inside out, and place it over a jug or bottle, so that it stays in place.  Using natural good colouring and a clean paintbrush, paint 5 thick strips from the tip of your piping bag to halfway down the bag.
  • Then carefully spoon your stiff meringue mixture into the piping back, and turn the bag back the right way around.  You need to pack the meringue mixture in tightly, ensuring there are no air bubbles.
  • With sharp scissors, cut the tip of the piping bag to the size of a 20p coin.
  • To get the piping bag flowing, use some of the mixture to pipe small dollops onto the four corners of your baking sheets, and use like glue to stick your baking paper to the sheet.
  • Hold the piping bag with both hands, placing your dominant hand at the top of the piping bag and your other hand halfway down the bag.  Use the top hand to apply pressure and the lower hand to control the flow of the kisses.  Squeeze the bag (like and udder!) to form the kisses.  They should have a 5cm diameter and a big peak at the top.  You can use different nozzles for different effects.  For example a star nozzle will give you beautiful little star-like kisses.
  • Once you have assembled your meringues into the desired shapes on your lined baking sheet (leaving a couple of centimetres between each shape), bake for approximately 30-40 minutes.  Take them out of the oven as soon as they lift off the baking paper with their bases intact.
  • Leave them to cool on the baking sheet.

Notes:

  • It’s easier to use a liquid egg white, such as Two Chicks, rather than separating and measuring eggs
  • The Meringue Girls use a ratio of 1:2, egg whites to sugar.  I have seen other ratios, but for meringue kisses, this ratio works fine
  • Room temperature whites achieve more volume than cold whites, so once you’ve measured them, allow them to come to room temperature – usually around 30 minutes
  • Your equipment must be clean of grease – if necessary wipe a cut lemon around the inside of the mixing bowl
  • Flavourings can be added by including an ingredient directly into the mixture (for coconut, you stir 25g desiccated coconut into one batch, and sprinkle 25g over the batch – but I also included a few drops of coconut Arome; for chocolate you take 3 Tbsp of cocoa, including half into the mixture, and scattering the remainder over the meringues before cooking (though I did include a little chocolate flavouring in them too).
  • I don’t take my meringues out of the oven straight away, as I found they had a tendency to crack, from being cooled down too quickly.  I turn off the oven, and stick a wooden spoon into the top of the oven door, propping it ajar…
  • Any extra meringues will keep for two weeks in an air-tight container, though I doubt they’ll last that long, particularly if you have children!
You can watch the Meringue Girls in the following clips:
With Paul Hollywood
How to make the mixture
Colouring and piping the mixture
Giant meringues
The Rainbow Cake
Tips and techniques
You can get the Meringue Girls book here – and it’s well worth having a look – there’s much more in there than just the kisses…
I’ve used coconut kisses as an element in a pineapple and coconut dessert:
Coconut meringues, coconut creme pattisserie,
brioche pain perdu, compressed pineapple, lime sorbet
They are also an intrinsic part of my petit-four collection, along with pâte de fruit, marshmallows, peanut butter fudge, macarons, and truffles.
Huge close up of coconut kisses…
A little bit of a joke, deliberately coloured and squat,
to look a little like little hats for some sugar work I was making
Production line for the school Christmas Fayre, along with
pâte de fruit – there are passion fruit, raspberry, cocoa, and blackberry there
Cocoa and chocolate flavoured meringues 

August 29, 2014 Recipe

Baked Mercenaria Mercenaria… Aka baked Clams, or Quahogs

I have a fabulous supplier, close to me, of all manner of delicious goodies.  Oakleaf European actually make twice weekly visits to Rungis, in Paris, and return with fabulous things for restaurants all over the UK, and even fly somethings abroad for one or two special restaurants.  Depending on the season their warehouse smells of truffles, the sweetest figs, planters of aromatic mint, basil, and bunches of chervil.

They can also supply me with all my Aromes and Sevarome pastes – and essential part of my patisserie larder, and Minus 8 vinegar, Japanese ginger vinegar…. The list is seemingly endless.

Returning to my house in the New Forest when I’ve had a delivery from Oakleaf is like being a child taken into your own sweetshop – my fridges groan with trays of carrots, apples, figs, heirloom tomatoes and the like. But there’s the rub, I need to order in 18’s rather than 6’s – so it’s always worth knowing that you have a spare fridge sitting waiting to receive all this bounty, and to supply the main kitchen when required.  Luckily I have a full house so often, that I know I can get through mountains of food in quite short order.

One of the items on my order this week were North Atlantic clams – Mercenaria mercenaria. They’re definitely bigger than venus clams, so not as suited to Linguine Vongole, which is what I would normally make for the 13 year old.  Instead I turned to our North American brethren – they call this type of clam a quahog, and often use it in chowder.  That seemed a little insensitive, given the quality of the clams, so instead I found a recipe which allowed for them to be minced and stuffed, then toasted with Parmesan – that sounded like an umami delight, so I’ve adapted a recipe by the Devon Seafood Grill, which exists rather bizarrely at the Hershey’s resort.  Yes. You read that correctly, Hershey’s has its own resort – who knew?

Ingredients:
10 large clams, rinsed (I used Mercenaria mercenaria, and had a whopping 17)
100ml of white wine
4 tablespoons shallots, minced
1 garlic clove, minced
115g unsalted butter
1 tablespoon fresh lemon juice
3 tablespoons fresh chopped chervil (or parsley)
50g panko bread crumbs
1 tablespoon cooking liquid from clams
60g parmesan cheese, grated
Salt and fresh ground black pepper to taste

Method:

  • Fill a large pot with 2 inches of water and bring to a boil. Add the clams and reduce heat to a simmer. Allow the clams to open, 6-10 minutes. Remove and allow clams to cool enough to handle. Discard any unopened clams.
  • Remove the clam meat and mince finely. Break the shells in half and save 10-12 of the nicest shells.
  • Preheat oven to 180ºC / 350ºF.
  • In a medium saute pan, melt the butter on medium heat, add the onions, and soften, 3-4 minutes. Add the garlic and cook another minute. Add the rest of the ingredients and stir until all is moistened. Add more cooking liquid if too dry and more panko if too wet.
  • Lay the clam shells on a baking tray and fill each clam with the mixture. Sprinkle with the parmesan cheese and bake for 20-25 minutes or until cheese is browned.

Optional: Squeeze fresh lemon juice just before eating.

Notes:
  • Your clams will come to you “dry”, that is not in water, as they actually drown if left in plain water.  Consequently it will be difficult for you to assess how dirty they are.  I pop mine into a gallon of room temperature water (that’s around four litres), with roughly 100g of sea salt (and sometimes a handful of polenta, to see if they will purge themselves).  Depending on the level of activity, I will whip them out after half an hour, and give them a good scrub.  If you pick the shell up, you’ll probably feel a certain sliminess on the shell, this is a definite indication they need to be cleaned.  You’ve only to clean one and compare it to the others to see what I mean, and I’ve included that in the photos.
  • This recipe calls for you to bring the liquid to the boil, then add the clams – I think you’re in real danger of smashing their shells if you do that, so I brought mine to the boil with the clams inside the pan.  However, I do have a power setting on my hob, which I timed, and took less than one minute to come to temperature.  You’ll need to make your own judgement based on your equipment.
  • I steamed mine in half plain water, and half sauvignon blanc – well come on – I am a European – it seems like a complete anathema to cook shellfish without some wine in the pan, especially if it’s going into a sauce afterwards.
  • Once the lid goes on the pan, the temperature will rise rapidly again, to keep it at a simmer you will need to adjust it downwards slightly.
  • It would be a crime to throw away all that cooking liquor, so sieve it through a fine cloche, and reduce it down!
  • I think it would be worth drying and oiling the shells before filling them, just to ensure that they don’t stick too much.

When checking shellfish like clams, there are only a few basic rules:

    • Rinse the clams, checking for any with broken shells – throw away any who’s shells are damaged
    • If the shells are not firmly closed, and do not close when you rap them hard – throw them away
    • Do not store them in fresh water
    • When you’ve cooked them, throw away any which have not opened during cooking!
    • So, very simple, must close when raw, must be open when cooked…

This is a dirty clam – you can see the dirt ingrained into the rings

These are the same clams when they’ve been scrubbed

Pop the clams gently into the pot – you don’t want to smash their shells

Only cook the clams until they’ve opened fully, making sure you leave enough room to allow them to “breathe” – move them gently with two spoons if you need to

Leave the clams to cool slightly

Once the mixture is ready, popped it into the shells and pop it into the oven

You can serve the clams on a bed of salt

August 29, 2014 Recipe

Malaysian Prawn and Pineapple Curry

Hubby makes a LOT of curries – curries and tagines. He’s often constrained by my need to eat fish or shellfish, but luckily there are any number of dishes from Asia and the Indian subcontinent which suit my requirements perfectly.  His favourite cookbooks are those by Atul Kochhar, Rick Stein and more recently my chum Dhruv Baker, and he also attended one of Atul’s courses, and prepared a meal for the lunch service. Hubby gained a number of useful insights into preparing curry, chief of which appears to be proper cooking of onions.  This recipe is actually a Malaysian curry, known as Udang Masak, and is based on one taught to Atul by Maria Mustafa…

 
Ingredients:

3 tablespoons vegetable or groundnut oil
Flesh from 1/2 small pineapple, peeled and diced
2 tablespoons palm sugar
500g raw prawns, peeled but with tails left on, cleaned and deveined
3 small tomatoes, cut into quarters
300ml coconut milk
Salt

Serves 4-6

For the paste:
2 thick lemongrass stalks, thinly sliced
3 shallots, chopped
1 garlic clove, finely chopped
3 red chillies, chopped
1 green chilli, chopped
1 teaspoon ground turmeric
4-6 candlenuts or macadamia nuts
A few spring onions, chopped into 2.5cm lengths to garnish

Method:

  • Pound or blend together all the paste ingredients with 2-3 tablespoons of water to make a fine paste. Heat the oil in a wok and fry the paste over a medium heat for 5-8min or until well cooked (there should be no smell of raw garlic and the oil should have started to separate out).
  • Add the pineapple and sauté for 2-3min, then add the sugar, some salt and 400ml water [see Notes]. Bring to the boil, then simmer for 3-5min or until the pineapple softens.
  • Add the prawns and continue to simmer for 4-5min or until the prawns turn pink and opaque. Add the tomatoes and cook for a further 2-3min, then pour in the coconut milk. Bring back to the boil, stirring well. Simmer gently for a further 3-5min, then serve, garnished with a few batons of spring onion.
Notes:
  • The curry is quite fragrant, and very sweet.  If you’re going to make it, I would suggest serving alongside a contrasting dish, perhaps Dhruv Baker’s green bean salad, with red onion and black mustard seeds.  It’s a delicious curry, and well-suited to those who don’t like very spicy curries.
  • Hubby didn’t add all of the water – he added around 150 ml he thinks, and that was still a little too much liquid.  Either Atul drains the curry a little before serving it, or something has been lost in the recipe process.  Below is the photo of Atul’s dish.  (I should point out Hubby’s is in a serving bowl, rather than an individual portion – hence the difference in quantity :0)

August 25, 2014 Baking

Orange and Cranberry Scones

The 9 year old’s on-going quest for the perfect bake has turned to scones.  So far we’ve made conventional scones, cheese, raisin, and this variation from a recipe by Ina Garten (aka The Barefoot Contessa).  Ina’s version includes cream and is made in the kitchen aid – I’ve included it because the ingredients and technique varied a great deal from the English versions I saw.

Some recipes included buttermilk, but that’s often because the acidity in the buttermilk acts on the raising agents, causing a better rise in the scone.  This is one of the few scone recipes I found however that included double cream – and it does make for a rich scone.  The higher fat content also ensures a more consistent scone.

For the scone:

560g plain flour, plus 35g extra
50g caster sugar, plus extra for sprinkling
2 tbsp baking powder
2 tsp salt
5g grated orange zest
340g cold unsalted butter, diced
4 large eggs, lightly beaten
240ml cold double cream
165g dried cranberries
1 egg beaten with 2 tbsp water or milk, for egg wash
For the Icing:
75g icing sugar
20ml freshly squeezed orange juice
Method:
  • Preheat the oven to 200C/Gas 6. In the bowl of an electric mixer fitted with a paddle attachment, mix 560g of the flour, 50g caster sugar, the baking powder, salt and orange zest. Add the cold butter and mix at the lowest speed until the butter is the size of peas.
  • Combine the eggs and double cream and, with the mixer on low speed, slowly pour into the flour and butter mixture. Mix until just blended. The dough will look lumpy! Combine the dried cranberries and 35g of flour, add to the dough, and mix on low speed until blended.
  • Dump the dough onto a well-floured surface and knead it into a ball. Flour your hands and a rolling pin and roll the dough 1.5cm thick. You should see small bits of butter in the dough. Keep moving the dough on the floured board so it doesn’t stick.
  • Flour a 7.5cm round plain or fluted cutter and cut circles of dough. Place the scones on a baking pan lined with parchment paper. Collect the scraps neatly, roll them out, and cut more circles. At this point you can transfer to a freezer-safe container to cook from frozen later. Please note, cooking times will increase when cooking from frozen and you may need to lower your oven temperature slightly.
  • Brush the tops of the scones with egg wash, sprinkle with the remaining caster sugar, and bake for 20 to 25 mins, until the tops are browned and the insides are fully baked. The scones will be firm to the touch.
  • Allow the scones to cool for 15 mins and then whisk together the icing sugar and orange juice, and drizzle over the top.
Notes:
  • I didn’t cover my scones in the glaze, it seemed a little too sweet for my more puritanical tastes – since I’ve given up sugar, anything covered in glaze seems a little extreme…
  • I did however top my scones in a little grated lime zest, which added perfume and a little more acidity to the scone
  • Yes, the picture shows it served “Devon” style, rather than “Cornish” – that is with the cream first, and then topped with the jam…  Personally I have absolutely no preference!
  • For purists, the fluted cutter is used for scones that include fruit, and the smooth cutter for plain scones.

July 13, 2014 Baking

Coconut Milk Creme Patisserie

231d6-p1010309I use the standard Creme Patisserie recipe on the blog a lot, but in a recent recipe (which contained a coconut curd), I thought I might make a coconut milk variation – after all the fat content of coconut milk is quite high, and the consistency can be similar to milk.  I altered the recipe slightly, but that was because I included 30ml of Malibu, and an increased quantity of flour – I wanted to be able to pipe the creme pat into quite stiff peaks on the plate, for a specific dessert.
Ingredients:

300g coconut milk 60g unrefined caster sugar
30g unsalted good quality butter
30 ml Malibu 45g plain flour
3 free range egg yolks
the seeds from 1 vanilla pod
pinch of salt

Method:

Put all the ingredients into the Thermomix bowl and cook for 7 minutes at 90C, speed 4.

Give it a quick whizz at the end to ensure it’s smooth, then pour into a bowl and cover with cling film until it’s cool.
 
Yes – that’s it!  Keep it in your fridge until you require it.

Oh. And if you’re stupid enough to stick in a block of quite cool butter, do put the lid on properly and start the machine quite slowly.

  • « Go to Previous Page
  • Go to page 1
  • Go to page 2
  • Go to page 3
  • Go to page 4
  • Go to page 5
  • Interim pages omitted …
  • Go to page 9
  • Go to Next Page »

Primary Sidebar

Categories

  • ▼Recipe
    • Baking
    • Breakfast
    • Cheese
    • Dessert
    • Eggs
    • Fish
    • Heston Blumenthal
    • Italian
    • Jamie Oliver
    • Marcus Wareing
    • Mediterranean
    • Pasta
    • Patisserie
    • Risotto
    • Smoothie
    • Sous Vide
    • Squash
    • Thermomix
    • Vegan
    • Vegetarian
    • Yotam Ottolenghi

Categories

  • ▼Book Review
    • ⭐️⭐️⭐️⭐️
    • ⭐️⭐️⭐️⭐️⭐️
    • Baking
    • Meat
    • Patisserie
    • Restaurant Cookbook
    • Vegetarian
    • Yotam Ottolenghi

Categories

  • ▼Restaurant
    • 1 Michelin Star
    • 2 Michelin Stars
    • 3 Michelin Stars
    • British
    • Fish
    • French
    • Italian
    • Japanese
    • Peruvian

Categories

  • 101 Cookbooks (1)
  • 3 Michelin Stars (1)
  • Advert (1)
  • Alan Murchison (2)
  • Alba Truffle (1)
  • Almond (1)
  • Angela Hartnett (1)
  • Angler (2)
  • Art Journal (2)
  • Artichokes (1)
  • Axis (1)
  • Azelia’s Kitchen (1)
  • Baking (9)
  • Baldwin (1)
  • Bara Brith (1)
  • Basics (1)
  • Beef (1)
  • Beetroot (2)
  • Ben Spalding (2)
  • Blackberry Soufflé (1)
  • Blackening Spice (1)
  • Blood Oranges (4)
  • ►Book Review (75)
    • Baking (10)
    • Meat (1)
    • Patisserie (6)
    • Restaurant Cookbook (3)
    • Vegetarian (3)
    • Yotam Ottolenghi (2)
    • ⭐️⭐️⭐️⭐️ (16)
    • ⭐️⭐️⭐️⭐️⭐️ (8)
  • Bread (3)
  • Breakfast (1)
  • Breakfast Tart (1)
  • brioche (1)
  • Brockhall Farm (1)
  • Bruschetta (1)
  • Bryn Williams (1)
  • Burrata (1)
  • Butter (1)
  • Buttercream (1)
  • Camembert (1)
  • Canapes (1)
  • caraway (2)
  • Casserole (2)
  • Chelsea Buns (1)
  • Chestnuts (1)
  • Chicken (3)
  • Chickpea (1)
  • Chocolate (4)
  • Chocolate Fondant (1)
  • Christmas (1)
  • Ciabatta (1)
  • Cinnamon (1)
  • Citrus (1)
  • Citrus Drizzle Cake (1)
  • Clams (1)
  • Coconut (2)
  • Coconut Milk (1)
  • Confectionary (1)
  • Creme Patisserie (1)
  • Dan Lepard (1)
  • Dessert (1)
  • detox (1)
  • Doughnuts (1)
  • Dried Fruit (1)
  • Drop Scones (1)
  • Ducasse (1)
  • Duck Egg (1)
  • Eggs (3)
  • El Bulli (1)
  • en Cocotte (1)
  • Epi (1)
  • Eric Treuille (1)
  • fennel (2)
  • Fettuccini (1)
  • Fish (1)
  • FrontPage (28)
  • Fruit Tea (1)
  • Glutamate (1)
  • Goat’s Cheese (1)
  • Gỏi Cuốn (1)
  • Granita (1)
  • Herbs (1)
  • Heritage Tomato (1)
  • Hibiscus Flower (1)
  • Hope and Greenwood (1)
  • Ice-Cream (3)
  • Iced Berry Souffle (1)
  • Icing (1)
  • Italian (1)
  • James Martin (1)
  • Jelly (1)
  • Journal (9)
  • Karen Scott (1)
  • King Oyster Mushroom (3)
  • Kummel (1)
  • L’Ortolan (1)
  • Lamb (1)
  • Lavender (1)
  • Laverstoke Park (1)
  • Lemon (3)
  • Lemon Drizzle Cake (1)
  • Lemon Grass (1)
  • Lemon Meringue Tart (1)
  • Lemon Poppy Seed Muffins (1)
  • Lentils (1)
  • Limewood (1)
  • Liquorice (1)
  • Liquorice Ice-Cream (1)
  • Lobster (3)
  • Lucas Hollweg (1)
  • Luke Holder (1)
  • Macarons (1)
  • Mango (1)
  • Marcus Wareing (1)
  • Mark Lloyd (1)
  • Market (1)
  • Mary Berry (1)
  • Meringue (1)
  • Michael Moore (1)
  • Michel Roux (3)
  • Mint (1)
  • Mister Truffle (2)
  • Modernist Cuisine at Home (1)
  • Moroccan (1)
  • Muffins (3)
  • Murano (1)
  • Mushroom (1)
  • Ollie Dabbous (1)
  • Ollie Fararr (1)
  • Ox cheek (1)
  • Palourde Clams (1)
  • Pancetta (1)
  • Panna Cotta (1)
  • Parmesan (1)
  • Passion Fruit (3)
  • Pasta (1)
  • Patisserie (1)
  • Paul Heathcote (1)
  • Pea (1)
  • Peter Reinhart (1)
  • Petit Fours (1)
  • Philip Howard (1)
  • Pierre Koffman (1)
  • Pierre Koffmann (1)
  • Pimms (1)
  • Pistachio (1)
  • Pistachio Soufflé (2)
  • Pistacho (1)
  • Pork (1)
  • Prawn (1)
  • Quiche (1)
  • Rachel Allen’s 30 Day Muffins (1)
  • Raspberry (2)
  • Ravioli (1)
  • Raymond Blanc (1)
  • ▼Recipe (192)
    • Baking (17)
    • Breakfast (2)
    • Cheese (1)
    • Dessert (7)
    • Eggs (3)
    • Fish (2)
    • Heston Blumenthal (5)
    • Italian (3)
    • Jamie Oliver (1)
    • Marcus Wareing (2)
    • Mediterranean (3)
    • Pasta (3)
    • Patisserie (7)
    • Risotto (1)
    • Smoothie (1)
    • Sous Vide (1)
    • Squash (1)
    • Thermomix (19)
    • Vegan (1)
    • Vegetarian (20)
    • Yotam Ottolenghi (2)
  • ►Restaurant (124)
    • 1 Michelin Star (17)
    • 2 Michelin Stars (9)
    • 3 Michelin Stars (3)
    • British (19)
    • Fish (4)
    • French (4)
    • Italian (3)
    • Japanese (1)
    • Peruvian (1)
  • Richard Bertinet (1)
  • Risotto (1)
  • Roganic (1)
  • Rolls (1)
  • Roux (3)
  • salad (2)
  • Salmon (2)
  • Sardinian Cookery (1)
  • Scandiliscious (1)
  • Sea Trout (1)
  • Sherbet Dab (1)
  • Signe Johansen (1)
  • Silvana de Soissons (1)
  • Simon Rogan (1)
  • Snail Caviar (1)
  • Soda Bread (1)
  • Sorbet (1)
  • Soufflé (11)
  • Soup (1)
  • Sous Vide (2)
  • Spice (1)
  • Stew (1)
  • Stuffing (1)
  • Sugar Baby (1)
  • Sugarwork (1)
  • Sumosan (1)
  • Supper (1)
  • Sweetcorn (1)
  • Sweetcorn Fritters (1)
  • Tamarillo’s (1)
  • Texturas Fizzy (1)
  • Thai (2)
  • The Bertinet Kitchen (1)
  • The Square (1)
  • Thermomix (10)
  • Toffe Fudge Muffins (1)
  • Tom Kitchin (1)
  • Tomato Bread (1)
  • Tony Fleming (4)
  • Tribute Dish (2)
  • Truffle (1)
  • Truffles (6)
  • Umami (1)
  • Uncategorized (1)
  • Vanilla (2)
  • Vegan (1)
  • Vegetables (1)
  • Vegetarian (3)
  • Verveine (1)
  • Vietname Summer Roll (1)
  • Watermelon (1)
  • William Curley (1)
  • yeasted dough (1)

I’m passionate about food, its provenance and its sustainability. As a technical cook, I like to see what’s happening in the kitchens of Michelin starred restaurants, but you’re just as likely to find me at home making sourdough. You can find some of my recipes in In The Mix 2, an award-winning Thermomix cookbook.

I’m also truly blessed – I can open my fridge at any time and know it’s crammed with all manner of loveliness – but that’s not the case for everyone. There are people all around me in the UK who rely on food banks to feed their kids, and themselves, and every box of cereal or teabag makes a difference. You can donate food to your local food bank, or time, or money, and if you want more information the best starting place is http://www.trusselltrust.org.

You can also find me here:

Foodies100 Index of UK Food BlogsFoodies100
The Renaissance Epicurean... London restaurants
Top Food BlogsUK Food Bloggers Association

The Eleven Madison Park Granola

Copyright © 2025 · Cookd Pro Theme On Genesis Framework · WordPress · Log in

Nourished
  • Home
  • Recipes
  • Book Reviews
  • Restaurants
  • Journal
  • About