• Skip to primary navigation
  • Skip to main content
  • Skip to primary sidebar

Nourished

  • Home
  • Recipes
  • Book Reviews
  • Restaurants
    • 3 Michelin Stars
    • 2 Michelin Stars
    • 1 Michelin Star
  • Journal
    • Art Journal
    • The Renaissance Diary
  • About
    • Contact Me
    • Instagram
    • Loves
    • Suppliers
    • Masterchef Links

Recipe

January 5, 2014 Recipe

Gordon Ramsay’s Baked Spice Porridge

My predictable January health kick survives* – we’ve reached the 5th – and although it’s a Sunday morning, I’ve managed to stall breakfast long enough to make baked porridge.  I’d caught this recipe earlier in the week on Ramsay’s show, and located the recipe online.  I have to say, it’s so much nicer than perhaps it sounds!  Forget that oats are a good source of soluble fibre, help reduce cholesterol, and provide an invaluable source of manganese and non-meat protein – this thing tastes yummy too!

Ingredients:
Serves 4–6
150g (5oz) jumbo rolled oats
seeds from 1 vanilla pod
1 tsp ground cinnamon
1⁄2 tsp freshly grated nutmeg, plus a little extra to sprinkle
50g (2oz) whole blanched almonds
50g (2oz) blanched hazelnuts
75g (3oz) raisins
1 ripe pear, peeled, cored and chopped into small chunks
500ml (18fl oz) milk, plus extra for serving
200ml (7fl oz) double cream
2 tbsp demerara sugar

Method:

  • Preheat the oven to 180C/Gas 4.
  • Combine the oats and vanilla seeds in a mixing bowl – use your fingers to rub the seeds through the oats. Add the spices, nuts, raisins and pear and mix well. Stir in the milk and cream,
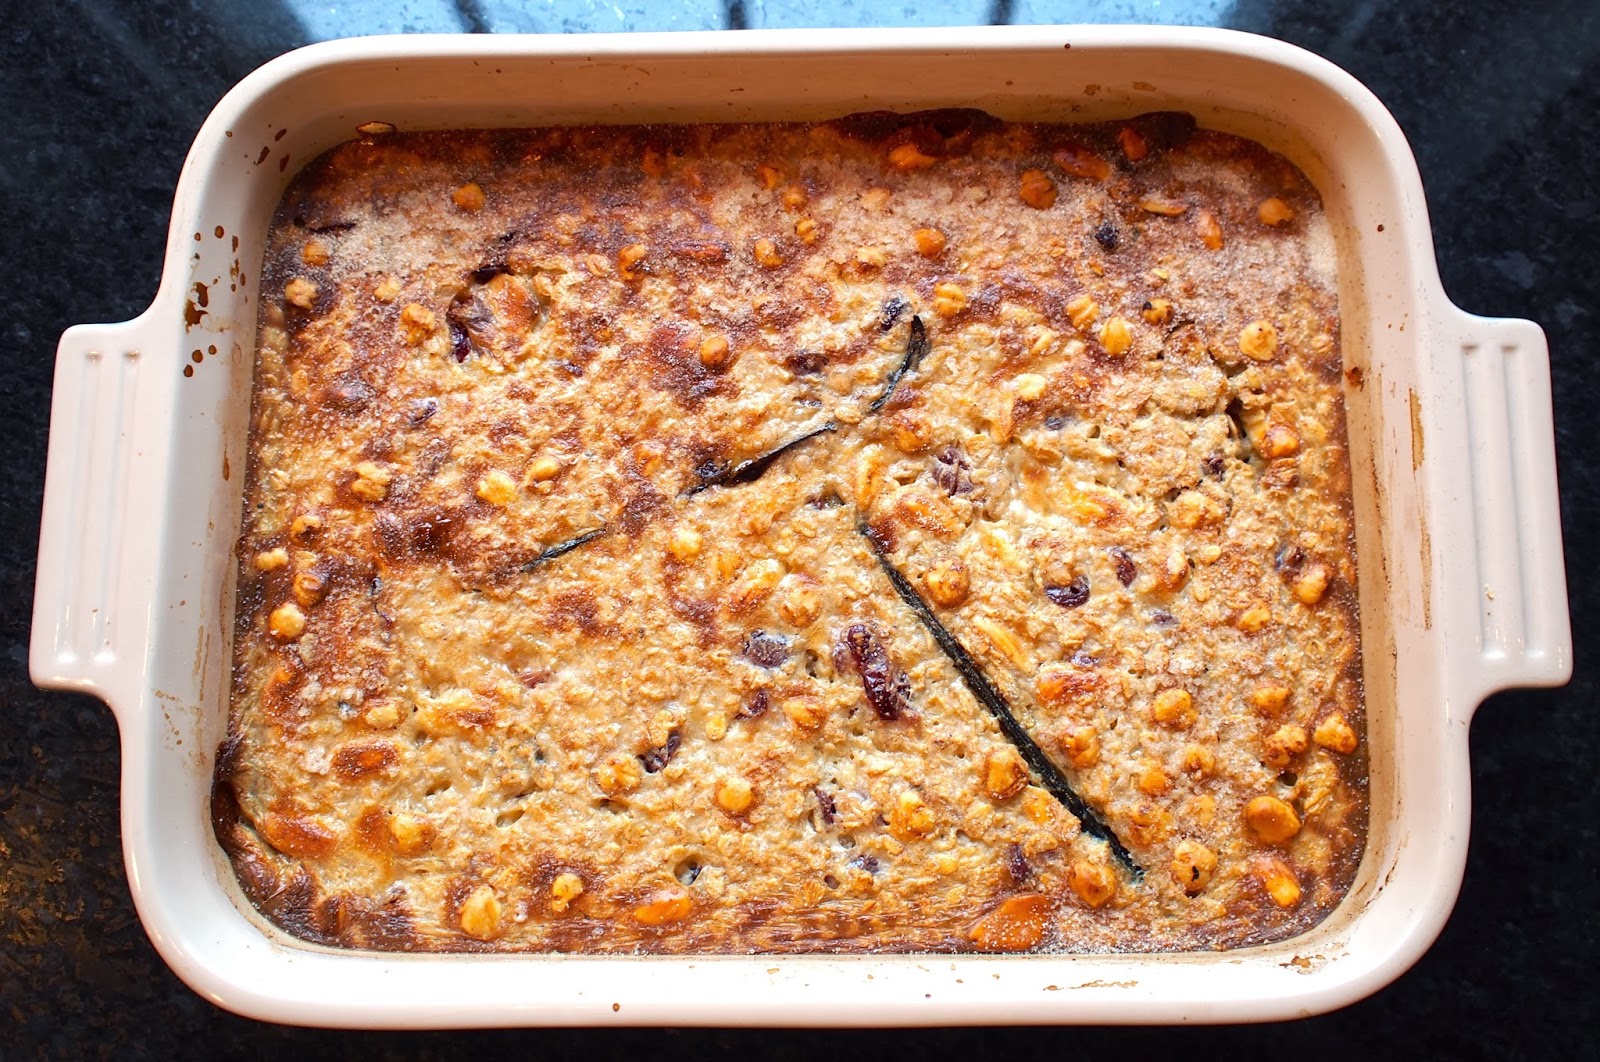
  • and then pour the mixture into a baking dish. Dust with a little extra grated nutmeg.
  • Place in the oven and bake for30–35 minutes, or until the oats are completely softened and the liquid absorbed.
  • Heat the grill on its highest setting. Sprinkle the top of the porridge with the sugar and place under the grill for 3–4 minutes, or until the sugar has melted and created a crust.
  • Serve warm, with a little extra milk on the side if desired

Notes:

  • I omitted the cream from mine, but I used whole milk, and upped it to 600ml
  • Do leave your nuts whole if you can, they will soften in the mix
  • I used 100g dried cranberries instead of raisins – I’m not that keen on raisins these days
  • I forgot to put in the pear – damnation – I have some excellent pears too
  • I used my Thiercelin Pain d’Epices spices, because I’m becoming vaguely addicted to the scent – although Hubby did say that it smelled a little like a Christmas pud, so beware
  • If you’re not going to pop your vanilla bean pod into sugar, you could put it into the porridge to cook alongside the other ingredients
  • Hubby had his porridge without milk on the side, but I did, it’s pretty thick otherwise
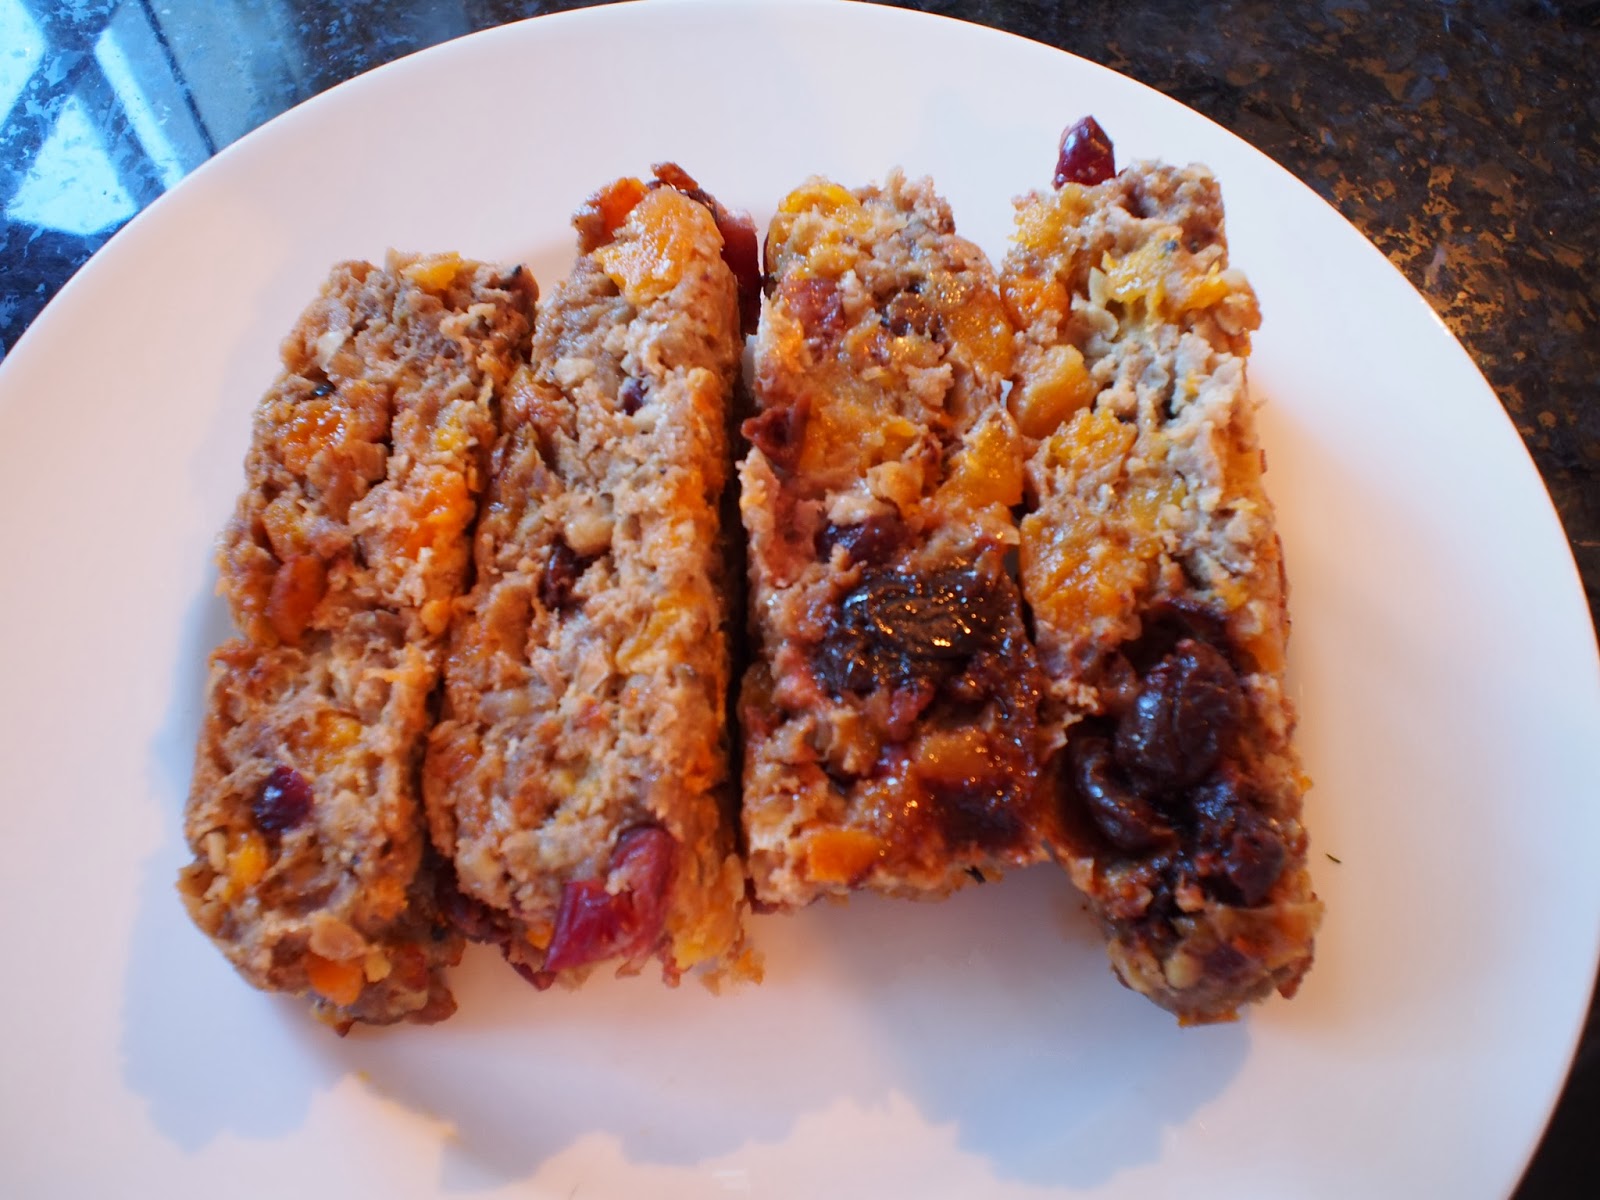
  • I cooked mine in a Le Creuset dish, which meant that when it cooled down, I was actually able to cut it into strips – like a soft breakfast bar.  It’s actually even more delicious cold – that’s my breakfast for tomorrow sorted, with some fresh fruit, and a splodge of natural yoghurt I’ll be good to go…

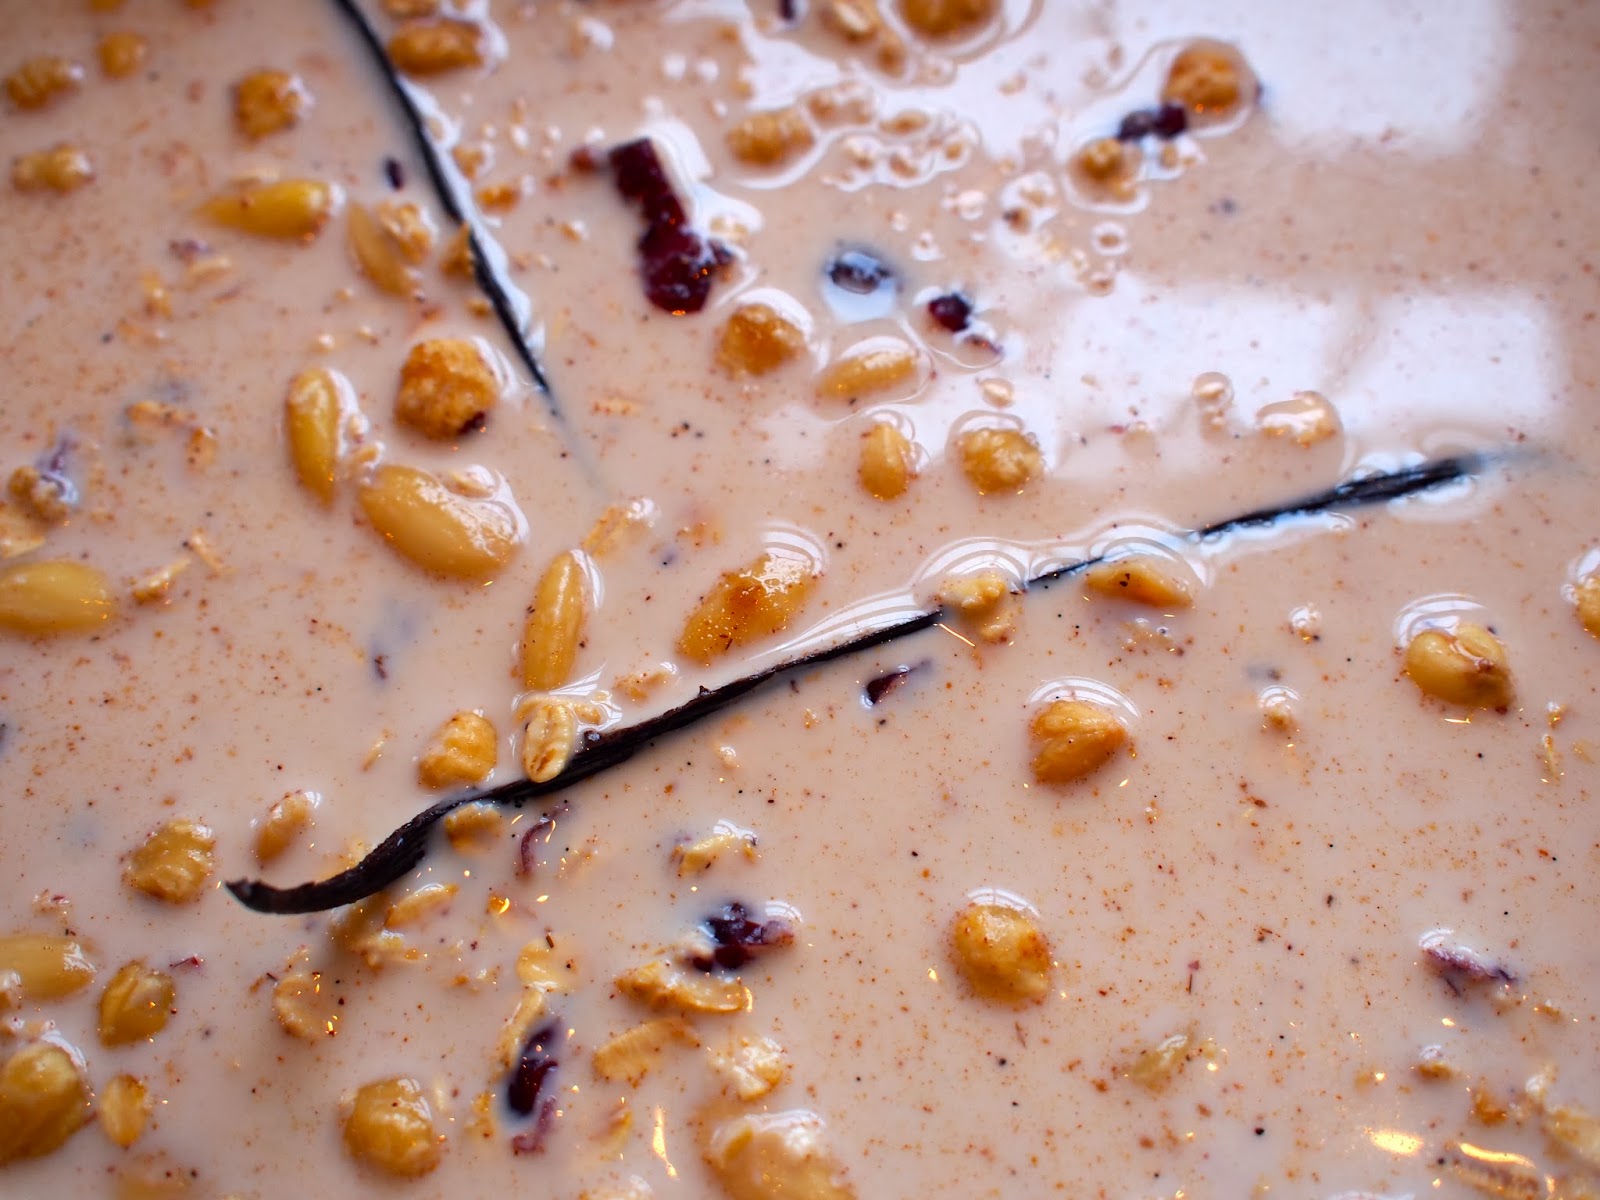
The Porridge and Milk

The Baked Porridge

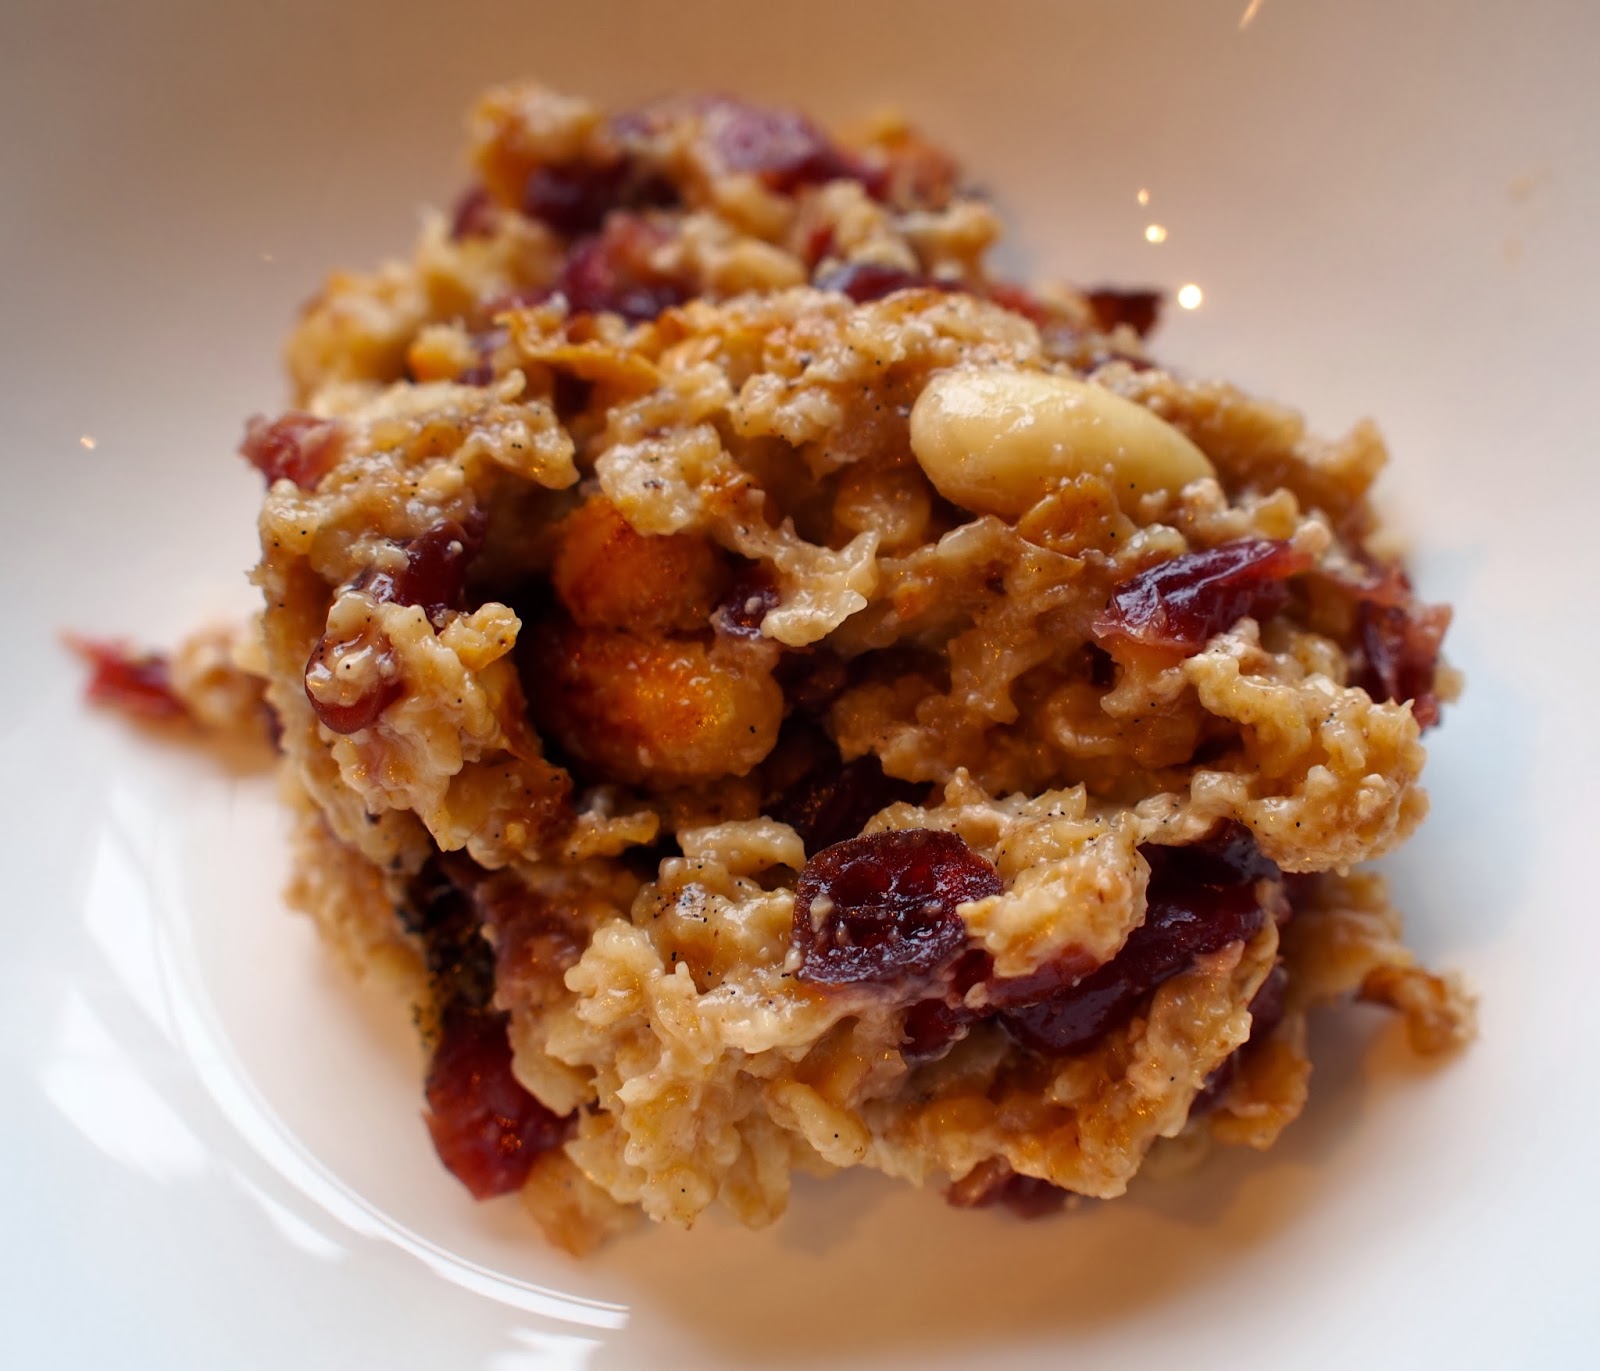
Delicious, but even nicer when set, and cut into slices


January 2, 2014 FrontPage

CakePops are Dead! Long live the MallowPop!

We’ve all made cake pops – good grief – what a bore!

For starters, who really wants a mouthful of dry cake, mixed with sickly sweet buttercream? Then there’s the fact that they take soooo long to make, fall off if you make them too big, or include too much buttercream… No, no.  The cakepop is dead.

So, what’s the alternative?  Clearly you’re reading my MallowPop post, so the answer must be a MallowPop – yay!

For starters:

  • the basic varieties are much easier to make
  • they actually last for much longer than cake pops, which means you can make them much further in advance – a real boon for those of us baking for cake sales, parties etc
  • anything you can do to a cakepop, you can do to a mallowpop
  • mallowpops can be made gluten-free – a huge boon if you’re creating for the masses
  • they also allow you a huge amount of scope in terms of decoration, flavouring etc.
  • you can make your own marshmallows if you really want to up the flavourings and complexity

I would almost go on to say that they offer the same customisation scope as macaron – and potentially far more flavour impact variations than cake…

But let’s not get ahead of ourselves – let’s start with the basic idea.  Anyone can take a packet of marshmallows, and cover them in chocolate – even using candy melts if you have to…  At this level it’s a great thing for kids to get involved with too, and nowhere nearly as traumatic as cake pops.

So lets begin….

Of course I may have lied a little, when I said I’d press on with the basic MallowPop.  But if you know me, you’d know that I have a mini-aversion to rubbish ingredients… If you’re going to make a decent MallowPop, I think it’s worth spending a little more time and money on decent ingredients.  I promise I will however post shortly using candy-melts, or something of that ilk.

Let’s start with a few basic couveture chocolate rules:

  • chocolate (generally) hates water – if you’re going to use a bain-marie to melt your chocolate, make sure you never drop any water into the melted chocolate – it will seize the mixture
  • all pre-tempered chocolate (which is generally what you’d be buying, already has tempered crystals in it.  We’re not going to talk extensively about that now, just bear that in mind
  • if you melt tempered chocolate to it’s given range (which is usually printed on the packet!), you will not take the chocolate out of temper (that is, remove the crystals)
  • even if you do take the chocolate out of temper, just add a bit more of the tempered chocolate back into it, and that will reseed the chocolate
  • calm down, none of this is as complicated as it sounds
  • very generally speaking, if you keep the temperature of the chocolate between 26ºC and about 38ºC, you will not have any problems
  • if you’re going to melt your chocolate in a microwave (which I do), make sure you only do it in 15 second busts, and check the temperature towards the end
  • always microwave your chocolate in a plastic, not glass bowl, and use a plastic spoon when mixing
  • an infrared / laser thermometer is an absolute god-send for checking the temperature of chocolate, as you don’t have to put it into the chocolate
  • always use fresh marshmallows – even marshmallows which have been out for 12 hours in an airtight box are too old – the chocolate will peel away, and the mallowpop is too dry
  • by far the best thing to set chocolate onto is food-grade acetate, which is inexpensive to buy
  • if you’re lucky enough to have Neff warming drawer ( I adore mine), you can keep several bowls of chocolate in temper while you’re working by keep them at the 1.5 setting – check the temperature again before you begin, and if over 38ºC, you can reseed them with a handful of fresh chocolate
  • I’ve found I can actually keep chocolate in temper overnight in the warming drawer, though it’s probably best to take it down the the 1 setting
MallowPop Method
  • As a basic method, take a freshly opened pack of marshmallows (or make your own, more on that later), and taking a 15cm cake pop stick, dip the stick into the melted chocolate, and plunge into your marshmallow
  • I found it easier to put all the marshmallows vertically onto a chopping board, and then plunge the stick in on that
  • Wait for a few minutes until the chocolate has set-up a little, and then swirl the marshmallow into a bowl of tempered chocolate.
  • Put the MallowPop either onto acetate to set, or using an old piece of polystyrene,  allow the chocolate to set there…  If the chocolate is still in temper, it should set within a couple of minutes


Chocolate Suppliers:

Vantage House
The Chocolate Trading Company

January 2, 2014 detox

Puy lentil salad, with roasted vegetables and king oyster mushrooms

It’s inevitable, as predictable as the rising sun – come the first of January and we all feel the call of the detox. I’ve been craving lentils ever since I caught the Nigel Slater show over Christmas – his dish of warm lentil salad, horseradish and rare beef chimed somewhere with my overloaded palate… However I really wanted to make it meat-free, and to incorporate some roasted king oyster mushrooms. The mushrooms are meaty enough – they’re perfect for roasting and absorb the flavour of anything they’re dressed in.  I coated them in porcini oil, and salt and pepper and roasted them for around 30 minutes.

I also roasted some red and golden beetroot in another dish, with fennel, radish, sweet potato and lemon and lime zest.  The lentils came courtesy of one of those ready packs, always a handy standby.  The juice of the lemon and lime were added to the oil from mushrooms as a dressing, and I left the entirety to meld for half an hour before serving.
The puy lentils were earthy and added to the savouriness of the king oyster mushrooms… Granny smith apples added texture and a touch of acidity, and the roasted vegetables were both sweet and crunchy.  For the first time in days I woke with an appetite, and raring to go! Bring on the detox – I’m ready for it now…

King oyster mushrooms

The mushrooms were sliced, and dipped in porcini oil

Sweet potato, radish, fennel, red and yellow beetroot, and lime and lemon zest

The dressed dish, roasted vegetables, king oyster mushrooms and puy lentils

January 1, 2014 Christmas

Christmas Stuffing

Food bloggers record their recipes for a variety of reasons – sometimes we’ve learnt something that we’d like to share with others, for example the correct range to maintain a gel for Meat Fruit – and on other occasions it really is just a gigantic aide-mémoire!  The more mundane recipes on my blog are in reality the ones I use the most – they make their way onto here so that no matter where I am, I can turn to them time and again…

I realise that Christmas has long since passed, but the reality is that if I don’t write down my recipes, in the fashion of Mr Slater, they’d just disappear from memory! This year I made up a new stuffing recipe, heavy on the dried fruit, and heavy on the pain d’épices spice I’d just acquired.  It was definitely the nicest I’d made to date, and was even nicer in sandwiches!  It remained moist and flavourful, and was being sought out amongst the other leftovers…  So.  I apologise if it’s another 50 weeks until Christmas – I’ll just have to remember that I’ve recorded it on here when the festivities come around again!

Ingredients

900g good quality sausage meat
1tsp salt and 1/2 tsp pepper
1tsp freshly grated nutmeg
1 tablespoon Thiercelin Pain d’épices spice
100g dried cherries
250g dried chopped apricots
100g dried cranberries
50g butter

Method

  • I put everything into my kitchen aid bowl, and beat for five minutes.  I wanted the larger pieces of dried fruit to break down a little.
  • Bake in a large shallow baking tray – I used a half sized disposable foil container, which gave me a depth of about 1 inch
  • Bake in a hot oven for around 1/2 hour until the top is golden and crusty – I used a thermometer to check the temperature was 60ºC for pork
  • If you have time, turn the stuffing over and pop back into the oven for a further 10 minutes to crisp up the other side too
  • Slice into wedges or cut into cubes

Notes:
  • I could see myself using this for other things – it’d make an interesting addition to picnics etc
  • Thiercelin spices are actually very strong – you might need to put in more if using a more typical spice range
Yes. Perhaps not the most flattering of pics, but trust me – it tastes yummy!

November 4, 2013 FrontPage

Butter Poached Lobster (sous vide), with Girolles and Hazelnuts

Girolles and hazelnuts are just the most glorious combination – both sweet, nutty and earthy, they complement each other well.  The lobster was actually just a vehicle for the girolles, and it could just as easily have been baked squash I made last week, or any number of roasted vegetables.

Girolles are a beautiful colour – they look (and are said to smell) like apricots.  They generally grow in a group together, and are best picked a few days after rain, to allow a decent amount of growth.

If you don’t have a pet forager, you can get girolles right now from the lovely people at Natoora, or from them via Ocado.  They require the minimum amount of cleaning, and personally I find them easiest to clean with a filleting knife.  The blade is particularly flexible, and allows you to ‘flick’ the dirt out of the gills, and to lightly ‘scrape’ the top of the mushroom. I’ve tried almost every other method, from a light rinse and spin, brushing with natural bristle, and brushing with silicone bristles – both of which merely drove the dirt further into the gills.
The lobster was sealed in a vacuum bag with butter, a splash of vermouth, about 10 pink peppercorns and sprigs of lemon thyme.  I also put a teaspoon of sumac into the bottom of the pouch.  They were cooked in a water bath at 60ºC for 15 minutes, but frankly they weren’t terribly big.  You might need to adjust your timings accordingly.
Once I’d browned the girolles until golden in some rapeseed oil and butter, I flashed the lobster through the butter just to pick up some more of the girolle scent. Both were served with a few crushed toasted hazelnuts, and a dressing made from the reduced reserved lobster liquor, and a little white balsamic vinegar.

November 4, 2013 Casserole

Braised Ox Cheek

In January I found myself tucking into a braised ox-cheek, in the middle of a horrific snow storm.  We were in Cheltenham to shoot, a shoot which would subsequently be called off due to 5ft snow drifts. We’d lunched at the fabulous Le Champignon Sauvage and were supposed to have an early dinner in the dining room at the Ellenborough hotel.  With the storm raging around us however, the chef had abandoned us in a fit of pique – apparently he had set up for a conference of two hundred people, and the whole thing had been cancelled at the last moment.

Without the dining room, the six remaining guests of the hotel were forced into the bar to make do with the brasserie menu.  You can imagine – you know me well enough by now to know I really wasn’t looking forward to it.  I spotted ox cheek on the menu, and concluding that it was probably being cooked sous vide, figured it couldn’t be ruined by whichever inexperienced soul they’d roped in to cover this shift.

The ox cheek was absolutely gorgeous – unctuous, soft, incredibly meaty, and full of umami savouriness.  Absolutely delicious.

So again we were heading to Cheltenham to shoot, with an obligatory dinner at Le Champignon Sauvage, and this time I actually wanted to go to the brasserie! Alas! The braised cheek was no longer on the menu…. I was so desperate for a hit of meaty richness that I headed to Waitrose as soon as we got back – Waitrose is one of the few places to get ox cheeks easily.  I did debate cooking them sous vide, but in the end decided to braise them.  I also marinated them overnight in my favourite marinade (that of Heston’s Meat Fruit), and the result was exactly what I’m looking for.  Ox cheek is currently £7.49 per kilo – an absolute bargain.  I always make make stew for our Christmas Quiz Night, and from now on, I will be using ox cheek!

Ingredients:
1kg of ox cheeks, trimmed of fat
1litre of chicken stock
2 carrots, diced
2 sticks celery, diced
2 cleaned leeks, diced
1 small onion, diced
1 tablespoon tomato paste

For the marinade:
100g shallots, finely sliced
3g minced garlic
15g sprigs of thyme
150g dry Madeira
150g ruby port
75g white port
50g brandy

Method:

  • Trim the ox cheek but do not remove the lines of sinew running through the centre, they will breakdown during cooking.  Cut the cheeks into large wide slices, or leave whole
  • Put the ox cheek and all of the marinade ingredients into a container, and marinate overnight
  • Chop the celery, onion, and carrots to give you a classic mirepoix or soffritto.  I added leeks to mine too
  • Put a little olive oil into a casserole dish, and add a little butter when it’s heating up
  • Brown the cheek in the casserole dish, then set aside
  • Add the mirepoix / soffritto to the pan, and brown the vegetables
  • Add two tablespoons of tomato paste to the vegetables and cook for a few minutes
  • Add the reserved meat back into the pan, and add the chicken stock, and the marinade
  • Bring back to the boil and when simmering put into the oven for approximately four hours
  • You can adjust the seasoning once the sauce is reduced, adding a little worcestershire sauce if appropriate, or perhaps a little pomegranate molasses or balsamic vinegar if the balance of flavours requires it

Notes:

  • You can serve the braised cheeks with any number of accompaniments – perhaps buttered leeks, puy lentils, parmesan polenta or champ (mashed potato with spring onions chopped through it)…  A crisp salad of baby gem lettuce and parsley would brighten the dish too.
  • This is an incredibly rich and meaty stew – the flavour is almost akin to oxtail – you certainly don’t need very much of it, so don’t overdo the portions

November 4, 2013 Recipe

Sweetcorn Fritters


442b6-pb040429It must be autumn, I’m craving all manner of autumnal veg, from pumpkin to sweetcorn, and every variety of squash and mushroom I can find.  I genuinely think we eat too much meat in our diets, and there is no reason not to have a delicious warm lunch, where the star is the vegetable.


One of my favourites is sweetcorn fritters – but I tend to mix an additional ingredient in, just to add a little variety.  Today’s variation was raw orange pepper.  I love raw peppers, but some people find it indigestible, so you could add anything else you fancy.  Crab perhaps? Always delicious. Spring onions? Grated courgettes?

The ingredients for the batter are a bit of a work in progress – I usually eyeball the batter depending on how many people I’m cooking for, and how wet the ingredients are.

Ingredients

1/2 cup of plain flour
1/4 teaspoon baking powder
Salt and pepper to taste
1/4 teaspoon smoked paprika (optional)
1 egg
About 40ml of buttermilk (or milk)
100g sweetcorn
1 small orange pepper, finely chopped

Method:

  • Chop the pepper finely if using, and remove the sweetcorn from the cob (or tin :0)
  • Pop the dry ingredients into one bowl, and mix the wet ingredients in a separate bowl or jug
  • Gradually add enough of the liquid to form a thick batter – do not overwork it
  • Incorporate enough of the batter into the vegetables to just thickly coat it
  • Cook the fritters on a moderate heat, in a little rapeseed oil
  • Like pancakes and drop scones, when the bubbles start to pop through, turn the fritter over
  • Serve with the sauce of your choice – sometimes I have tzatziki, but today it was chill jelly!

November 4, 2013 Baking

Lemon Drizzle Cake

All bow to Mary Berry, the queen of baking.  And it’s true, if I’m looking for a traditional bake, I’ll usually look at her recipe first and then move on to check out any variations.  In this case we’ve never moved beyond Mary’s recipe, and it’s the cake the children ask for most.  If made using the all-in-one method in a food processor, it literally can be in the oven in five minutes… C’mon – who doesn’t have time for a five minute cake???

The basic mixture is what the Americans call pound cake – that is that the four main ingredients weigh the same as each other.  Although this can result in a slightly heavier cake than others, it is here lightened with a little baking powder.  The sugar glaze also sinks into the cake, and forms a crust which keeps the moisture inside the cake.

For the cake:
3 large eggs
175g (6 oz) self-raising flour
175g (6 oz) caster sugar
175g (6 oz) softened butter
1.5 level tsp baking powder
Finely grated zest of 1 lemon

For the crunchy lemon icing:
100g (4 oz) granulated sugar
Juice of 1 lemon

You’ll also need:
900g (2lb) loaf tin, greased and lined (or smaller presentation cases, as I have used)

Method

  • Preheat the oven to 180ºC / 350ºF / Gas Mark 4.
  • Beat together the eggs, flour, caster sugar, butter, baking powder and lemon zest until smooth in a large mixing bowl and turn into the prepared tin
  • Bake in the pre-heated oven for about 35 mins, or until golden brown, shrinking away from the sides of the tin and springy to the touch.
  • While the cake is still warm, make the lemon drizzle topping. Mix together the sugar and lemon juice, and pour over the warm cake
  • Do keep going back to top up the glaze until you can see it isn’t being absorbed any more.  In my photographs, the cake on the left was glazed a couple of minutes before that on the right – both had the same amount of glaze, but you can see that the one on the left has absorbed more glaze
  • Leave to cool a little and loosen the sides of the cake, then lift the cake out of the tin (or, if using presentation cases, clearly you can leave the cake alone until you need it.  This will keep it fresher for longer
Notes
  • If the mixture looks too thick, add a little milk to slacken it
  • If using a food processor, try not to over mix the batter, as it will over-develop the gluten – just mix the batter for long enough to bring it together
  • If you do make it in the traditional way (beating the butter and sugar) you will get a better cake – depends how much of a purist / sadist you are – I now do it the full form way!
  • My batter looks a little orange.  Because I was using small eggs, I’d put in four to make it up to the right quantity, giving me one extra yolk.  I was also using Clarence Court eggs, and their yolks are a very rich colour
  • I don’t use the recommended quantities for the glaze, as I often have very large lemons (from lovely Natoora – yummy Amalfi lemons!).  So, I juice my lemon, and then add enough sugar to give you a firm enough glaze.  Works perfectly well, and doesn’t seem to overdo the sugar glaze – of course this may be because I’m putting it across two smaller cakes
  • If using slightly smaller cases, do reduce the cooking time accordingly
  • The mixture makes two cakes in the cases I use, and they take around 25 minutes to cook
  • The little presentation cases are available in bulk from Bakery Bits
  • This makes an excellent tray bake too – if using the tray bake size from Lakeland, give the cake about 20-22 minutes…


This recipe is taken from Mary Berry’s Stress-free Kitchen

    May 6, 2013 Heston Blumenthal

    Heston Blumenthal’s Perfect Burger

    Yay, it’s finally BBQ season… It may look like I only cook chocolate delice and frangipane tarts, but hey, my kids like a burger as much as the next person.  Of course that wouldn’t be a generic supermarket burger, and so finally the opportunity to try Heston’s perfect burger recipe.  I’d seen this recipe on his How to Cook Like Heston show, but we didn’t fire our BBQ at all last year, and so the itch grew and grew.

    Why this recipe in particular? Well, to cut to the chase, Heston lines the minced meat in such a way that when you bite into the burger, the burger breaks down in your mouth… Confused?  Trust me – this is one technique that’s worth having in your BBQ arsenal.  I’ve subsequently added additional flavourings to the burger, but the basic principle remains the same. You can watch the technique here.

    To go with the perfect burger, the best burger bun recipe I’ve found to date.  This enriched dough recipe comes courtesy of The Fabulous Baker Brothers, and really is an incredibly simple dough to make.  On the second occasion I used the same recipe to make hot dog bus too, just leave off the egg glaze and shape them into longer batons.  I quick dusting with flour will ensure that you end up with a soft bun.

    The one thing I have learnt after a weekend barbecuing, don’t spend hours making all those sides.  I soon realised that all people were interested in were the burgers, hot dogs and ribs… Soul destroying – my amazing coleslaw with grated apple and a touch of orange zest will end up as tomorrow’s lunch.  Even jacket potatoes were jettisoned by most people as they headed straight for the protein.  And let’s face it – this protein overload won’t matter in the long run – because this weather won’t last…  So – get your BBQ on and get baking…

    For the buns:
    500g strong white flour
    1 tbsp caster sugar
    25g lard [I substituted butter]
    10g salt
    200ml tepid milk
    5g dried yeast
    100ml tepid water
    1 egg, beaten
    Sesame seeds, to sprinkle over

    [Additions: I added an egg to the dough, and used golden caster sugar.  I also used poppy seeds rather than sesame seeds because one guest had an allergy] 

    Method

    • Weigh the flour, sugar, lard and salt into a large bowl and add the milk. Mix the yeast with the tepid water and mix thoroughly into a dough. Turn it out onto a lightly floured surface and knead for 10 minutes until your dough is soft and elastic. Leave to rise for 1 hour in a covered bowl left in a warm place.
    • Divide the dough into 10 pieces and on a lightly floured surface roll into balls with your hands. Then using a rolling pin flatten into 10cm baps on a floured surface. Place on baking trays lined with baking paper and brush beaten egg over each bap. Cover loosely with cling film and leave them in a warm place for 30 minutes
    • Brush with a second coat of beaten egg and sprinkle a pinch of sesame seeds onto each bap. Cover loosely with cling film and leave for a final 30 minutes to rise.
    • Meanwhile preheat your oven to 200°C/fan 180°C/gas mark 6. Bake the baps until they are perfectly golden, about 10-15 minutes

    For the burgers
    1.8kg sirloin, cut into 3x3cm cubes
    13g salt

    For the sauce

    90g tomato ketchup
    145g mayonnaise
    15g French’s mustard

    To serve

    10 sliced burger buns, toasted
    10 slices gruyère cheese
    2 baby gem lettuces, broken into leaves
    2 vine-ripened tomatoes, sliced
    ½ sweet onion, peeled and finely sliced
    2 dill pickles, sliced lengthways

    Method

    • Place 600g of the cubed sirloin in a bowl and sprinkle with the salt. Mix together, cover with clingfilm then place in the fridge for 4 hours. The salt will penetrate the meat during this time and begin to draw out some of the moisture.
    • Using a meat grinder fitted with a 3mm plate, grind the unsalted sirloin then refrigerate this meat until very cold. Combine the cold ground meat with the cold, salted sirloin cubes and mix well.
    • Before you begin the final grinding, place two layers of clingfilm across a chopping board or baking sheet and position it under the mouth of the grinder. Using a coarser, 8mm grinding plate, pass the meat mixture through the grinder. This will retain some larger pieces of the sirloin.
    • As the meat comes out of the grinder, have a second person use their hands to lay out the strands of meat on the clingfilm. Try to keep the grain of the individual strands running lengthwise in the same direction without getting tangled together. To do this, start laying the meat down at the edge of the sheet furthest from the grinder and work towards the closest edge.
    • Wrap the meat up tightly in the clingfilm, twisting the ends tightly to form a log. Prick a few holes in the clingfilm with a pin to release any air pockets trapped inside, then continue to twist the ends to tighten until the log is about 12cm in diameter.
    • Wrap the log in another layer of clingfilm to keep it from coming apart, and refrigerate for at least 2 hours, or until needed.
    • When ready to cook, place the still-wrapped log on a cutting board and use a very sharp knife to cut slices that are approximately 2cm in thickness. (The clingfilm helps to keep the meat from falling apart.) Place the finished burgers on a baking tray and refrigerate until needed. If you have more burgers than you need, they can be individually wrapped in clingfilm at this point and frozen until needed.
    • To cook the burgers, rub each one with a little oil and place them on the barbecue or a really hot frying pan, and flip them every 15–20 seconds. Cook to your liking or for medium rare, take the burger to 45ºC in the centre. Immediately after the last flip, place a slice of cheese on top of each burger and allow to melt for the final 15 seconds.
    • To make the sauce, combine the ketchup, mayonnaise and mustard in a bowl and mix thoroughly.
    • To serve, place the bottom half of a bun on a plate and put a burger with melted cheese on top. Place a couple of slices of tomato and onions followed by a couple of leaves of lettuce and a couple of slices of pickles. Finish with a spoon full of sauce. Place the top half of the bun on top and serve.
    Notes
    • The structure of the burger really does work as you bite into it, but you still have the distinct texture of mince. Not sure how to get around that… I think the method works well because it allows you to get a really good crispy crust on the outside, but it looks a little… unusual…  I think worth a go to see for yourself.
    • The bun will now be my default bun.  I have made these on just one prove – they’ll be okay at a push, but they’re much nicer if given the full treatment.
    • I did make the sauce Heston uses too – delicious, though mine was a little sloppy, as you’ll see from the photographs… Yummy though…
    The buns, before the second prove
    Light, fluffy and soft – great burger buns
    You can see the structure of the burger

    April 21, 2013 Recipe

    Prawns, Pork and Squid Noodle Salad

    Noodle SaladThe sun is coming out, and so it’s time to eat ‘cleaner’ food.  I’m a huge fan of Japanese cuisine, but there’s something very appealing in Asian noodle salads from all over the continent.  This Cambodian salad, from Rick Stein’s Far Eastern Odyssey, really hits my buttons.  Best of all, it can be made in advance – perfect for Sunday evening when you’re trying to recover from the post-Sunday lunch blow-out!

    Ingredients:
    vegetable oil for frying
    100g shallots
    200g glass noodles
    200g large raw peeled prawns
    200g squid, sliced into 5mm-thick rings
    100g minced pork (or meatballs, see the Notes)
    25g dried shrimp
    3 Tbsp fish sauce
    4 Tbsp lime juice
    20g mint leaves
    1 Tbsp palm sugar
    50g peanuts
    1 red bird’s eye chillies
     
    Method:
    • Pour 1cm oil into a large, deep, frying-pan.  Add the shallots and fry over a medium heat until they are crisp and golden brown.  Lift them out with a slotted spoon onto plenty of kitchen paper and leave to drain.  Reserve the frying oil.
    • Bring a large pan of unsalted water to the boil, add the noodles, take the pan off the heat and leave them to soak for 2 minutes.  Drain well, roughly cut the noodles into a manageable length and set aside to drain even further. If there is a lot of excess water in the noodles, place some folded sheets of kitchen paper into the bottom of a bowl and tip the noodles on top.
    • Heat 2 tablespoons of the shallot-flavoured oil in a wok or large deep frying pan, add the prawns, season lightly with salt and stir-fry for 2 minutes or until just cooked.  Lift onto a plate, add another 1-2 tablespoons oil to the pan and add the squid, season lightly with salt and stir-fry for 1-11/2 minutes until nicely caramelised.  Add to the plate with the prawns.  Finally, heat another 1-2 tablespoons il in the pan, add the minced pork and stir-fry for 1-11/2 minutes, breaking it up with a wooden spoon into small pieces as it browns.
    • Put the noodles into a large bowl and add the pork, prawns, squid, peanuts, mint, dried shrimp and chilli, and toss together well.  Mix the lime juice, sugar and fish sauce together, toss through the salad and serve at room temperature.
    Notes:
    • I had to use those fresh rice noodles, but they come with an oily film over them.  I’ve tried washing it off in the past, but the result is not ideal.  I’ve tried soaking them in juice too, but it’s not much better… The easiest solution I’ve found is to toss them for a few minutes in about a tablespoon of sesame oil.  This compliments the overall dish, and adds a further level to the flavour combinations.
    • I didn’t use the squid, didn’t have any :0)
    • I found the pork mince a little… flaccid… I popped it into a hot oven for 5 minutes or so just to really give it a more roasted, and crispy edge – it much improved the texture
    • I did add some halved baby gem leaves too, for a little more texture, clearly that’s not authentic, but does improve the texture overall
    • The next time I made this, I bought mini meatballs instead, and pressed them down in the pan as I was shallow-frying them.  I then popped them into the oven for 15 minutes.  Chopped into quarters, they form a much better crunch than the mince (imho)

    Noodle Salad


    There are lots of other interesting recipes in Rick’s book >

    • « Go to Previous Page
    • Go to page 1
    • Go to page 2
    • Go to page 3
    • Go to page 4
    • Go to page 5
    • Go to page 6
    • Interim pages omitted …
    • Go to page 9
    • Go to Next Page »

    Primary Sidebar

    Categories

    • ▼Recipe
      • Baking
      • Breakfast
      • Cheese
      • Dessert
      • Eggs
      • Fish
      • Heston Blumenthal
      • Italian
      • Jamie Oliver
      • Marcus Wareing
      • Mediterranean
      • Pasta
      • Patisserie
      • Risotto
      • Smoothie
      • Sous Vide
      • Squash
      • Thermomix
      • Vegan
      • Vegetarian
      • Yotam Ottolenghi

    Categories

    • ▼Book Review
      • ⭐️⭐️⭐️⭐️
      • ⭐️⭐️⭐️⭐️⭐️
      • Baking
      • Meat
      • Patisserie
      • Restaurant Cookbook
      • Vegetarian
      • Yotam Ottolenghi

    Categories

    • ▼Restaurant
      • 1 Michelin Star
      • 2 Michelin Stars
      • 3 Michelin Stars
      • British
      • Fish
      • French
      • Italian
      • Japanese
      • Peruvian

    Categories

    • 101 Cookbooks (1)
    • 3 Michelin Stars (1)
    • Advert (1)
    • Alan Murchison (2)
    • Alba Truffle (1)
    • Almond (1)
    • Angela Hartnett (1)
    • Angler (2)
    • Art Journal (2)
    • Artichokes (1)
    • Axis (1)
    • Azelia’s Kitchen (1)
    • Baking (9)
    • Baldwin (1)
    • Bara Brith (1)
    • Basics (1)
    • Beef (1)
    • Beetroot (2)
    • Ben Spalding (2)
    • Blackberry Soufflé (1)
    • Blackening Spice (1)
    • Blood Oranges (4)
    • ►Book Review (75)
      • Baking (10)
      • Meat (1)
      • Patisserie (6)
      • Restaurant Cookbook (3)
      • Vegetarian (3)
      • Yotam Ottolenghi (2)
      • ⭐️⭐️⭐️⭐️ (16)
      • ⭐️⭐️⭐️⭐️⭐️ (8)
    • Bread (3)
    • Breakfast (1)
    • Breakfast Tart (1)
    • brioche (1)
    • Brockhall Farm (1)
    • Bruschetta (1)
    • Bryn Williams (1)
    • Burrata (1)
    • Butter (1)
    • Buttercream (1)
    • Camembert (1)
    • Canapes (1)
    • caraway (2)
    • Casserole (2)
    • Chelsea Buns (1)
    • Chestnuts (1)
    • Chicken (3)
    • Chickpea (1)
    • Chocolate (4)
    • Chocolate Fondant (1)
    • Christmas (1)
    • Ciabatta (1)
    • Cinnamon (1)
    • Citrus (1)
    • Citrus Drizzle Cake (1)
    • Clams (1)
    • Coconut (2)
    • Coconut Milk (1)
    • Confectionary (1)
    • Creme Patisserie (1)
    • Dan Lepard (1)
    • Dessert (1)
    • detox (1)
    • Doughnuts (1)
    • Dried Fruit (1)
    • Drop Scones (1)
    • Ducasse (1)
    • Duck Egg (1)
    • Eggs (3)
    • El Bulli (1)
    • en Cocotte (1)
    • Epi (1)
    • Eric Treuille (1)
    • fennel (2)
    • Fettuccini (1)
    • Fish (1)
    • FrontPage (28)
    • Fruit Tea (1)
    • Glutamate (1)
    • Goat’s Cheese (1)
    • Gỏi Cuốn (1)
    • Granita (1)
    • Herbs (1)
    • Heritage Tomato (1)
    • Hibiscus Flower (1)
    • Hope and Greenwood (1)
    • Ice-Cream (3)
    • Iced Berry Souffle (1)
    • Icing (1)
    • Italian (1)
    • James Martin (1)
    • Jelly (1)
    • Journal (9)
    • Karen Scott (1)
    • King Oyster Mushroom (3)
    • Kummel (1)
    • L’Ortolan (1)
    • Lamb (1)
    • Lavender (1)
    • Laverstoke Park (1)
    • Lemon (3)
    • Lemon Drizzle Cake (1)
    • Lemon Grass (1)
    • Lemon Meringue Tart (1)
    • Lemon Poppy Seed Muffins (1)
    • Lentils (1)
    • Limewood (1)
    • Liquorice (1)
    • Liquorice Ice-Cream (1)
    • Lobster (3)
    • Lucas Hollweg (1)
    • Luke Holder (1)
    • Macarons (1)
    • Mango (1)
    • Marcus Wareing (1)
    • Mark Lloyd (1)
    • Market (1)
    • Mary Berry (1)
    • Meringue (1)
    • Michael Moore (1)
    • Michel Roux (3)
    • Mint (1)
    • Mister Truffle (2)
    • Modernist Cuisine at Home (1)
    • Moroccan (1)
    • Muffins (3)
    • Murano (1)
    • Mushroom (1)
    • Ollie Dabbous (1)
    • Ollie Fararr (1)
    • Ox cheek (1)
    • Palourde Clams (1)
    • Pancetta (1)
    • Panna Cotta (1)
    • Parmesan (1)
    • Passion Fruit (3)
    • Pasta (1)
    • Patisserie (1)
    • Paul Heathcote (1)
    • Pea (1)
    • Peter Reinhart (1)
    • Petit Fours (1)
    • Philip Howard (1)
    • Pierre Koffman (1)
    • Pierre Koffmann (1)
    • Pimms (1)
    • Pistachio (1)
    • Pistachio Soufflé (2)
    • Pistacho (1)
    • Pork (1)
    • Prawn (1)
    • Quiche (1)
    • Rachel Allen’s 30 Day Muffins (1)
    • Raspberry (2)
    • Ravioli (1)
    • Raymond Blanc (1)
    • ▼Recipe (192)
      • Baking (17)
      • Breakfast (2)
      • Cheese (1)
      • Dessert (7)
      • Eggs (3)
      • Fish (2)
      • Heston Blumenthal (5)
      • Italian (3)
      • Jamie Oliver (1)
      • Marcus Wareing (2)
      • Mediterranean (3)
      • Pasta (3)
      • Patisserie (7)
      • Risotto (1)
      • Smoothie (1)
      • Sous Vide (1)
      • Squash (1)
      • Thermomix (19)
      • Vegan (1)
      • Vegetarian (20)
      • Yotam Ottolenghi (2)
    • ►Restaurant (124)
      • 1 Michelin Star (17)
      • 2 Michelin Stars (9)
      • 3 Michelin Stars (3)
      • British (19)
      • Fish (4)
      • French (4)
      • Italian (3)
      • Japanese (1)
      • Peruvian (1)
    • Richard Bertinet (1)
    • Risotto (1)
    • Roganic (1)
    • Rolls (1)
    • Roux (3)
    • salad (2)
    • Salmon (2)
    • Sardinian Cookery (1)
    • Scandiliscious (1)
    • Sea Trout (1)
    • Sherbet Dab (1)
    • Signe Johansen (1)
    • Silvana de Soissons (1)
    • Simon Rogan (1)
    • Snail Caviar (1)
    • Soda Bread (1)
    • Sorbet (1)
    • Soufflé (11)
    • Soup (1)
    • Sous Vide (2)
    • Spice (1)
    • Stew (1)
    • Stuffing (1)
    • Sugar Baby (1)
    • Sugarwork (1)
    • Sumosan (1)
    • Supper (1)
    • Sweetcorn (1)
    • Sweetcorn Fritters (1)
    • Tamarillo’s (1)
    • Texturas Fizzy (1)
    • Thai (2)
    • The Bertinet Kitchen (1)
    • The Square (1)
    • Thermomix (10)
    • Toffe Fudge Muffins (1)
    • Tom Kitchin (1)
    • Tomato Bread (1)
    • Tony Fleming (4)
    • Tribute Dish (2)
    • Truffle (1)
    • Truffles (6)
    • Umami (1)
    • Uncategorized (1)
    • Vanilla (2)
    • Vegan (1)
    • Vegetables (1)
    • Vegetarian (3)
    • Verveine (1)
    • Vietname Summer Roll (1)
    • Watermelon (1)
    • William Curley (1)
    • yeasted dough (1)

    I’m passionate about food, its provenance and its sustainability. As a technical cook, I like to see what’s happening in the kitchens of Michelin starred restaurants, but you’re just as likely to find me at home making sourdough. You can find some of my recipes in In The Mix 2, an award-winning Thermomix cookbook.

    I’m also truly blessed – I can open my fridge at any time and know it’s crammed with all manner of loveliness – but that’s not the case for everyone. There are people all around me in the UK who rely on food banks to feed their kids, and themselves, and every box of cereal or teabag makes a difference. You can donate food to your local food bank, or time, or money, and if you want more information the best starting place is http://www.trusselltrust.org.

    You can also find me here:

    Foodies100 Index of UK Food BlogsFoodies100
    The Renaissance Epicurean... London restaurants
    Top Food BlogsUK Food Bloggers Association

    The Eleven Madison Park Granola

    Copyright © 2025 · Cookd Pro Theme On Genesis Framework · WordPress · Log in

    Nourished
    • Home
    • Recipes
    • Book Reviews
    • Restaurants
    • Journal
    • About