• Skip to primary navigation
  • Skip to main content
  • Skip to primary sidebar

Nourished

  • Home
  • Recipes
  • Book Reviews
  • Restaurants
    • 3 Michelin Stars
    • 2 Michelin Stars
    • 1 Michelin Star
  • Journal
    • Art Journal
    • The Renaissance Diary
  • About
    • Contact Me
    • Instagram
    • Loves
    • Suppliers
    • Masterchef Links

Recipe

November 4, 2012 Modernist Cuisine at Home

Cured Confit of Salmon, cooked sous-vide

3ac5d-img_2299


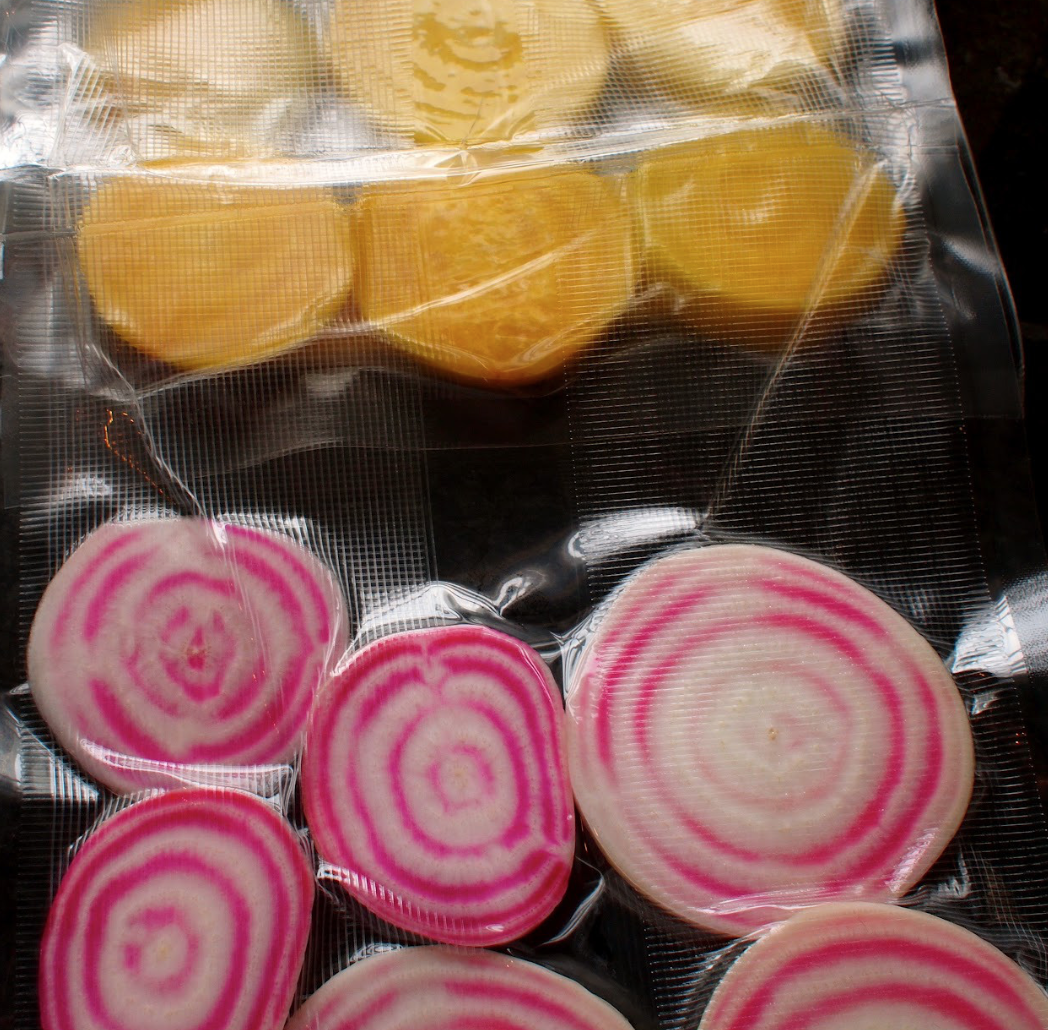
The day has finally arrived, my kitchen finally has a chamber vacuum packer! This immediately means that I can sous vide items which contain marinades, or confit them in olive oil.  My first thought was a piece of salmon, though today I have watermelon compressed with pink salt and basil oil in my fridge, and the Sunday beef sitting in my Grant waterbath!  In a moment I will be sealing the soused raw vegetables I made to accompany the salmon, which will mean they remain fresh until next weekend – what a difference this machine is going to make to my kitchen.  Having said that – it’s flipping enormous!  I was assured this new machine had been specifically designed for the home cook, but given the size and weight of it. I’m going to have to find a permanent home for it in my back kitchen…

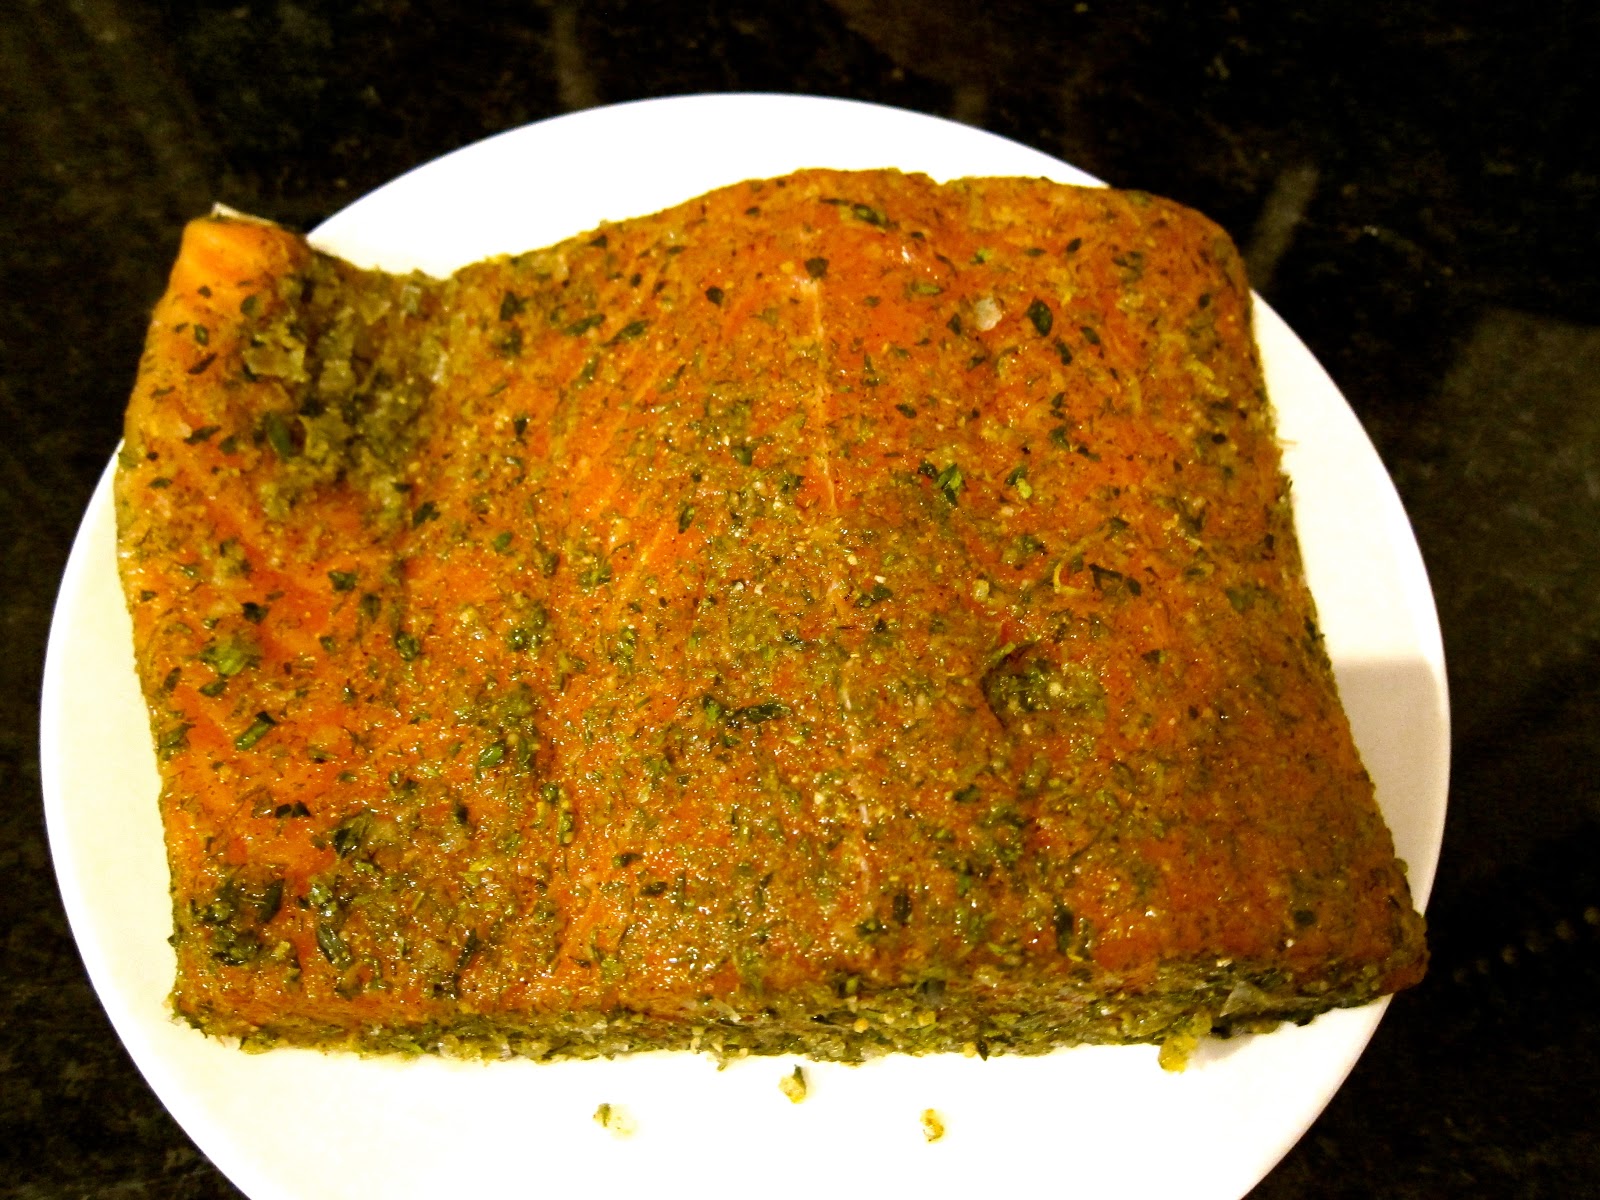
Anyway, back to the salmon – the recipe I chose is based on one that Raymond Blanc did on his show, Kitchen Secrets.  I didn’t use the whole recipe, but I did brine the salmon as per his recipe.  Raymond also suggests cooking it at 42°C, but checking my copy of Modernist Cuisine at Home, it gave me 45°C for rare, 48°C for medium, and 52°C for firm.  Knowing that my 11 year old would baulk at the texture of rare salmon even if cooked, I plumped for the 48°C range.  The cure stops the fish from leaching its albumen during cooking, and ensures a firmer texture to the fish too.  The full recipe can be found here, and includes a rather lovely lemon verbena and apple jelly!

Ingredients:
large pinch fresh lemon verbena, finely chopped
10g sea salt
2 pinches freshly ground white pepper
large pinch caster sugar
1 tsp finely chopped fresh dill
1 x 280g salmon fillet, preferably organic, pin bones removed, skin removed
200ml extra virgin olive oil
1 lemon, zest peeled off in one strip

Preparation method:

  • Mix together the lemon verbena, salt, pepper, sugar and dill in a bowl until well combined. Sprinkle half of the mixture onto a baking tray, then place the salmon fillet on top and press to coat it in the marinade mixture. Press the remaining marinade on top of the salmon. Cover the tray with cling film and chill in the fridge for 30 minutes. [I usually pop mine into one of those sealed food bags – less mess]When the salmon has marinated, remove it from the fridge and wash off the marinade. Pat dry, then cut lengthways in half and widthways in half again, to make four portions.
  • Seal the salmon fillets in a bag and sous vide at 48°C for 25 minutes (though I found this a little tepid for my taste, adjust the cooking time accordingly to taste). [I’ve now cooked it again at 50°C, and much prefer the texture]
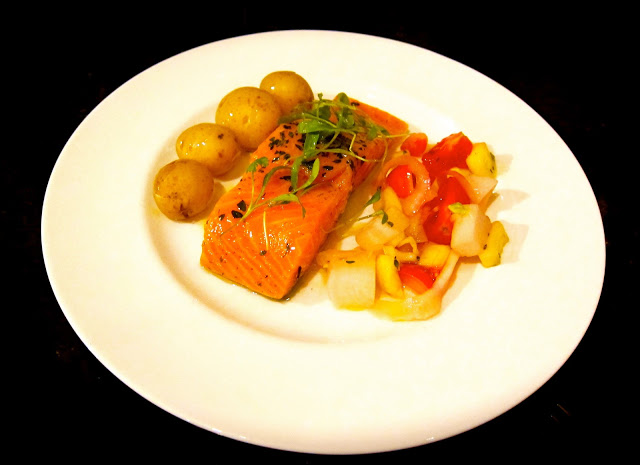
  • I served the salmon with new potatoes and a lightly soused raw vegetable salad, made of radishes, mooli, fennel, roscoff pink onions and cucumber, as a nod to the Scandinavian cure.  (And please ignore the rather incongruous placing of the potatoes :0) You know my lot, they’re always too hungry to wait while I fiddle…)
    The texture is absolutely delicious, silky, luscious, dense – even the 11yo polished it off, and she hates the texture of smoked salmon (though does eat raw salmon, oddly).


You can find more recipes from Raymond Blanc in his books, and I’d recommend the Modernist Cuisine for those interested in sous-vide cooking.  I have the bigger collection too, but this is more accessible…


November 3, 2012 Baking

Basic Measurements

I’ve culled these measurements from sites all over the web, but if you click on the header it will take you to the originating site :0)

Approximate Conversions from Volume to Weight
1 large egg = 1/4 cup (4 tablespoons) = 2 ounces = 55 grams
1 large egg = 1/4 cup egg substitute liquid *
1 large egg white = 2 tablespoons = 1 ounce = 30 grams
2 large egg whites = 2 1/2 to 3 cups stiffly beaten
1 large egg yolk = 1 to 1 1/2 tablespoons = 2/3 ounces = 25 grams
1 large egg yolk = 2 tablespoons egg substitute liquid
1 dozen large eggs = 2 1/3 cups = 660 grams
1 dozen large egg whites = 1 1/2 cups = 360 grams
1 dozen large egg yolks = 7/8 cup = 300 grams
1 cup eggs = 4 to 5 large eggs
1 cup egg yolks = 11 to 12 large egg yolks
1 cup egg whites = 7 to 8 large egg whites
1 kilogram eggs (1,000 grams) = 18 large eggs
1 kilogram egg whites (1,000 grams) = 33 large egg whites
1 kilogram egg yolks (1,000 grams) = 40 large egg yolks

Sugar Temperatures:

Stage
Type
Celsius
Fahrenheit
Thread
Syrup
110°C to 112°C
230°F to 234°F
Soft ball
Fudge
112°C to 116°C
234°F to 240°F
Firm ball
Caramel
118°C to 120°C
242°F to 248°F
Hard ball
Nougat
121°C to 130°C
250°F to 268°F
Soft crack
Butterscotch
132°C to 143°C
270°F to 290°F
Hard crack
Toffee
146°C to 154°C
300°F to 310°F

From Recipes4Living:

Liquid Measure
1/5 tsp 1 ml
1/4 tsp 1 dash 3 drops
1 tsp 5 ml
1 tbsp 3 tsp 1/16 cup 1/2 fl oz 15 ml
2 tbsp 6 tsp 1/8 cup 1 oz 30 ml
4 tbsp 12 tsp 1/4 cup 2 fl oz
5 1/3 tbsp 1/3 cup
8 tbsp 24 tsp 1/4 pt 1/2 cup 4 fl oz 118 ml
16 tbsp 48 tsp 1/2 pt 1 cup 8 fl oz 237 ml
32 tbsp 1 pt 2 cups 16 fl oz 473 ml
64 tbsp 1 qt 2 pts 4 cups 32 fl oz 946 ml (.95 liters)
1 gal 4 qts 8 pts 16 cups 128 fl oz 3.8 liters
Dry Measure
1/8 tsp 1 pinch
1 tbsp 3 tsp 1/16 cup 1/2 fl oz 14 grams
2 tbsp 6 tsp 1/8 cup 1 fl oz 28 grams
4 tbsp 12 tsp 1/4 cup 2 fl oz 57 grams
8 tbsp 24 tsp 1/2 cup 4 oz 113 grams 1 stick butter
16 tbsp 48 tsp 1 cup 8 oz 227 grams 1/2 lb
32 tbsp 1 pt 2 cups 16 oz 454 grams 1 lb
1 qt 2 pts 4 cups 32 oz 907 grams 2 lbs
2 gal 8 qts 16 pts 1 peck
8 gal 4 pecks 1 bushel
Making Conversions
ounces to grams: multiply ounce figure by 28.3 to get number of grams
grams to ounces: multiply gram figure by .0353 to get number of ounces
pounds to grams: multiply pound figure by 453.59 to get number of grams
pounds to kilograms: multiply pounds by 0.45 to get number of kilograms
ounces to milliliters: multiply ounce figure by 30 to get number of milliliters
cups to liters: multiply cup figure by 0.24 to get number of liters
Some Common Weights Egg Substitute
1 cup sifted flour 5 oz 1 large egg 2 oz = 1/4 cup = 4 tbsp
1 cup sugar 8 oz 1 egg yolk 1 tbsp + 1 tsp
1 cup brown sugar 6 oz 1 egg white 2 tbsp +2 tsp
1 cup confectioner’s (powdered) sugar 4.5 oz
Temperature
Converting Fahrenheit to Celsius: subtract 32 from the Fahrenheit amount, multiply by 5 then divide by 9 Converting Celsius to Fahrenheit: multiply the Celsius amount by 9, divide by 5, then add 32
Fahrenheit Celsius Fahrenheit Celsius
-10 -23 (freezer temp) 275 135
0 18 300 149
32 0 (water freezes) 325 162
50 10 350 177
68 20 (room temp) 375 190
100 38 400 204
150 66 425 218
205 96 (water simmers) 450 232
212 100 (water boils) 475 246
225 110 500 260 (broiling)
250 120

Fresh Yeast Conversion

fresh bakers yeast
Fresh yeast, also called baker’s yeast, cake yeast or compressed yeast is my preferred type of yeast when making bread.  It should be kept in the fridge and lasts up to 4 weeks.  Fresh yeast has no artificial additives.  Although not widely available in Australian shops, it is possible to find it in some delis and bakeries.

To buy fresh yeast look for a nice creamy colour without any dark or dried out spots.  It should smell pleasantly and crumble easily.  Greyish yeast that is stretchy and gummy is past the required freshness and might produce unsatisfactory loaf.  If in doubt, mix a small amount of yeast in some warm water with a tablespoon of flour.  If it rises, it means it’s still active.

Dry yeast on the other hand can be kept for up to 2 years.   This is especially handy if you don’t bake with yeast very often.  However, dry yeast usually contains additive sorbitan monostearate (E491).

COMMON YEAST PACKAGING

In recipes requiring yeast, different yeast types and amounts can be stated.  That can be very confusing.  Also, depending on the origin of the recipe the amount can be stated as a cube or a cake of yeast.  Here are the most common yeast packaging sizes:
    • Dry yeast in small packs has most universal weight.  One packet, one sachet or one envelope weighs7 grams (0.25 oz or 2 teaspoons).   1 teaspoon (5 ml) of dry yeast equals 3.5 grams
 
  • Fresh yeast packaging differs significantly.  In Australia it’s commonly produced in 1 kg blocks and then cut up into prepackaged small chunks or sold at the counter according to the customer’s requirements.  US cake of fresh yeast is packed in 0.6 oz or 17 grams.  If a recipe of Europeanorigin asks for a cube of fresh yeast, the required weight is 42 grams or 1.5 oz or 2.5 US cake portions.

FRESH YEAST TO DRY YEAST CONVERSION AND VICE VERSA

The packaging types, sizes and measuring systems aren’t the only thing needing conversions.  If you only have dry yeast and the recipe calls for fresh yeast, what do you do?  Fresh yeast to dry yeast conversion and other way round is an easier one.  Very often I read in different recipes suggestion to half  or double the amount to change the type of yeast.  That would result in too much of dry yeast of too little of fresh and longer proving time.
The rule of thumb is dividing or multiplying by 3:
  • from fresh yeast to dry – divide amount by 3, eg. instead of 30 grams of fresh yeast use 10 grams of dry
  • from dry yeast to fresh – multiply by 3, meaning 7 grams or dry yeast becomes 21 grams of fresh.
Another easy way to remember yeast conversion is:
10g of fresh yeast = 1 teaspoon of dry yeast
10 : 3 = 3.33 g
As you can see above, this is close to 3.5 g – the average weight of one level teaspoon of dry yeast.  Teaspoon volume varies depending on the manufacturer and the shape.  However, a few grams more or less of yeast won’t make a huge difference in your recipe.
Note:
The amount of dry yeast in recipes and on the packaging instruction is often exaggerated.  As a result the dough rises too quickly and has a yeasty taste.  Reduce the amount of yeast and allow the dough a bit of extra time if necessary.
Happy baking!

September 13, 2012 Baking

Swiss Meringue Buttercream Icing [Thermomix]

I’ve been making a lot of macarons lately, and when I’m completely happy with the process, I’ll put a post up.  But in the meantime I’ve come to realise that whilst a perfect macaron shell is lovely, actually what the majority of people remember are the fillings.  Macarons are vehicles for flavour, and I guarantee most people won’t know if your ‘feet’ have separated, or your shells are hollow.  What they will remember is the texture! 


So far I’ve played with freshly made jam (meh), buttercream (meh – too buttery), Italian meringue buttercream (still a bit buttery) and agar gels (lots of potential here).

But then I stumbled across a recipe by Karen Scott on the Australian thermomix forum for Italian meringue buttercream, and I had to give it a go.  The idea that you can get on with making your macaron whilst the Thermo is making the filling is just too tempting!

I followed the recipe exactly as it stated, and oh my word!  I’m really not a buttercream icing kind of girl, it’s always a bit to rich in my experience – but this is absolutely exceptional.  Perhaps I should elaborate?  It’s still incredibly buttery and creamy, but the quality of the meringue lifts it beyond anything I’ve seen made at home before.  I’m not a massive cake eater, but when I’ve had them forced on me the overwhelming taste of the icing is either icing sugar, or butter (or worse still, both).  In this there is an instant melt-in-the-mouth affect, with no one thing dominating – this allows the actual flavour to completely sing!  I made passionfruit puree, then salted caramel – they taste nothing like each other – each tastes of its own component.  This makes a large batch of this the perfect vehicle for flavouring several batches of macarons or cupcakes.

The meringue produced by the Thermo was way beyond my expectations, and I’m seriously considering using it to make macaron…  In the meantime, I will never make buttercream any other way!  Clearly you need a Thermomix to make the magic happen, but if you do have one – you just have to try this!

Ingredients
Swiss Meringue Buttercream
100 g egg whites
200 g Sugar (white or raw)
300 g unsalted butter cubed

Preparation

  • Place egg whites and sugar into the TM Bowl. Mix for 5 minutes at 70c Speed 2.
  • Check that all the sugar has dissolved by rubbing a bit between your fingertips. You should not be able to feel any sugar crystals. if you can, beat for 2-3 more minutes and check again.
  • Place the butterfly into the bowl and mix for 10 minutes at speed 4. At this stage the mixture should be smooth and glossy and form stiff peaks.
  • If the mix has not yet cooled to room temperature, keep beating until the bowl is no longer warm to touch. This could take another 10-20 minutes. If you are short on time, transfer the mix to a stainless steel or glass bowl and sit in a basin of cold water. Once the bowl is cool to touch, tranfer the mix back to your TM bowl and continue.
  • Mix for 3-4 minutes at speed 4, slowly adding the butter bit by bit through the lid. Don’t worry if it looks a little curdly along the way, it should all come back together.
  • At this stage you can add colour or flavour of your choice. Suggestions are; vanilla extract (1 tsp), chocolate (100g melted and cooled), orange oil, lemon oil etc. I split my bacth in half and added chocolate to one half.
  • Pipe or spread onto your cake or cupcakes and enjoy.  You can put it in the fridge if you are not going to use it straight away but bring it back to room temperature and whip it again before using.
  • You can increase the quantities to whatever you need, just keep the egg whites, sugar and butter in the ratio of 1:2:3. An 8 inch cake will take about 150g egg whites depending on the type of piping you use.

This is the first stage of the meringue, you can see the dense meringue consistency

Following the addition of the butter, the meringue icing is a much richer colour and density

I’ve now made several batches of this and it really is the best icing.  One thing I have noticed is that if you keep beating the meringue until it’s completely cold, it does seem to re-liquify slightly.  I’d be tempted to remove the jug and the lid to speed up the cooling process, but without over-whipping.  I’ve also now made this with equal quantities of the buttercream and melted chocolate, and it’s ridiculously good.  The kids have been flavouring it with all kinds of flavourings – great fun!

September 9, 2012 Patisserie

Agar gels… A possible filling for macaron?

We’ve all seen them dotted around the plates of certain chefs, but when Nigel Haworth had an agar gel on the BBC’s Saturday Kitchen, it suddenly seemed very mainstream.  Had to make one didn’t I? I have lots of recipes for agar gel, but I thought I’d make this one, using blackberries instead of blackcurrants.

Actually, it was surprisingly easy to make, and immediately it stuck me that it would actually make a very good vehicle for flavouring macaron – the gel is firm enough to stand proud, but still tastes very much of its key ingredient – ideal for macaron then!  I will be experimenting with a number of them to see how they compare to the more ‘jammy’ fillings, and I think I’m going to give Kuzu a go for exactly the same reasons.

When using a ‘molecular’ component, it is incredibly important to get the weight of ingredients absolutely accurate.  It’s 6g of agar agar, this must be exact.  I use this kind of scale for measuring ingredients like this – it measures in 0.01g increments – some scales work in 2g increments – check your scale before measuring it out!

I should point out, by the way, these photos are on a saucer not a dinner plate!

Ingredients

400g/14oz blackcurrants
115g/4oz caster sugar
2 tsp lime juice
200ml/7fl oz water
6g agar agar
Method
  • Add the blackcurrants, sugar, lime juice and water to a medium sized pan and bring to the boil.
  • Boil for two minutes and then pass through a fine sieve.
  • Place the blackcurrant liquid back into the pan, bring to the boil, whisk in the agar agar and return to the boil.
  • Once boiled, pass through a sieve again and place into a tray and put in the fridge until the liquid has set to a gel.
  • Once the gel has set, place into a blender and blend until smooth.
  • Pour into a squeezy bottle and reserve.
PS. I have now tried using the agar gel in a macaron, and it’s perfect for those that you want to serve pretty much immediately or in the next 6-12 hours.  At least is saves the overnight proving of your macaron, but left any longer than that and it completely soaks into the shells and makes them soggy.  Clearly one option would be to up the agar quantity to create a jelly, which is something I will try next. Still useful if you need macarons for immediate consumption though.  One tester likened the effect to being the ‘best jaffa cake’ she’d ever had, if that in anyway helps… :0)

You can see that the gel is still easy enough to spread, despite holding its shape

September 3, 2012 Fish

Halibut, with Salsa Verde and a Citrus Dressing…

I have finally found a decent fish supplier – hurrah! Despite the fact that I live less than three miles from a harbour, it’s almost impossible to buy fish locally.  I think most of it seems to disappears straight out of the town. I was bemoaning this fact to Matthew at the michelin starred Montagu Arms, and he introduced me to their suppliers – Premier Fish… A quick look on their web site sent me into small ecstasies – there’s brill, turbot, halibut, lobster, prawns, clams, anything you can think of – fabulous.  It seemed like the perfect opportunity to do something “big”, so, meet my chum, the 3kg halibut, dubbed Herbert by the 11 year old.

Halibut is a pretty high end fish – it’s delicate yet meaty, a stunning white colour, with an open texture.  It can handle pretty robust flavours, and when I spotted a recipe by Tom Kitchin which included salsa verde a citrus dressing, and olives, I knew I had to make it.  I’m a huge fan of Tom’s.  He’s worked with and for Pierre Koffmann, and a number of other excellent chefs.  As a punter, it’s always fabulous when you find a chef who’s palate matches your own personal preferences, and Tom inspires me utterly.  Some flavours are understated, others are incredibly bold – but always the produce is allowed to shine through to show respect to the ingredients… That’s my kind of chef!

The joy of a restaurant recipe is that you tend to find the chef has broken the dish down into stages, many of which can be completed in advance.  In this case the salsa verde, citrus dressing and vegetables can all be prepped earlier in the day.  The fish itself requires no more than 6 minutes cooking in total, so it’s perfectly viable to do that bit of the dish at the last moment.

Now of course it isn’t necessary for you to buy a whole halibut, heaven forbid!  I bought one because I really wanted to fillet it :0) Filleting a big fish is hilarious – it’s practically wrestling – but if you’re interested in having a go, there are several excellent videos on YouTube – just make sure you choose the right fish.  Oh, and another fishy point, farmed halibut will have a mottled underbelly, where wild will have a white belly…

HalibutSalsaVerde
Ingredients
Salsa Verde
2 tablespoons chopped basil
3 tablespoons chopped parsley
1 tablespoon mint
3 tablespoons capers
4 anchovy fillets
1 garlic clove, peeled and chopped
1 tablespoon Dijon mustard
150ml olive oil
4 tablespoons sherry vinegar
1 lemon, zest and juice
(You might need a tiny bit of sugar to balance the acidity)

Citrus Dressing
4 lemons, segments and zest
8 cherry tomatoes, halved
1 teaspoon sugar
2 tablespoons olive oil

Vegetables
6-8 new potatoes (I used fir, didn’t have any new to hand)
vegetable oil
100g fresh samphire (didn’t have any)
12 olives, pitted and chopped (we both used black)
300g baby spinach
2 tablespoons chopped chivesFish
2 x 200g halibut fillets

To Serve
chervil and dill
micro leaves if you have them
diced croutons made with 2 slices of white bread

Method (in advance)

  • To prepare the salsa verde, blend everything together until smooth, then set aside in the fridge
  • For the dressing, toss everything together and set aside
  • Cut the bread into small dice, and fry in oilive oil until golden
  • Boil the potatoes until cooked, and cut into slicesWhen ready to serveFry the potato slices in vegetable oil until crisp and golden brown
  • Add the samphire, and chopped olives, then the baby spinach, shallots and chives
  • Pat the halibut fillets dry, and sason well with salt.
  • Heat two tablespoons of vegetable oil over a medium head, and add the fish.
  • Cook until they are golden on both sides, turning once.
  • This will take around three minutes per side.  Allow the fish to rest for 3 or 4 minutes

To plate

  • Put a pool of salsa verde onto each plate
  • Top with the vegetable mix, then the halibut
  • Spoon the dressing over the halibut, and add some croutons
  • Garnish with the herbs (and micro-leaves, if you have them)

The salsa verde and citrus dressing don’t clash – there are so many other big flavours that they work together well.  The last time I had something similar, it was actually a rabbit dish, cooked by an Observer food editor twenty years ago, and had the same earthy and bright notes…  I know they sound completely different, but they strike the same note within my palate.  Hubby and the 11yo had cleared their plates before I’d even finished photographing mine – and wanted to know when I could make it again!  Another victory for the lovely Mr Kitchin.


 You can find this recipe in Tom’s first book, and don’t forget his second is due out imminently! >


September 2, 2012 Clams

Thai Steamed Palourde Clams…

Seriously, I’m not sure that there could be a faster or more delicious supper, or perhaps starter.  The entire thing takes no more than ten minutes to make!  As long as you have good palourdes (or mussels, razor clams, etc), you’re good to go!  In fact this is so easy, I’m getting the 11yo to cook it.

Ingredients
1kg palourde clams (aka Venus or smooth clam)
2 red chillis, seeded and chopped
1 clove garlic, crushed
1 lemon grass stalk, sliced (or you can crush it, and remove before serving)
1 tsp grated fresh root ginger
200ml (7fl oz) coconut milk
handful of chopped coriander

When checking shellfish like clams, there are only a few basic rules:

  • Rinse the clams, checking for any with broken shells – throw away any who’s shells are damaged
  • If the shells are not firmly closed, and do not close when you rap them hard – throw them away
  • Do not store them in fresh water
  • When you’ve cooked them, throw away any which have not opened during cooking!  

So, very simple, must close when raw, must be open when cooked…

Method

  • Put everything apart from the clams into a tall pot
  • Bring to the boil, and simmer for one minute
  • Add the cleaned clams, and put a lid on the pan.  Cook for 4-5 minutes
  • Lift the clams out and divide between your plates
  • Bring the sauce back to the boil and simmer for a further minute
  • Spoon the sauce over the clams
Delicious – and something the 11yo can cook for her friends – a one pot dish to impress anyone…  We never made it out of the kitchen – she grabbed her bowl, eating them with an empty shell, while I was still fetching cutlery :0)

August 27, 2012 Beetroot

Sous-Vide Beetroots, with Herb Crusted Lamb and Lettuce Sauce…

Beetroot, with herb crusted
lamb, lettuce sauce and jus

Ever since I first saw candy beetroot (the one’s with the pink rings) and golden beetroot, I’ve been obsessed with showcasing their beautiful colours.  Needless to say, as soon as you try to cook them, they tend to lose their colour, or their colour bleeds into everything else – saving that colour has become a bit of a holy grail for me.  Usually I’ve resorted to serving them raw, which isn’t exactly a hardship.  However, on The Great British Menu, the lovely Simon Rogan sliced his very finely, and cooked them sous vide in a water bath… That’s been in the back of my mind ever since.

Eleven Maddison Park’s Beetroot Salad

On a recent trip to Eleven Madison Park they were served very simply, with fennel pollen – and the colour and the integrity of the beetroot was preserved perfectly – I assume they too cook them sous vide…

Whilst I’m perfectly comfortable with cooking them in a water bath, it’s actually the sous vide bit that’s been bothering me lately.  I have a pretty average desktop vacuum packer, and it’s really beginning to limit what I can achieve with my Grant water bath – liquids are really problematic with such a basic machine.  I’ve been coveting a chamber vacuum machine, but they’re certainly not the cheapest, and I wouldn’t exactly be using it every day.

When I managed to finally harvest some beetroot from my poor water-logged garden, I really wanted to give the sous vide method a go.  I peeled the beetroot lightly,  sliced them, and vacuum packed them with some very cold butter (which again I reasoned wouldn’t seep out of the pack, and cause me problems with my machine).

A quick search on-line gave me an average range of 80-83°C, for a minimum of 1½ hours, and as with most sous vide ingredients, longer cooking wouldn’t necessarily be a problem…  I plumped for 82°C.

I thought I’d serve them with a herb crusted loin of lamb, bringing some earthiness to the sweet grassy lamb, and with a lettuce sauce…

Lettuce Sauce (from Tom Kitchin’s book)
4 baby gem lettuce roughly chopped
1 onion thinly sliced
1 teaspoon of vegetable oil
pinch of salt
250 ml chicken stock
250 ml whipping cream (had no cream left – used creme fraiche – little tart but just as delicious)

Bring a large saucepan of water to the boil, add salt and quickly blanch the baby gem in the boiling water for 30 seconds.  Carefully remove and immediately shock in a bowl of iced water for two minutes.  Squeeze out any excess moisture and set aside in the fridge.

In the meantime, slowly sweat the onion in a heavy bottomed pot with vegetable oil and a pinch of salt. Once the onions are soft (with no colour) add the chicken stock and cream.  Reduce by almost two-fiths and transfer to a blender.  Add the chilled lettuce and blitz for 5 minutes or until smooth.  Set aside.

For the herb crust (there are several examples on the BBC web site)
200g fresh white bread (actually, I used about 100g of panko breadcrumbs)
2 tbsps chopped flatleaf parsley
1 tsp chopped thyme
1 tsp chopped rosemary
1 fat garlic clove, peeled and finely chopped
4 tbsp vegetable oil
100g/4oz unsalted butter
sea salt and freshly ground black pepper
2 tbsp Dijon mustard
2 lamb loins

Method
To prepare the herb crust, break the bread into large pieces and place in a food processor or blender and turn into fine crumbs.  Add the herbs and garlic and blitz for a further 30 seconds.

Heat some butter and oil in pan until foaming, but not coloured. Season the loins, and sear in the pan.  Remove and brush with mustard (in my case – a basil infused dijon), roll the in the herb breadcrumbs, and cook in the oven for a further seven minutes at 200°C.  Remove from the pan and leave to rest for 5 minutes.

You can see that the candy beetroot still lost some of its distinctive rings, but the flavour was very good.  The golden retained its colour evenly!  I plated it with lardons, broad beans and peas scattered over the beetroot, the lettuce sauce under the lamb, and the jus drizzled over the dish.  Yummy!

You can find more of Tom’s amazing recipes here:


August 26, 2012 Baking

The Scandilicious Chelsea Bun…

I’ve been following Signe on twitter for ages now, and there’s always something very familiar about her flavour combinations and recipes…  That’s not to say that I’ve found them available widely, on the contrary, but having grown up in Germany there’s something about the Scandinavian palate that resonates strongly with my childhood.  We spent a lot of time living around Bremen, and Hamburg, right at the top of Germany and not far from Scandinavia proper.  And since Signe released her new Baking book, I’ve been dying to delve into it to try something.

Originally I’d said that I’d cook a pavlova, and I will at some point, but it’s the spiced things that have been drawing me in…  In a quick poll on twitter at 7am this morning, the consensus (of two) was that I should go for the Chelsea buns first.  I must admit the cardamom twists are still calling to me, like a baking siren…

So, Chelsea buns first…  Of course I made a few variations, not to the spicing, but to the fruitiness – just because of my kids, but Signe did give us the option to play with the tea etc.

Dough
340ml whole milk
75g butter
550g refined spelt or plain flour (I used 50/50)
60g of golden caster sugar
1.5 tsp cinnamon

0.5 tsp mixed spice
1.5 tsp fine sea salt
20g fresh yeast or 10g of fast action dried yeast
2 medium eggs, beaten

Filling
80g currants (actually, I used craisins)
80g sultanas (I used orange river)
1 large mug (at least 250ml) strong Lady Grey Tea (I used mandarin and cranberry)
150g buter
100g light brown muscovado sugar
1 tsp vanilla salt
1.5 tsp cinnamon
0.5 tsp mixed spice
demerara sugar or natural sugar crystals for sprinkling (optional) (I used cinnamon sugar)

Glaze
1 jar marmalade (284g)
40g butter
zest of 1 lemon (and lemon juice, optional)


Method (cheekily lifted from Signe’s website, though the photo’s are my own))
“In a saucepan scald the milk and allow the butter to melt in the hot milk. Set aside to cool to below 50 C otherwise the heat will kill off your yeast.

In a large bowl sieve flour, sugar, dried yeast (if using fresh yeast add a spoonful of sugar to it in a small bowl before adding to the mixture just to check it’s alive), spices, salt and stir thoroughly to distribute all the ingredients.


Once the milk has cooled to below 50 C, add the beaten eggs (and fresh yeast if using), milk and stir for 5 minutes using a large metal spoon. You can knead it for 5 minutes on the table but it’s not absolutely essential with spelt flour I find, and sometimes a good thrashing with a large spoon does the trick, a good way to release any tension! 

Cover the dough and set aside to rise for an hour or so. It should double in size. You can also just leave it in the fridge overnight to bubble and ferment for a slower maturation and slightly more complex flavour. Soak the currants and sultanas in tea (or whisky!) and cover for 1 hour or so or leave overnight. 

Once the dough has doubled in size knock back by kneading for 1 minute or so. Using a rolling pin roll the dough out to 40 cm x 20cm for bunlets rather than big buns. They still end up being about 5cm in diameter so you’re not depriving anyone by making them this size, plus there’s a better yield from all this work!

Drain the fruit of excess liquid. In a separate bowl mix the filling ingredients, minus the soaked fruit. Spread in an even layer across the rectangular dough and then scatter the soaked fruit in another even layer over the filling. Now using a dough scraper or a palette knife gently roll the dough up like a swiss roll and make sure the seal is on the bottom before you start slicing the dough into buns.


Line one very large rectangular tin or two smaller 30 cm x 20cm tins with baking parchment. Using a sharp knife slice the buns into 1 inch discs. Place each bun into the baking tin, allowing a bit of space between each one (they will squish together while proving), once filled, cover the baking tin with cling film and set aside to prove for 30 mins or so until the buns have puffed and doubled in size. Touch one on its lower side, when you remove your finger it should leave an imprint on the dough. Preheat the oven to 220 C 10 minutes before the end of proving.  
When the buns are proved, sprinkle with demerara sugar or sugar crystals and bake on the upper middle shelf of the oven.  Turn the heat down from 220 C to 190 C after 5 minutes of baking so they don’t scorch. Bake a further 20 or so minutes until the buns look golden brown and sound hollow when you tap them.


Remove from the oven and set aside while you warm the marmalade, butter and a splash of water in a small saucepan. If you want a tangier glaze add the juice of a lemon to the mixture. Using a pastry brush generously glaze the buns with your marmalade mixture and then use a microplane zester to add lemon zest on top. You can of course use orange zest or omit the zest altogether but I like the extra citrus note, lifts the buns to something more than the sum of their parts…”

So, amazing, sticky, tart, sweet and spicy – love them – really tangy with the marmalade!  I popped mine back into the oven as it cooled, to allow the glaze to seep into the buns…

You can find this and lots of other yummy recipes in Signe’s book >

July 8, 2012 Heston Blumenthal

Heston Blumenthal’s Meat Fruit

I recently had dinner at Dinner, by Heston Blumenthal. For various reasons the Hubby and I weren’t actually going to order “Meat Fruit”, but the kitchen sent us one, and we were completely blown away by the texture of the parfait, and the contrasting acidity of the jelly.  The dish is light, but rich, moreish, very slightly palate cleansing – and yes – I accept that those are complete contradictions.  It’s the mandarin jelly – it really does release something in the palate that allows the very rich parfait to not become overly cloying.

When I wrote my restaurant review I searched for the recipe, intrigued about how it was made – everyone knows I’m a complete sucker for a culinary challenge :0)

Not only did I found the actual recipe given to the Guardian by Heston, but I also found a tiny bit of video clip which showed it being dipped, a video blog by a Thermomix blogger, and a variation by the Cumbrian Foodie on his blog.  I suggest you look at them all. If you’re serious about making this at home, it’s worth making the parfait a week or so before you need it, and perhaps doubling the quantify to allow you time to play with the jelly dipping.  All of the procedures up to the jelly are incredibly easy – do give it a go – it’s much easier than it might seem.

Key stages and timings:

  • Put the marinade ingredients together, leave for 24 hours
  • Make the chicken liver parfait, leave for 24 hours
  • Put the parfait into the moulds, and freeze until solid (6 hours maybe?)
  • Assemble the two halves of the parfait ‘sphere’, and refreeze (1 hour maybe?)
  • Dip the spheres into the mandarin jelly, then leave to defrost in the fridge for 6+ hours
There are some additional photos of the key stages at the end of this post
For the chicken liver parfait:
100g shallots, finely sliced
3g minced garlic
15g sprigs of thyme, tied with string
150g dry Madeira
150g ruby port
75g white port
50g brandy
18g table salt
400g chicken livers (trimmed weight)
240g eggs
300g unsalted butter, melted

  1. Place the shallots, garlic and thyme in a saucepan with the Madeira, ruby port, white port and brandy. Set aside to marinate for 24 hours.
  2. Heat the marinated mixture until nearly all the liquid has evaporated, stirring regularly to prevent the shallots and garlic from burning. Remove from the heat and discard the thyme.
  3. Preheat the oven to 100C/gas mark ¼. Fill a bain-marie with 5cm water and place in the oven.
  4. Preheat a water bath to 50C.
  5. Sprinkle the table salt over the livers and put them in a sous-vide bag. Put the eggs and the alcohol reduction in a second sous-vide bag, and the butter in a third. Seal all the bags under full pressure, then place in the water bath for 20 minutes. Remove the bags from the water bath.
  6. Combine the eggs, alcohol reduction and meat in a Thermomix and blend until smooth at 50C. Slowly blitz in the butter and blend until smooth. Pass the mix through a fine sieve using the back of a small ladle.
  7. Pour into a terrine dish and place in a bain-marie and cover the bain-marie with aluminium foil. Cook the parfait until the temperature in the centre reaches 64C.
  8. Remove from the oven and allow to cool. Refrigerate for 24 hours before serving.

For the mandarin jelly: 

45g leaf gelatine
500g mandarin purée (I used half a pack of Boiron’s mandarin purée)
80g glucose
0.4g mandarin oil
1.5g paprika extract (the paprika is to colour the gel – instead I used a specialist cake decorating gel, in egg yolk yellow)

  1. Place the gelatine in cold water to soften.
  2. Gently heat the mandarin purée and glucose in a pan to combine.
  3. Add the softened gelatine and stir well until dissolved.
  4. Remove from the heat and add the mandarin oil and paprika extract and stir well.
  5. Pass the mix through a fine sieve and reserve in the fridge until required.

To make the fruits:

  1. Using a spoon, fill dome moulds with parfait, ensuring there is enough pressure to create a completely smooth surface. Level off the tops so that they are flat, and cover with cling-film. Gently press the clingfilm directly onto the surface of the parfait. Place in the freezer until completely frozen. (if you put half the moulds onto a flat tray, you can achieve a slightly inverted dip on top of the fruit – see my photograph below)
  2. Gently de-mould the parfait domes. Place on a board with the flat sides facing upwards. Very briefly run the flame of a blow torch over the flat side, being careful only to just melt the surface of the parfait. Join two halves together and compress using a square of cling-film. Wrap well in cling-film and place back in the freezer until required.
  3. Gently push a wooden cocktail stick into the middle of the rounded surface and re-wrap until all the parfaits are complete.
  4. Gently melt the mandarin jelly in a saucepan and allow to cool to room temperature. Remove the cling-film and dip each ball of parfait into the jelly and stand the sticks, covered in cling-film, into a piece of Oasis (the green material you get in florist shops to help the flowers stand up). Place in the fridge for a minute, then repeat the dipping process.
  5. Dip three times, then gently remove the cocktail stick and place the balls onto a tray covered in cling-film. Place a lid over the tray and leave in the fridge to defrost for at least six hours.
  6. Once defrosted, gently push the top of the ball using your thumb to create the shape of a mandarin. Place a stalk and leaf in the top centre of the indent to complete the fruit.

Not this is the point where I show you a perfect meat fruit, the one I prepared earlier… But I don’t want to do that just yet :0) Instead here are the things I’ve learnt, which you might like to consider, with photo’s to illustrate the points.  After all what’s the point of blogging if we don’t share our experiences?

So, example 1.  If the parfait ball is too smooth to start off with, the resulting mandarin looks somehow quite fake. I took to roughing up the parfait slightly in the cling-film with my hands before dipping it. Also in this example, the jelly was definitely too warm – I thought it was room temperature, it wasn’t. At this point I decided to take one parfait and dip it every ten minutes. As a result this parfait sat on the side for over half an hour, and you can see that effectively defrosting it at room temperature causes the shape to slump.  There’s still not quite enough colour in the gel to cover all the flaws (you can’t see it as well here, because I re-dipped it), but I had to boost the colour to a practically fluorescent orange colour – you’re not looking for natural – you really are looking for an unnatural intensity.  You can see all of the above in the photograph.

“Too Smooth” Meat Fruit

In this next example the jelly was far too cool, and it set around the parfait instantly in a slightly monstrous and lumpy version of the skin! Amusing though – we thought this one was great fun.  It may look as though you can get away with this, but bear in mind it will have a very thick jelly coating!

“Monster” Meat Fruit

In the next example we whisked the jelly until it was smooth again and a fraction warmer, and then repeated… This was among the better examples.

Meat Fruit

I didn’t make many, but I think you can see that it’s the dipping that requires the work – everything else was easy. I have seen other examples where people just went with the smooth jelly, and if this is your preference, stick to it all the way through to ensure consistency.

The one good thing is that you can keep the parfait balls in the freezer until your ready – I think in future I’ll make everything up to that point at least a week in advance (and make more than I need), and then just keep them in the freezer until they’re required. Pate can be stored for up to a month in the freezer, so you could keep a batch on the go, as long as you date them appropriately.

Does it taste like the real thing? Well, it’s chicken liver and doesn’t have the fois gras included in the restaurant version, but I think it’s a pretty accurate recipe.

As a quick aside, I do have a water bath, sous vide equipment and thermomix, so I followed the recipe on that basis – you can adapt the recipe easily if you don’t have them.  Like everyone else, my silicone moulds were too large – you really would be better off trying smaller moulds, and next time I shall try these…

Update: I spoke to Ashley Palmer-Watts on twitter about the dipping process, and this was his advice:

@APWChef Not bad, just need to not rush at the end, let them re freeze between dips and keep the gel at a steady temp pic.twitter.com/aYfFe7cD

@Bebejax Ah, of course, hadn’t occurred to keep it constant! Don’t suppose you’d care to reveal the magic number?

@APWChef 28c but you must not over heat the gel much more than 50

@Bebejax Thanks! Will try it again and post pics! And yes, took the gel above 50, but was using gold
@APWChef bronze gelatine is the one we use

Now that you’re a Heston expert, don’t forget I have his lemon tart recipe on the blog, and for the more adventurous, I’ve just come across his snail porridge recipe!  Yes.  Good luck with that…

July 7, 2012 Patisserie

Petit Fours: Pâtes de Fruits

Of all the petits fours presented at the end of the meal, I always have a soft spot for pâtes de fruits, the little cubes of fruit jelly.  A petite bite of acidic sweetness, it’s always stuck me that it’s the perfect way to combine sweet and sour, and intense fruitiness too.  This acidity is achieved by including citric or tartaric acid into the recipe, and the light mouthfeel is achieved by using pectin, rather than gelatine.  This allows the jelly to melt in your mouth, which releases both the sweet and acidic elements of the jelly at the same time.  Don’t store the finished product in the fridge – the granulated sugar will begin to dissolve.

I’ve adapted this recipe from one on the Sosa website.

Ingredients
1kg fruit pureé (in my case, blackberry, but look below for the fab colour of passion fruit)
1kg sugar
30g pectin jaune (a kind of fruit pectin)
300g glucose
5g citric acid

Method:

  • Heat the fruit pureé until boiling point
  • Mix 100g of the sugar with the pectin and then add to the pureé stirring constantly
  • Boil again and add half sugar
  • Boil again and add the sugar remaining
  • Heat again until boiling point and add the liquid glucose
  • Cook on a low heat until you reach 106ºC
  • Add the citric acid and remove from the heat
  • Pour in a frame or moulds
  • Leave to cool at room temperature for around three hours, or overnight
  • Cut into your preferred shape and dredge in sugar


Pâte de Fruit

Cook on a low heat until you reach 160ºC

Pour in a frame or moulds

This is a passion fruit variation, which also makes excellent pâte de fruit

  • « Go to Previous Page
  • Go to page 1
  • Interim pages omitted …
  • Go to page 6
  • Go to page 7
  • Go to page 8
  • Go to page 9
  • Go to Next Page »

Primary Sidebar

Categories

  • ▼Recipe
    • Baking
    • Breakfast
    • Cheese
    • Dessert
    • Eggs
    • Fish
    • Heston Blumenthal
    • Italian
    • Jamie Oliver
    • Marcus Wareing
    • Mediterranean
    • Pasta
    • Patisserie
    • Risotto
    • Smoothie
    • Sous Vide
    • Squash
    • Thermomix
    • Vegan
    • Vegetarian
    • Yotam Ottolenghi

Categories

  • ▼Book Review
    • ⭐️⭐️⭐️⭐️
    • ⭐️⭐️⭐️⭐️⭐️
    • Baking
    • Meat
    • Patisserie
    • Restaurant Cookbook
    • Vegetarian
    • Yotam Ottolenghi

Categories

  • ▼Restaurant
    • 1 Michelin Star
    • 2 Michelin Stars
    • 3 Michelin Stars
    • British
    • Fish
    • French
    • Italian
    • Japanese
    • Peruvian

Categories

  • 101 Cookbooks (1)
  • 3 Michelin Stars (1)
  • Advert (1)
  • Alan Murchison (2)
  • Alba Truffle (1)
  • Almond (1)
  • Angela Hartnett (1)
  • Angler (2)
  • Art Journal (2)
  • Artichokes (1)
  • Axis (1)
  • Azelia’s Kitchen (1)
  • Baking (9)
  • Baldwin (1)
  • Bara Brith (1)
  • Basics (1)
  • Beef (1)
  • Beetroot (2)
  • Ben Spalding (2)
  • Blackberry Soufflé (1)
  • Blackening Spice (1)
  • Blood Oranges (4)
  • ►Book Review (75)
    • Baking (10)
    • Meat (1)
    • Patisserie (6)
    • Restaurant Cookbook (3)
    • Vegetarian (3)
    • Yotam Ottolenghi (2)
    • ⭐️⭐️⭐️⭐️ (16)
    • ⭐️⭐️⭐️⭐️⭐️ (8)
  • Bread (3)
  • Breakfast (1)
  • Breakfast Tart (1)
  • brioche (1)
  • Brockhall Farm (1)
  • Bruschetta (1)
  • Bryn Williams (1)
  • Burrata (1)
  • Butter (1)
  • Buttercream (1)
  • Camembert (1)
  • Canapes (1)
  • caraway (2)
  • Casserole (2)
  • Chelsea Buns (1)
  • Chestnuts (1)
  • Chicken (3)
  • Chickpea (1)
  • Chocolate (4)
  • Chocolate Fondant (1)
  • Christmas (1)
  • Ciabatta (1)
  • Cinnamon (1)
  • Citrus (1)
  • Citrus Drizzle Cake (1)
  • Clams (1)
  • Coconut (2)
  • Coconut Milk (1)
  • Confectionary (1)
  • Creme Patisserie (1)
  • Dan Lepard (1)
  • Dessert (1)
  • detox (1)
  • Doughnuts (1)
  • Dried Fruit (1)
  • Drop Scones (1)
  • Ducasse (1)
  • Duck Egg (1)
  • Eggs (3)
  • El Bulli (1)
  • en Cocotte (1)
  • Epi (1)
  • Eric Treuille (1)
  • fennel (2)
  • Fettuccini (1)
  • Fish (1)
  • FrontPage (28)
  • Fruit Tea (1)
  • Glutamate (1)
  • Goat’s Cheese (1)
  • Gỏi Cuốn (1)
  • Granita (1)
  • Herbs (1)
  • Heritage Tomato (1)
  • Hibiscus Flower (1)
  • Hope and Greenwood (1)
  • Ice-Cream (3)
  • Iced Berry Souffle (1)
  • Icing (1)
  • Italian (1)
  • James Martin (1)
  • Jelly (1)
  • Journal (9)
  • Karen Scott (1)
  • King Oyster Mushroom (3)
  • Kummel (1)
  • L’Ortolan (1)
  • Lamb (1)
  • Lavender (1)
  • Laverstoke Park (1)
  • Lemon (3)
  • Lemon Drizzle Cake (1)
  • Lemon Grass (1)
  • Lemon Meringue Tart (1)
  • Lemon Poppy Seed Muffins (1)
  • Lentils (1)
  • Limewood (1)
  • Liquorice (1)
  • Liquorice Ice-Cream (1)
  • Lobster (3)
  • Lucas Hollweg (1)
  • Luke Holder (1)
  • Macarons (1)
  • Mango (1)
  • Marcus Wareing (1)
  • Mark Lloyd (1)
  • Market (1)
  • Mary Berry (1)
  • Meringue (1)
  • Michael Moore (1)
  • Michel Roux (3)
  • Mint (1)
  • Mister Truffle (2)
  • Modernist Cuisine at Home (1)
  • Moroccan (1)
  • Muffins (3)
  • Murano (1)
  • Mushroom (1)
  • Ollie Dabbous (1)
  • Ollie Fararr (1)
  • Ox cheek (1)
  • Palourde Clams (1)
  • Pancetta (1)
  • Panna Cotta (1)
  • Parmesan (1)
  • Passion Fruit (3)
  • Pasta (1)
  • Patisserie (1)
  • Paul Heathcote (1)
  • Pea (1)
  • Peter Reinhart (1)
  • Petit Fours (1)
  • Philip Howard (1)
  • Pierre Koffman (1)
  • Pierre Koffmann (1)
  • Pimms (1)
  • Pistachio (1)
  • Pistachio Soufflé (2)
  • Pistacho (1)
  • Pork (1)
  • Prawn (1)
  • Quiche (1)
  • Rachel Allen’s 30 Day Muffins (1)
  • Raspberry (2)
  • Ravioli (1)
  • Raymond Blanc (1)
  • ▼Recipe (192)
    • Baking (17)
    • Breakfast (2)
    • Cheese (1)
    • Dessert (7)
    • Eggs (3)
    • Fish (2)
    • Heston Blumenthal (5)
    • Italian (3)
    • Jamie Oliver (1)
    • Marcus Wareing (2)
    • Mediterranean (3)
    • Pasta (3)
    • Patisserie (7)
    • Risotto (1)
    • Smoothie (1)
    • Sous Vide (1)
    • Squash (1)
    • Thermomix (19)
    • Vegan (1)
    • Vegetarian (20)
    • Yotam Ottolenghi (2)
  • ►Restaurant (124)
    • 1 Michelin Star (17)
    • 2 Michelin Stars (9)
    • 3 Michelin Stars (3)
    • British (19)
    • Fish (4)
    • French (4)
    • Italian (3)
    • Japanese (1)
    • Peruvian (1)
  • Richard Bertinet (1)
  • Risotto (1)
  • Roganic (1)
  • Rolls (1)
  • Roux (3)
  • salad (2)
  • Salmon (2)
  • Sardinian Cookery (1)
  • Scandiliscious (1)
  • Sea Trout (1)
  • Sherbet Dab (1)
  • Signe Johansen (1)
  • Silvana de Soissons (1)
  • Simon Rogan (1)
  • Snail Caviar (1)
  • Soda Bread (1)
  • Sorbet (1)
  • Soufflé (11)
  • Soup (1)
  • Sous Vide (2)
  • Spice (1)
  • Stew (1)
  • Stuffing (1)
  • Sugar Baby (1)
  • Sugarwork (1)
  • Sumosan (1)
  • Supper (1)
  • Sweetcorn (1)
  • Sweetcorn Fritters (1)
  • Tamarillo’s (1)
  • Texturas Fizzy (1)
  • Thai (2)
  • The Bertinet Kitchen (1)
  • The Square (1)
  • Thermomix (10)
  • Toffe Fudge Muffins (1)
  • Tom Kitchin (1)
  • Tomato Bread (1)
  • Tony Fleming (4)
  • Tribute Dish (2)
  • Truffle (1)
  • Truffles (6)
  • Umami (1)
  • Uncategorized (1)
  • Vanilla (2)
  • Vegan (1)
  • Vegetables (1)
  • Vegetarian (3)
  • Verveine (1)
  • Vietname Summer Roll (1)
  • Watermelon (1)
  • William Curley (1)
  • yeasted dough (1)

I’m passionate about food, its provenance and its sustainability. As a technical cook, I like to see what’s happening in the kitchens of Michelin starred restaurants, but you’re just as likely to find me at home making sourdough. You can find some of my recipes in In The Mix 2, an award-winning Thermomix cookbook.

I’m also truly blessed – I can open my fridge at any time and know it’s crammed with all manner of loveliness – but that’s not the case for everyone. There are people all around me in the UK who rely on food banks to feed their kids, and themselves, and every box of cereal or teabag makes a difference. You can donate food to your local food bank, or time, or money, and if you want more information the best starting place is http://www.trusselltrust.org.

You can also find me here:

Foodies100 Index of UK Food BlogsFoodies100
The Renaissance Epicurean... London restaurants
Top Food BlogsUK Food Bloggers Association

The Eleven Madison Park Granola

Copyright © 2025 · Cookd Pro Theme On Genesis Framework · WordPress · Log in

Nourished
  • Home
  • Recipes
  • Book Reviews
  • Restaurants
  • Journal
  • About