• Skip to primary navigation
  • Skip to main content
  • Skip to primary sidebar

Nourished

  • Home
  • Recipes
  • Book Reviews
  • Restaurants
    • 3 Michelin Stars
    • 2 Michelin Stars
    • 1 Michelin Star
  • Journal
    • Art Journal
    • The Renaissance Diary
  • About
    • Contact Me
    • Instagram
    • Loves
    • Suppliers
    • Masterchef Links

Chocolate

January 2, 2014 FrontPage

CakePops are Dead! Long live the MallowPop!

We’ve all made cake pops – good grief – what a bore!

For starters, who really wants a mouthful of dry cake, mixed with sickly sweet buttercream? Then there’s the fact that they take soooo long to make, fall off if you make them too big, or include too much buttercream… No, no.  The cakepop is dead.

So, what’s the alternative?  Clearly you’re reading my MallowPop post, so the answer must be a MallowPop – yay!

For starters:

  • the basic varieties are much easier to make
  • they actually last for much longer than cake pops, which means you can make them much further in advance – a real boon for those of us baking for cake sales, parties etc
  • anything you can do to a cakepop, you can do to a mallowpop
  • mallowpops can be made gluten-free – a huge boon if you’re creating for the masses
  • they also allow you a huge amount of scope in terms of decoration, flavouring etc.
  • you can make your own marshmallows if you really want to up the flavourings and complexity

I would almost go on to say that they offer the same customisation scope as macaron – and potentially far more flavour impact variations than cake…

But let’s not get ahead of ourselves – let’s start with the basic idea.  Anyone can take a packet of marshmallows, and cover them in chocolate – even using candy melts if you have to…  At this level it’s a great thing for kids to get involved with too, and nowhere nearly as traumatic as cake pops.

So lets begin….

Of course I may have lied a little, when I said I’d press on with the basic MallowPop.  But if you know me, you’d know that I have a mini-aversion to rubbish ingredients… If you’re going to make a decent MallowPop, I think it’s worth spending a little more time and money on decent ingredients.  I promise I will however post shortly using candy-melts, or something of that ilk.

Let’s start with a few basic couveture chocolate rules:

  • chocolate (generally) hates water – if you’re going to use a bain-marie to melt your chocolate, make sure you never drop any water into the melted chocolate – it will seize the mixture
  • all pre-tempered chocolate (which is generally what you’d be buying, already has tempered crystals in it.  We’re not going to talk extensively about that now, just bear that in mind
  • if you melt tempered chocolate to it’s given range (which is usually printed on the packet!), you will not take the chocolate out of temper (that is, remove the crystals)
  • even if you do take the chocolate out of temper, just add a bit more of the tempered chocolate back into it, and that will reseed the chocolate
  • calm down, none of this is as complicated as it sounds
  • very generally speaking, if you keep the temperature of the chocolate between 26ºC and about 38ºC, you will not have any problems
  • if you’re going to melt your chocolate in a microwave (which I do), make sure you only do it in 15 second busts, and check the temperature towards the end
  • always microwave your chocolate in a plastic, not glass bowl, and use a plastic spoon when mixing
  • an infrared / laser thermometer is an absolute god-send for checking the temperature of chocolate, as you don’t have to put it into the chocolate
  • always use fresh marshmallows – even marshmallows which have been out for 12 hours in an airtight box are too old – the chocolate will peel away, and the mallowpop is too dry
  • by far the best thing to set chocolate onto is food-grade acetate, which is inexpensive to buy
  • if you’re lucky enough to have Neff warming drawer ( I adore mine), you can keep several bowls of chocolate in temper while you’re working by keep them at the 1.5 setting – check the temperature again before you begin, and if over 38ºC, you can reseed them with a handful of fresh chocolate
  • I’ve found I can actually keep chocolate in temper overnight in the warming drawer, though it’s probably best to take it down the the 1 setting
MallowPop Method
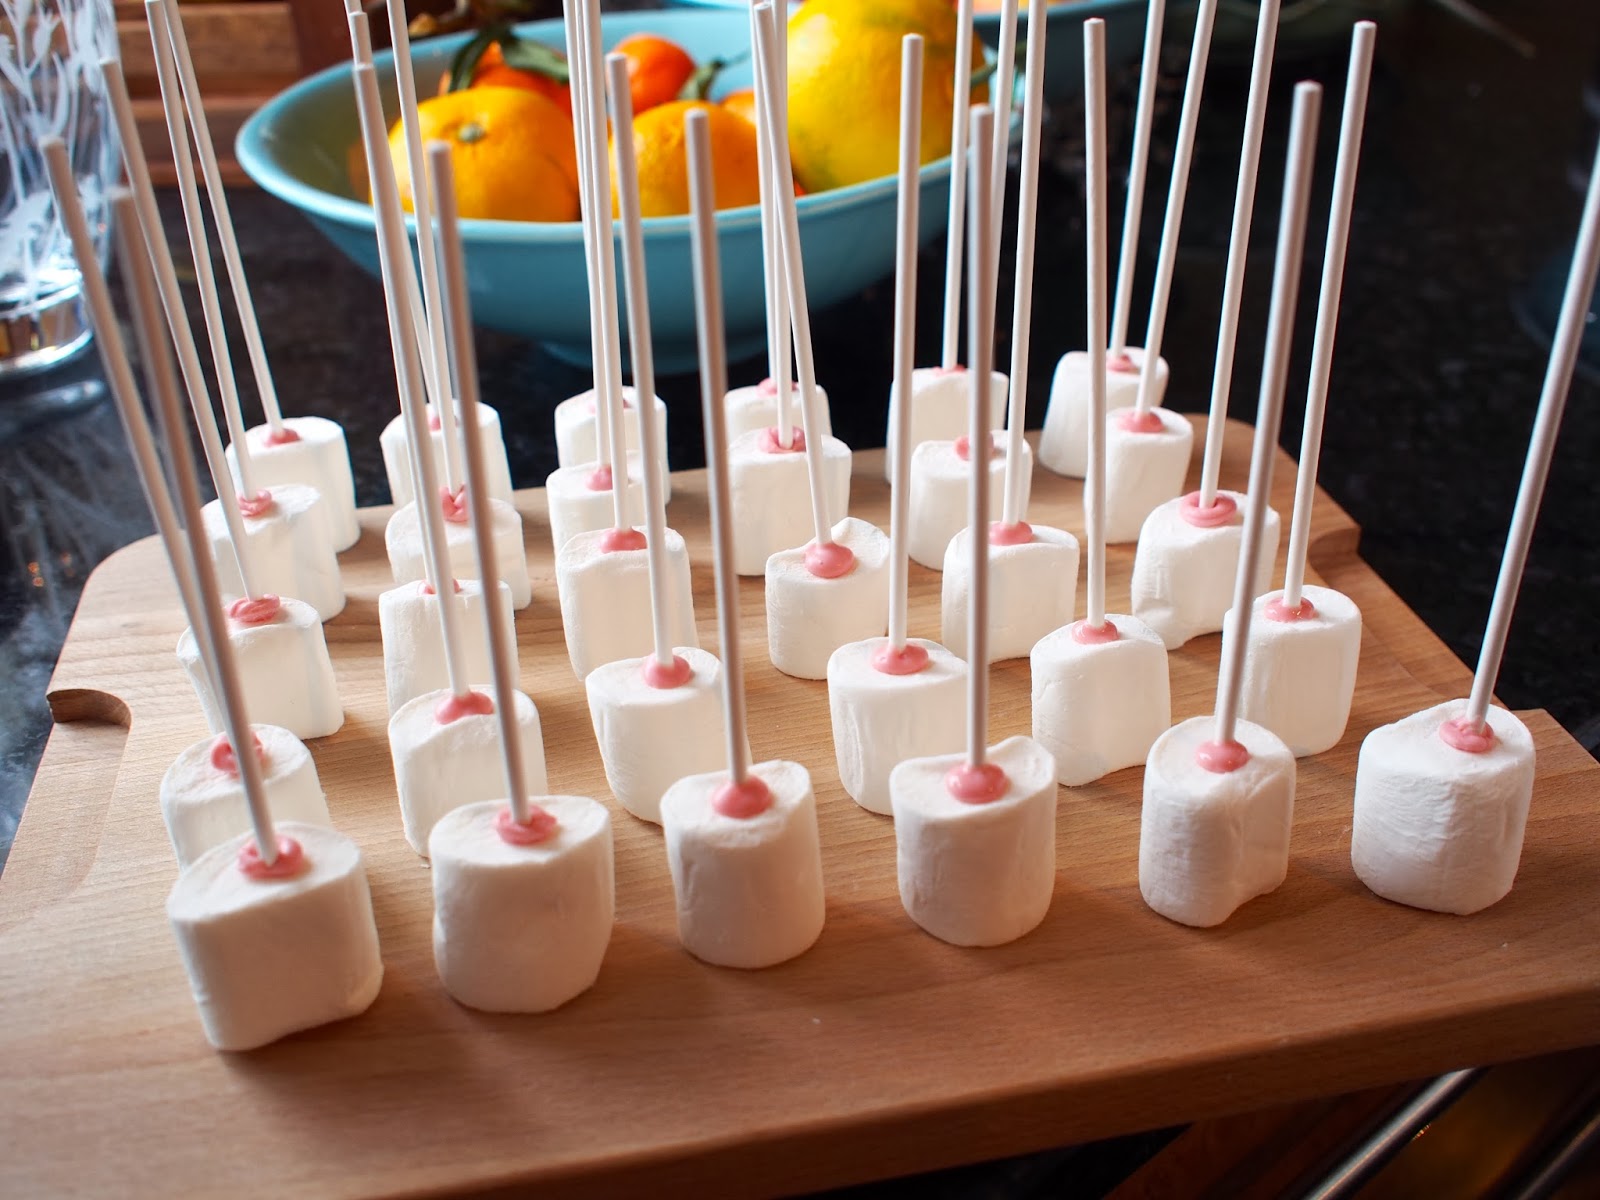
  • As a basic method, take a freshly opened pack of marshmallows (or make your own, more on that later), and taking a 15cm cake pop stick, dip the stick into the melted chocolate, and plunge into your marshmallow
  • I found it easier to put all the marshmallows vertically onto a chopping board, and then plunge the stick in on that
  • Wait for a few minutes until the chocolate has set-up a little, and then swirl the marshmallow into a bowl of tempered chocolate.
  • Put the MallowPop either onto acetate to set, or using an old piece of polystyrene,  allow the chocolate to set there…  If the chocolate is still in temper, it should set within a couple of minutes


Chocolate Suppliers:

Vantage House
The Chocolate Trading Company

April 10, 2013 Recipe

Chocolate Delice

I realise that I don’t usually pay homage to a chef when making a recipe, but the legendary Monsieur Blanc is no ordinary chef!  Nearly as important to my culinary journey as the Roux Brothers, Raymond is completely self-taught, and his Manoir aux Quat’Saisons has held two Michelin stars since 1985 – no mean feat.  As well as sharing my birthday, Raymond is a most amusing and very brave man – he served both his first and second wife a croquembouche on their wedding day…

This delice was featured on Kitchen Secrets, a most enlightening look at a number of dishes and techniques.  Every time I see an episode, I note another little detail.  You can see this particular recipe on You Tube, which certainly shows you how simple it can be.

Ingredients

For the base
100g/3½oz toasted hazelnuts
100g/3½oz caramelised sugar pieces
150g /5¼oz bran flakes, slightly crushed

For the delice
140ml/5fl oz full-fat milk
325ml/11½fl oz double cream
2 free-range eggs
340g/12oz good-quality dark chocolate, minimum 60 per cent cocoa solids, roughly chopped

For the caramel hazelnuts
125g/4½oz caster sugar
8 hazelnuts, shells removed, lightly toasted in a dry frying pan

For the coffee foam
200ml/7¼fl oz strong black espresso coffee
1 sheet gelatine, soaked in cold water for 10 minutes, drained

To serve
2-3 tbsp cocoa powder
1 tbsp freshly ground coffee beans

Preparation method

  • For the base, blend the hazelnuts and caramelised sugar pieces in a food processor until you have a smooth paste. Heat the paste in a small pan on a gentle heat until warmed through.
  • Place the bran flakes and warmed praline paste into a mixing bowl and scrunch them together, using your hands, until the bran flakes have broken down and been incorporated into the paste.
  • Line a baking tray with a sheet of greaseproof paper, then transfer the praline mixture onto it. Cover the praline mixture with a second sheet of greaseproof paper, then roll the mixture out until it measures at least 14cm x 20cm/5½in x 8in and is 0.5cm/¼in thick.
  • Remove the top sheet of greaseproof paper, then push a 14cm x 20cm x 3cm/5½in x 8in x 1¼in rectangular pastry frame down onto the praline mixture and trim off any excess. (NB: The excess praline mixture can be pressed into any gaps in the mould, if necessary.)
  • Cover the mould with greaseproof paper and chill the praline in the fridge for 30 minutes, or until set.
  • Meanwhile, for the delice, heat the milk and cream in a saucepan and heat gently over a medium heat until it just reaches boiling point.
  • Meanwhile, whisk the eggs in a bowl.
  • As the milk and cream mixture comes to the boil, pour it over the eggs, then whisk the mixture constantly until smooth and thick.
  • Stir in the chopped chocolate and whisk again until the chocolate has melted and the custard is smooth.
  • Remove the base from the fridge and pour in the chocolate delice to fill the mould. Gently tap the sides of the mould to release any trapped air bubbles, then smooth the surface using a palette knife. Chill in the fridge for 6-12 hours, or until completely set.
  • Meanwhile, for the caramel hazelnuts, heat the caster sugar in a pan over a low heat, stirring occasionally until golden-brown and caramelised. Remove from the heat and set aside to cool slightly. (NB: The caramel is cool enough when a cocktail stick dragged across its surface leaves an imprinted trail.)
  • Spear each hazelnut onto a cocktail stick, then dip the hazelnuts into the caramel until coated. Stick a little adhesive putty onto the underside of a shelf or cupboard above a worksurface and secure the cocktail stick into the putty, so that the caramel drips off the hazelnut and creates a tail. (NB: Place a baking tray or sheets of greaseproof paper underneath the hazelnuts to catch any caramel that drips.)
  • Set the caramel hazelnuts aside to cool and harden for at least 30 minutes.
  • For the coffee foam, just before serving, heat half of the coffee in a pan until just hot but not boiling.
  • Squeeze the gelatine sheet dry, then add it to the hot coffee and continue to warm until the gelatine has completely dissolved.
  • Pour the remaining cold coffee into a bowl, then add the hot coffee mixture to it. Whisk well until the mixture starts to foam.
  • To serve, heat the outside of the mould using a chefs’ blow torch to loosen the base of the delice. Carefully remove the pastry frame from the delice.
  • Heat the top of the delice very quickly using a chefs’ blow torch to make the surface glossy. Dust the delice with some of the cocoa powder and ground coffee beans.
  • Smear a teaspoonful of the coffee foam across the width of six to eight serving plates. Plunge the blade of a knife into boiling water to heat the metal, then slice the delice into six to eight pieces and place one onto each smear of foam, at an angle. Rest a caramel hazelnut against each slice. Dust each serving with the remaining cocoa powder.

Whisk the mixture constantly until smooth and thick

Stir in the chopped chocolate and whisk again until the chocolate has melted and the custard is smooth

It will look like this, leaving ribbons on itself…
Pour in the chocolate delice to fill the mould (I didn’t have a rectangular mould to hand)
Watch your caramel, it’s cool enough when a cocktail stick dragged across its surface leaves an imprinted trail
The finished article – a gigantic slice of chocolate delice – I’d recommend a slice about half the size

January 13, 2013 Baking

Pecan and Salted Caramel Brownies

1241c-p1130670
Just lately I’ve been craving Gower Cottage’s chocolate brownies, but my secret stash in the freezer was sorely depleted over Christmas!  However serendipity has struck again, as I spotted Ed Kimber‘s brownie recipe in my in-box this morning.  There’s definitely something about salted caramel… It’s my favourite filling in Laduree Macaron’s, my favourite combination in chocolate bars, there’s something about the salty sweetness that becomes utterly addictive!

It was a given then that I’d have to try these, but I thought I’d adapt the brownie recipe for the Thermomix, to see how they’d turn out.  You can find the original recipe on Ed’s site.

Salted Caramel Filling
175g caster sugar
150ml double cream
10g unsalted butter
large pinch of flaked sea salt OR
1/2 jar of Bonne Maman Confiture de Caramel

Fudge Brownies
180g plain flour
3 tbsp cocoa powder (preferably Green and Blacks, which uses the ‘Dutch’ process)
1/4 tsp salt
300g dark chocolate, around 65-75% cocoa solids
150g unsalted butter
220g light brown sugar
150g caster sugar
4 large eggs
1 tsp vanilla extract
100g pecans, chopped (optional extra, half inside the brownie, half on top)

Method

  • I’m not going to make caramel today, and instead I’m using the jar – okay, stop shouting at me – I’m baking with the 4 year old and I don’t like making caramel when he’s climbing up the counters!  If you want more information on the cooking temperatures for caramel, please have a look at my fudge post…
  • For the brownies preheat the oven to 180°C/160°C fan. Grease a 9×9 inch pan and line with a strip of parchment.  Leave a ‘handle’ over the pan’s edge to ease removal. [The Lakeland foiled parchment is perfect for this!]
  • Pulse the butter and chocolate in the Thermomix bowl for 5 seconds / Speed 5, and scrape down the bowl.
  • Melt the butter and chocolate together for 4 mins / Speed 1 / 70° C
  • Add the eggs, vanilla, salt and sugar and mix for 10 seconds / Speed 3
  • Add the flour and cocoa powder and mix for 10 seconds / Speed 4.  Scrape down the bowl (inevitably some of the flour will have been thrown up), and repeat for a further 10 seconds.
  • Pour half of the mixture into your prepared tin, and then pour the caramel over the batter, leaving a 1 1/2 cm border.  Scatter the chopped pecans over the caramel if using… [I like the combination of pecans and salted chocolate, and I wanted some additional texture in the brownie.]  Pour the remaining batter over the caramel mixture to cover it.  Ed does this by piping it over, otherwise when you spread the second layer of batter you inevitably push the caramel out to the edge, where it can boil over the batter.  Until I’ve perfected a cheats way, I suggest you pipe too…
  • Bake in the preheated oven for 35-40 minutes, until a cake tester or skewer (just) comes out cleanly (you don’t want them overdone).  Don’t forget, the caramel will be scalding hot, so allow the brownies to cool fully before cutting into squares.
Alternatives:
  • Scatter chocolate chips in on top of the caramel, and again over the surface before baking
  • If like me you have thousands of blood oranges in your kitchen – don’t waste the skin and oils – zest the oranges into the batter before using them.
  • You can use chopped salted Brindisa’s salted almonds – quite a grownup taste, but absolutely amazing.  Pulse them for the briefest of moments in the thermo and set aside, before melting the chocolate and butter
  • If you’re a complete salt addict, you can use salted butter, but in that case, please remember to take the salt out of the other ingredients.
A couple of little brownie tips:
  • If you’ve managed not to scoff the lot straight away, you can revive your brownies for around 20 seconds in the microwave; and
  • A great little tip I spotted on the lovely Azelia’s blog, if you have any type of cake which hasn’t quite cooked through, you can finish them off for a few seconds in the microwave… As Azelia points out in her recent doughnut post, the microwave cooks from the inside out… Clever eh?
Now fend off your children and friends with a rolling pin…
Melting the chocolate and butter together
This is the batter once mixing is completed – it’s quite a thick batter
Spoon the caramel over the batter, and scatter with pecans
Cover with the remaining batter and bake
Yummy! And I like the pecans in it!

Primary Sidebar

Categories

  • ▼Recipe
    • Baking
    • Breakfast
    • Cheese
    • Dessert
    • Eggs
    • Fish
    • Heston Blumenthal
    • Italian
    • Jamie Oliver
    • Marcus Wareing
    • Mediterranean
    • Pasta
    • Patisserie
    • Risotto
    • Smoothie
    • Sous Vide
    • Squash
    • Thermomix
    • Vegan
    • Vegetarian
    • Yotam Ottolenghi

Categories

  • ▼Book Review
    • ⭐️⭐️⭐️⭐️
    • ⭐️⭐️⭐️⭐️⭐️
    • Baking
    • Meat
    • Patisserie
    • Restaurant Cookbook
    • Vegetarian
    • Yotam Ottolenghi

Categories

  • ▼Restaurant
    • 1 Michelin Star
    • 2 Michelin Stars
    • 3 Michelin Stars
    • British
    • Fish
    • French
    • Italian
    • Japanese
    • Peruvian

Categories

  • 101 Cookbooks (1)
  • 3 Michelin Stars (1)
  • Advert (1)
  • Alan Murchison (2)
  • Alba Truffle (1)
  • Almond (1)
  • Angela Hartnett (1)
  • Angler (2)
  • Art Journal (2)
  • Artichokes (1)
  • Axis (1)
  • Azelia’s Kitchen (1)
  • Baking (9)
  • Baldwin (1)
  • Bara Brith (1)
  • Basics (1)
  • Beef (1)
  • Beetroot (2)
  • Ben Spalding (2)
  • Blackberry Soufflé (1)
  • Blackening Spice (1)
  • Blood Oranges (4)
  • ►Book Review (75)
    • Baking (10)
    • Meat (1)
    • Patisserie (6)
    • Restaurant Cookbook (3)
    • Vegetarian (3)
    • Yotam Ottolenghi (2)
    • ⭐️⭐️⭐️⭐️ (16)
    • ⭐️⭐️⭐️⭐️⭐️ (8)
  • Bread (3)
  • Breakfast (1)
  • Breakfast Tart (1)
  • brioche (1)
  • Brockhall Farm (1)
  • Bruschetta (1)
  • Bryn Williams (1)
  • Burrata (1)
  • Butter (1)
  • Buttercream (1)
  • Camembert (1)
  • Canapes (1)
  • caraway (2)
  • Casserole (2)
  • Chelsea Buns (1)
  • Chestnuts (1)
  • Chicken (3)
  • Chickpea (1)
  • Chocolate (4)
  • Chocolate Fondant (1)
  • Christmas (1)
  • Ciabatta (1)
  • Cinnamon (1)
  • Citrus (1)
  • Citrus Drizzle Cake (1)
  • Clams (1)
  • Coconut (2)
  • Coconut Milk (1)
  • Confectionary (1)
  • Creme Patisserie (1)
  • Dan Lepard (1)
  • Dessert (1)
  • detox (1)
  • Doughnuts (1)
  • Dried Fruit (1)
  • Drop Scones (1)
  • Ducasse (1)
  • Duck Egg (1)
  • Eggs (3)
  • El Bulli (1)
  • en Cocotte (1)
  • Epi (1)
  • Eric Treuille (1)
  • fennel (2)
  • Fettuccini (1)
  • Fish (1)
  • FrontPage (28)
  • Fruit Tea (1)
  • Glutamate (1)
  • Goat’s Cheese (1)
  • Gỏi Cuốn (1)
  • Granita (1)
  • Herbs (1)
  • Heritage Tomato (1)
  • Hibiscus Flower (1)
  • Hope and Greenwood (1)
  • Ice-Cream (3)
  • Iced Berry Souffle (1)
  • Icing (1)
  • Italian (1)
  • James Martin (1)
  • Jelly (1)
  • Journal (9)
  • Karen Scott (1)
  • King Oyster Mushroom (3)
  • Kummel (1)
  • L’Ortolan (1)
  • Lamb (1)
  • Lavender (1)
  • Laverstoke Park (1)
  • Lemon (3)
  • Lemon Drizzle Cake (1)
  • Lemon Grass (1)
  • Lemon Meringue Tart (1)
  • Lemon Poppy Seed Muffins (1)
  • Lentils (1)
  • Limewood (1)
  • Liquorice (1)
  • Liquorice Ice-Cream (1)
  • Lobster (3)
  • Lucas Hollweg (1)
  • Luke Holder (1)
  • Macarons (1)
  • Mango (1)
  • Marcus Wareing (1)
  • Mark Lloyd (1)
  • Market (1)
  • Mary Berry (1)
  • Meringue (1)
  • Michael Moore (1)
  • Michel Roux (3)
  • Mint (1)
  • Mister Truffle (2)
  • Modernist Cuisine at Home (1)
  • Moroccan (1)
  • Muffins (3)
  • Murano (1)
  • Mushroom (1)
  • Ollie Dabbous (1)
  • Ollie Fararr (1)
  • Ox cheek (1)
  • Palourde Clams (1)
  • Pancetta (1)
  • Panna Cotta (1)
  • Parmesan (1)
  • Passion Fruit (3)
  • Pasta (1)
  • Patisserie (1)
  • Paul Heathcote (1)
  • Pea (1)
  • Peter Reinhart (1)
  • Petit Fours (1)
  • Philip Howard (1)
  • Pierre Koffman (1)
  • Pierre Koffmann (1)
  • Pimms (1)
  • Pistachio (1)
  • Pistachio Soufflé (2)
  • Pistacho (1)
  • Pork (1)
  • Prawn (1)
  • Quiche (1)
  • Rachel Allen’s 30 Day Muffins (1)
  • Raspberry (2)
  • Ravioli (1)
  • Raymond Blanc (1)
  • ►Recipe (192)
    • Baking (17)
    • Breakfast (2)
    • Cheese (1)
    • Dessert (7)
    • Eggs (3)
    • Fish (2)
    • Heston Blumenthal (5)
    • Italian (3)
    • Jamie Oliver (1)
    • Marcus Wareing (2)
    • Mediterranean (3)
    • Pasta (3)
    • Patisserie (7)
    • Risotto (1)
    • Smoothie (1)
    • Sous Vide (1)
    • Squash (1)
    • Thermomix (19)
    • Vegan (1)
    • Vegetarian (20)
    • Yotam Ottolenghi (2)
  • ►Restaurant (124)
    • 1 Michelin Star (17)
    • 2 Michelin Stars (9)
    • 3 Michelin Stars (3)
    • British (19)
    • Fish (4)
    • French (4)
    • Italian (3)
    • Japanese (1)
    • Peruvian (1)
  • Richard Bertinet (1)
  • Risotto (1)
  • Roganic (1)
  • Rolls (1)
  • Roux (3)
  • salad (2)
  • Salmon (2)
  • Sardinian Cookery (1)
  • Scandiliscious (1)
  • Sea Trout (1)
  • Sherbet Dab (1)
  • Signe Johansen (1)
  • Silvana de Soissons (1)
  • Simon Rogan (1)
  • Snail Caviar (1)
  • Soda Bread (1)
  • Sorbet (1)
  • Soufflé (11)
  • Soup (1)
  • Sous Vide (2)
  • Spice (1)
  • Stew (1)
  • Stuffing (1)
  • Sugar Baby (1)
  • Sugarwork (1)
  • Sumosan (1)
  • Supper (1)
  • Sweetcorn (1)
  • Sweetcorn Fritters (1)
  • Tamarillo’s (1)
  • Texturas Fizzy (1)
  • Thai (2)
  • The Bertinet Kitchen (1)
  • The Square (1)
  • Thermomix (10)
  • Toffe Fudge Muffins (1)
  • Tom Kitchin (1)
  • Tomato Bread (1)
  • Tony Fleming (4)
  • Tribute Dish (2)
  • Truffle (1)
  • Truffles (6)
  • Umami (1)
  • Uncategorized (1)
  • Vanilla (2)
  • Vegan (1)
  • Vegetables (1)
  • Vegetarian (3)
  • Verveine (1)
  • Vietname Summer Roll (1)
  • Watermelon (1)
  • William Curley (1)
  • yeasted dough (1)

I’m passionate about food, its provenance and its sustainability. As a technical cook, I like to see what’s happening in the kitchens of Michelin starred restaurants, but you’re just as likely to find me at home making sourdough. You can find some of my recipes in In The Mix 2, an award-winning Thermomix cookbook.

I’m also truly blessed – I can open my fridge at any time and know it’s crammed with all manner of loveliness – but that’s not the case for everyone. There are people all around me in the UK who rely on food banks to feed their kids, and themselves, and every box of cereal or teabag makes a difference. You can donate food to your local food bank, or time, or money, and if you want more information the best starting place is http://www.trusselltrust.org.

You can also find me here:

Foodies100 Index of UK Food BlogsFoodies100
The Renaissance Epicurean... London restaurants
Top Food BlogsUK Food Bloggers Association

The Eleven Madison Park Granola

Copyright © 2025 · Cookd Pro Theme On Genesis Framework · WordPress · Log in

Nourished
  • Home
  • Recipes
  • Book Reviews
  • Restaurants
  • Journal
  • About