• Skip to primary navigation
  • Skip to main content
  • Skip to primary sidebar

Nourished

  • Home
  • Recipes
  • Book Reviews
  • Restaurants
    • 3 Michelin Stars
    • 2 Michelin Stars
    • 1 Michelin Star
  • Journal
    • Art Journal
    • The Renaissance Diary
  • About
    • Contact Me
    • Instagram
    • Loves
    • Suppliers
    • Masterchef Links

Front

October 17, 2014 FrontPage

Giant couscous, vegetables, herbs, pea-shoots

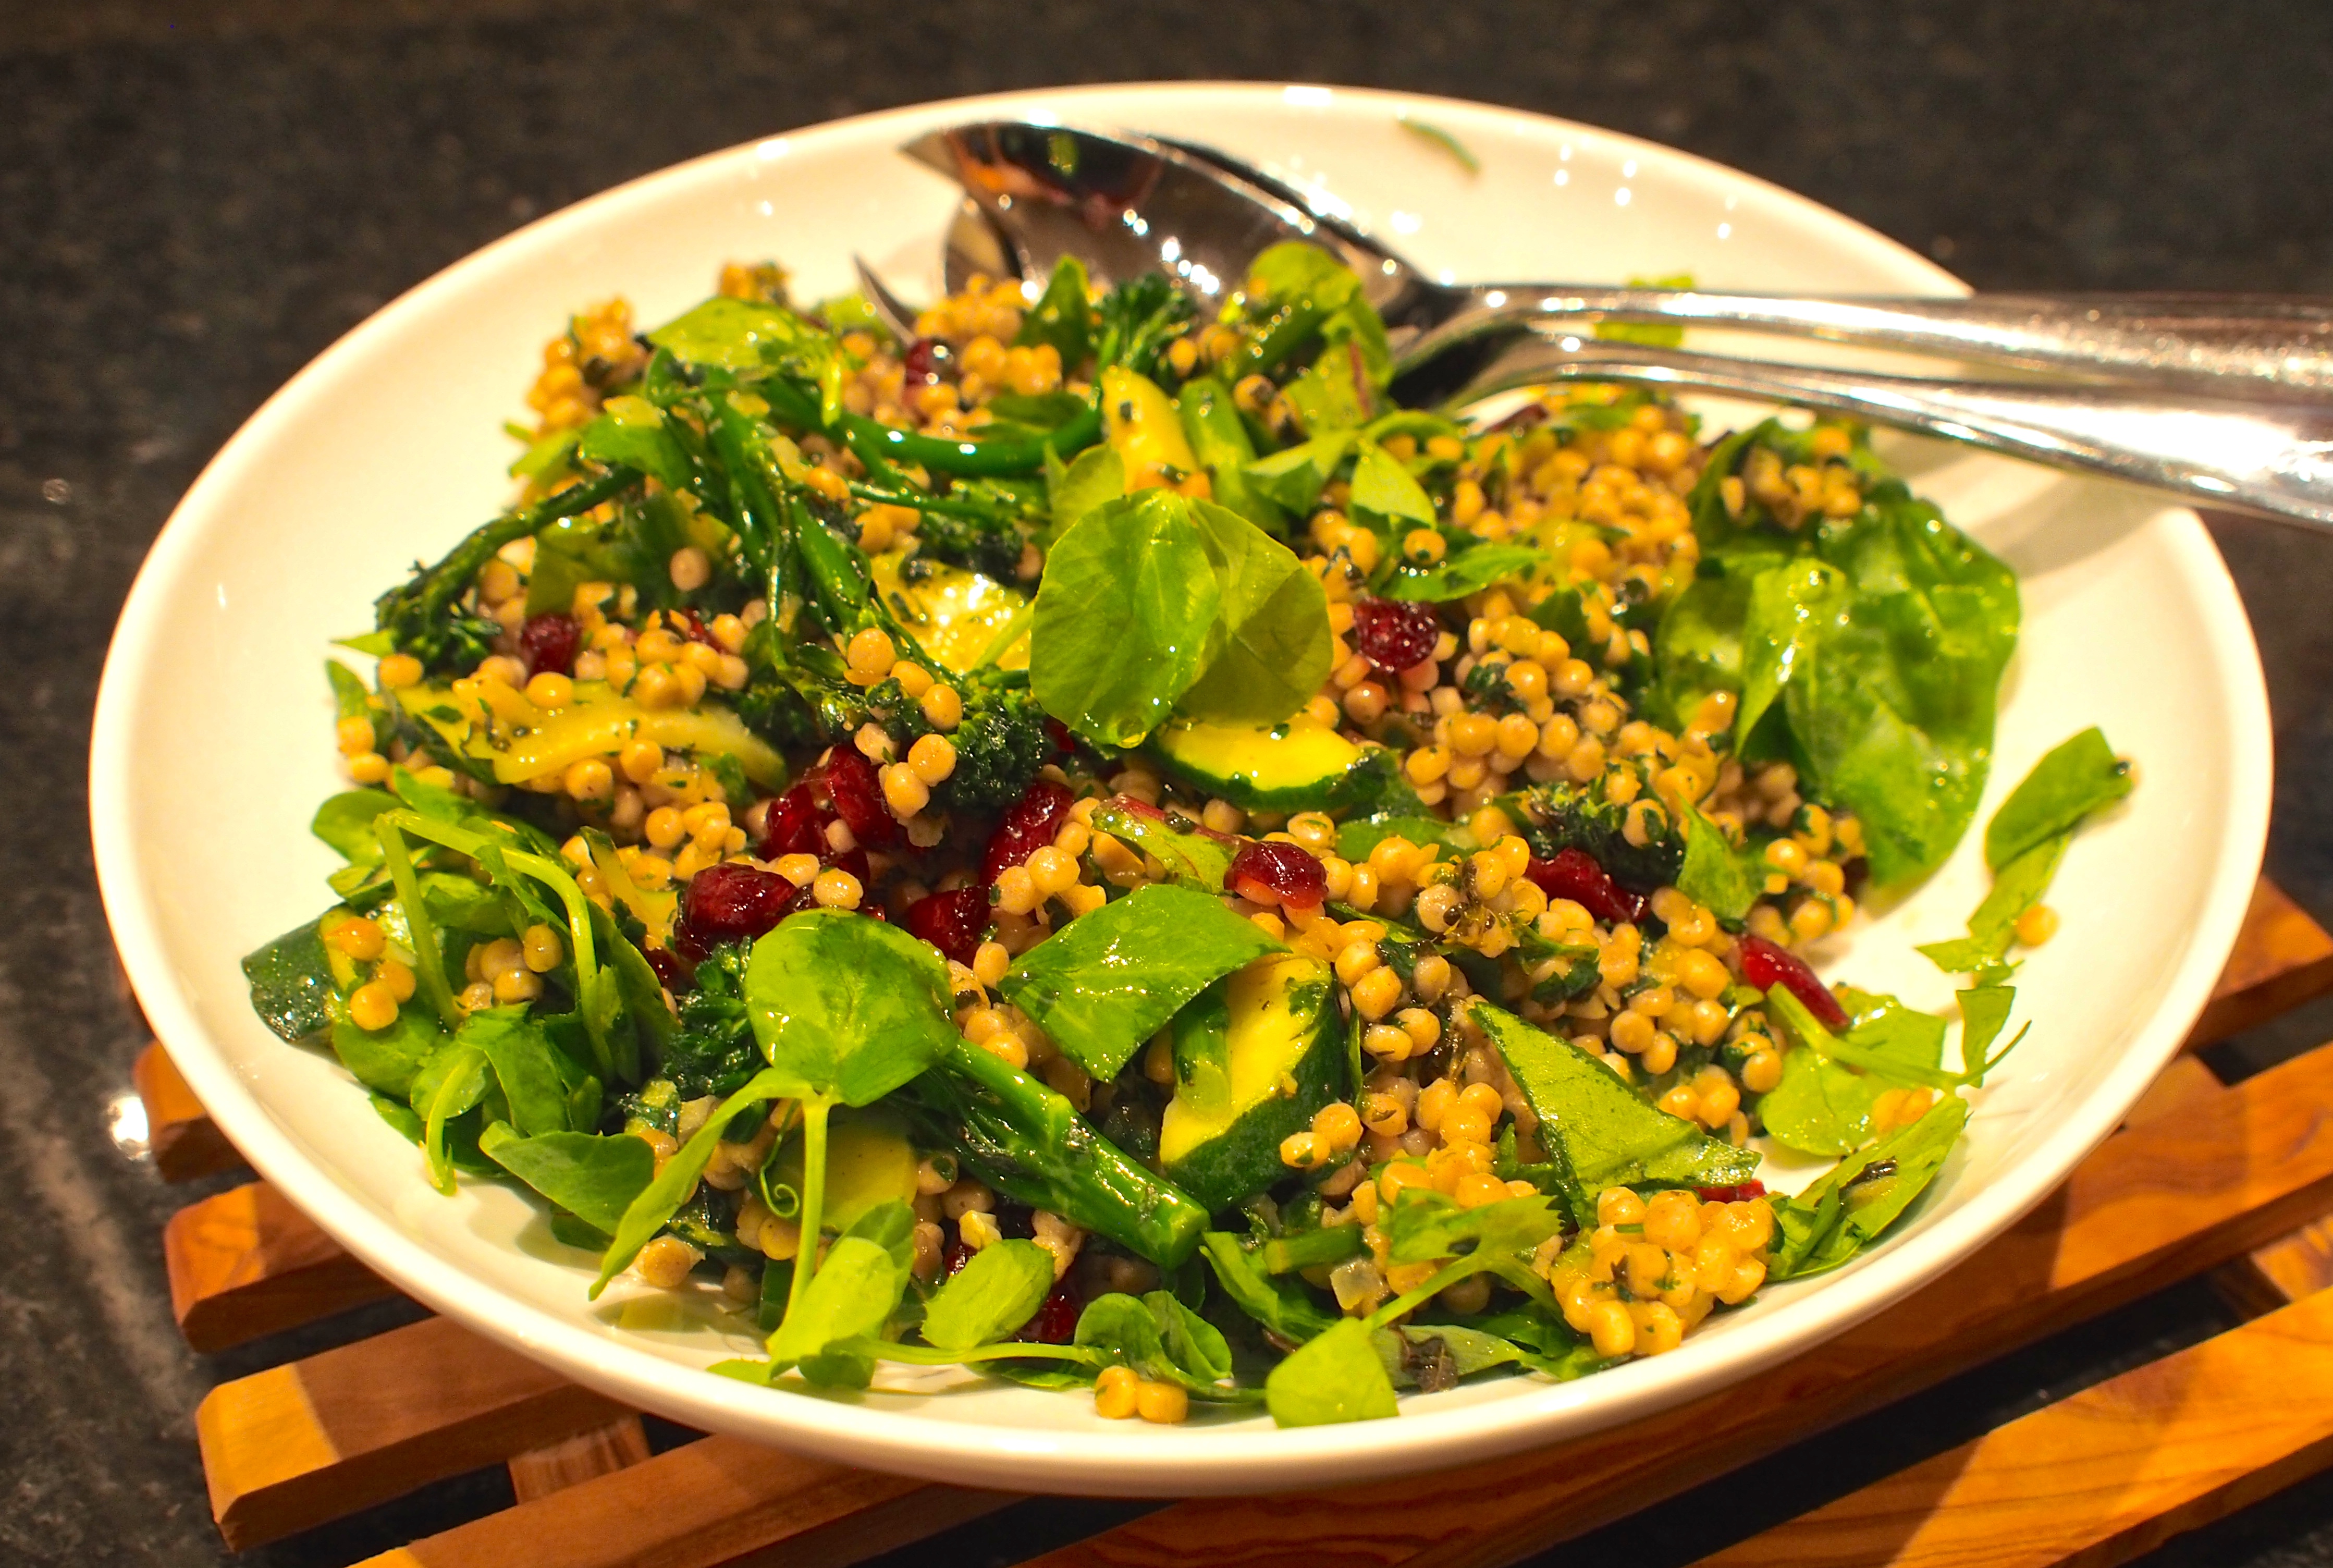
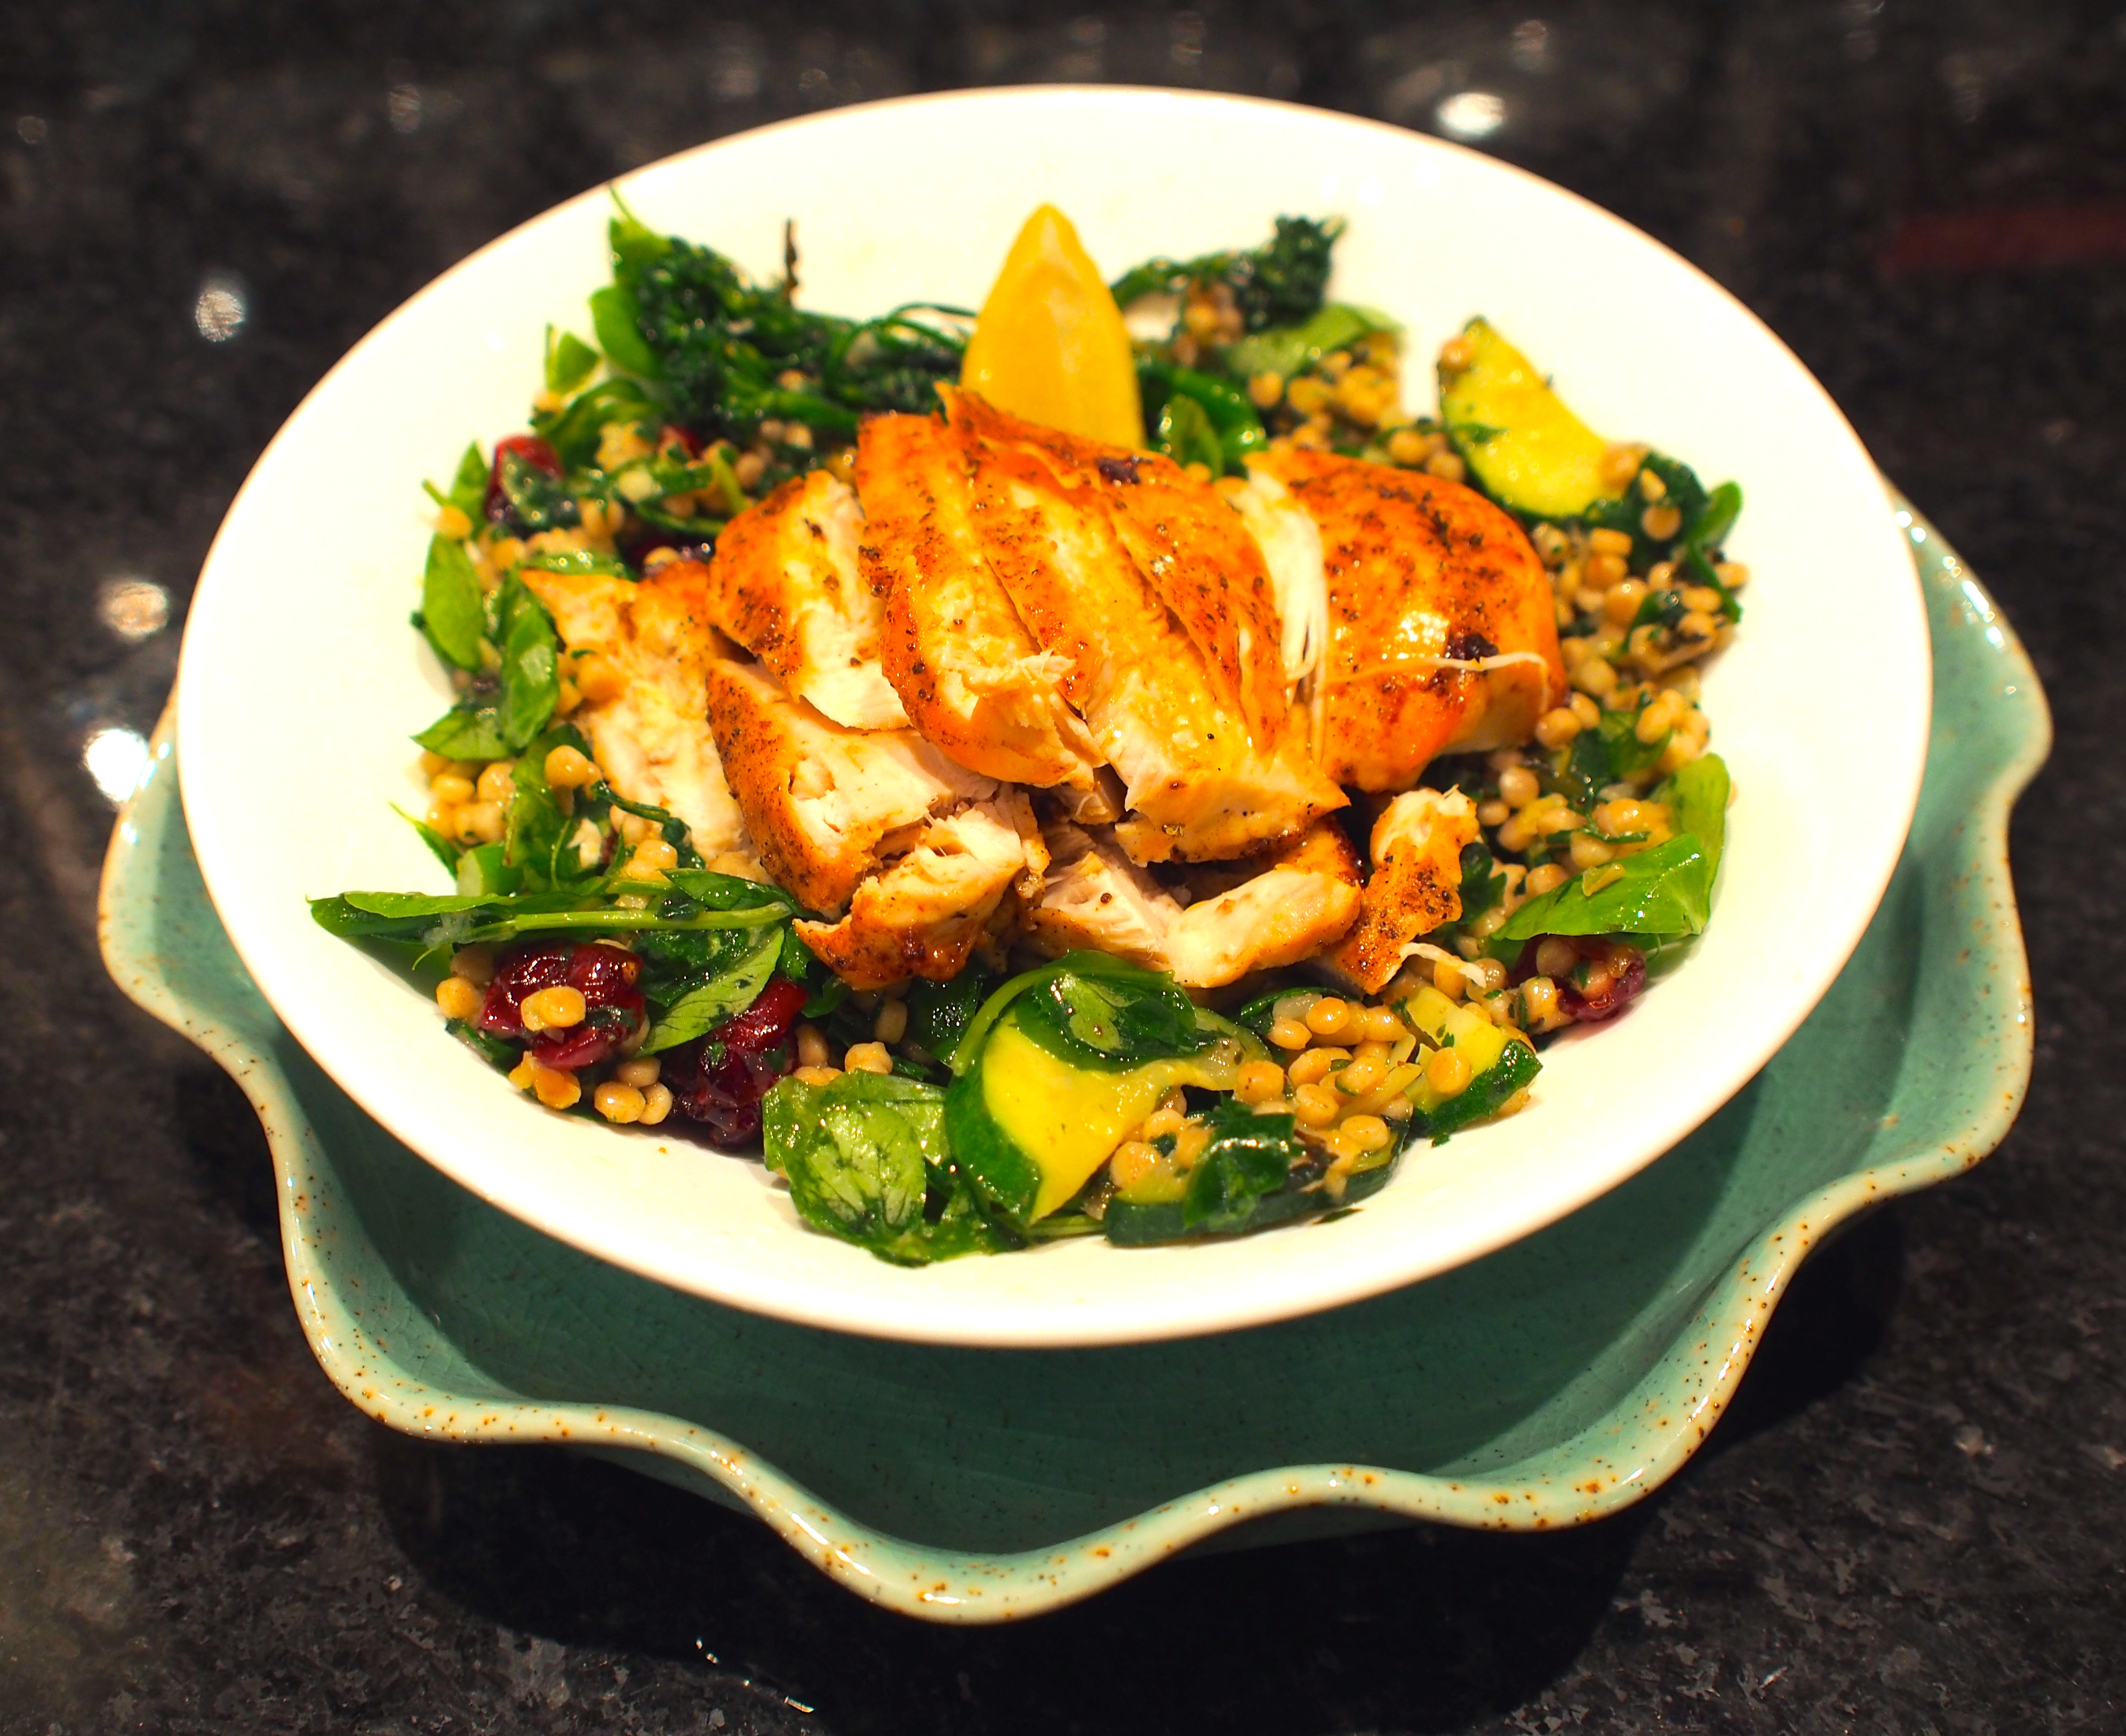
This dish is based very loosely on another Ottolenghi dish from Plenty – in it he combines rocket, onions, couscous and herbs.  It struck me that it’s the perfect sort of dish to adapt based on what you love, or have available.  Whilst rocket is peppery, for me pea-shoots impart a sweet freshness to the dish, that echoes the sweet and savoury shallots and cumin.  I rustled Hubby up some blackened chicken to go with his dish, and the whole thing was done and dusted in the time it took to roast – no more than 25 minutes from beginning to end.  This is one dish I’ll make dozens of variations of, and will treat as a method, rather than a recipe to adhere to rigidly.
Ingredients:

2 shallots
1 medium courgette
100g giant couscous
200g boiling water
1 tsp ground cumin
1 large clove of garlic
A handful each of parsley, mint, chives and chervil (whichever you have to hand or love)
80g pea-shoots
50g dried cranberries
olive oil, to fry the shallots in
Juice of one lemon, to dress
Extra virgin olive oil, to dress

Method:

  • Measure one mug of giant couscous into a bowl, and measure two mugs of boiling water, at the same level, pouring into the bowl.  Cover the bowl with cling film and set to one side (the couscous will cook in the residual heat of the boiling water – this method is sometimes called the absorption method, and will take around 15 minutes).
  • Finely slice two small shallots, and add to the pan with the olive oil.  Gently fry until they are golden brown.  Add a scant teaspoon of cumin powder, and lightly toss the mixture together.
  • Add the crushed garlic to the pan and soften without browning.
  • Cut the courgette into diagonal slices (if it pleases you), and if large, cut those slices in half.  Cut the broccoli into manageable sections, and add both the broccoli and courgette to the pan.  When lightly cooked, set the pan aside to cool a little.
  • Finely chop (or mince) a large handful of mint, parsley, chives, and chervil – or whichever herbs you prefer.
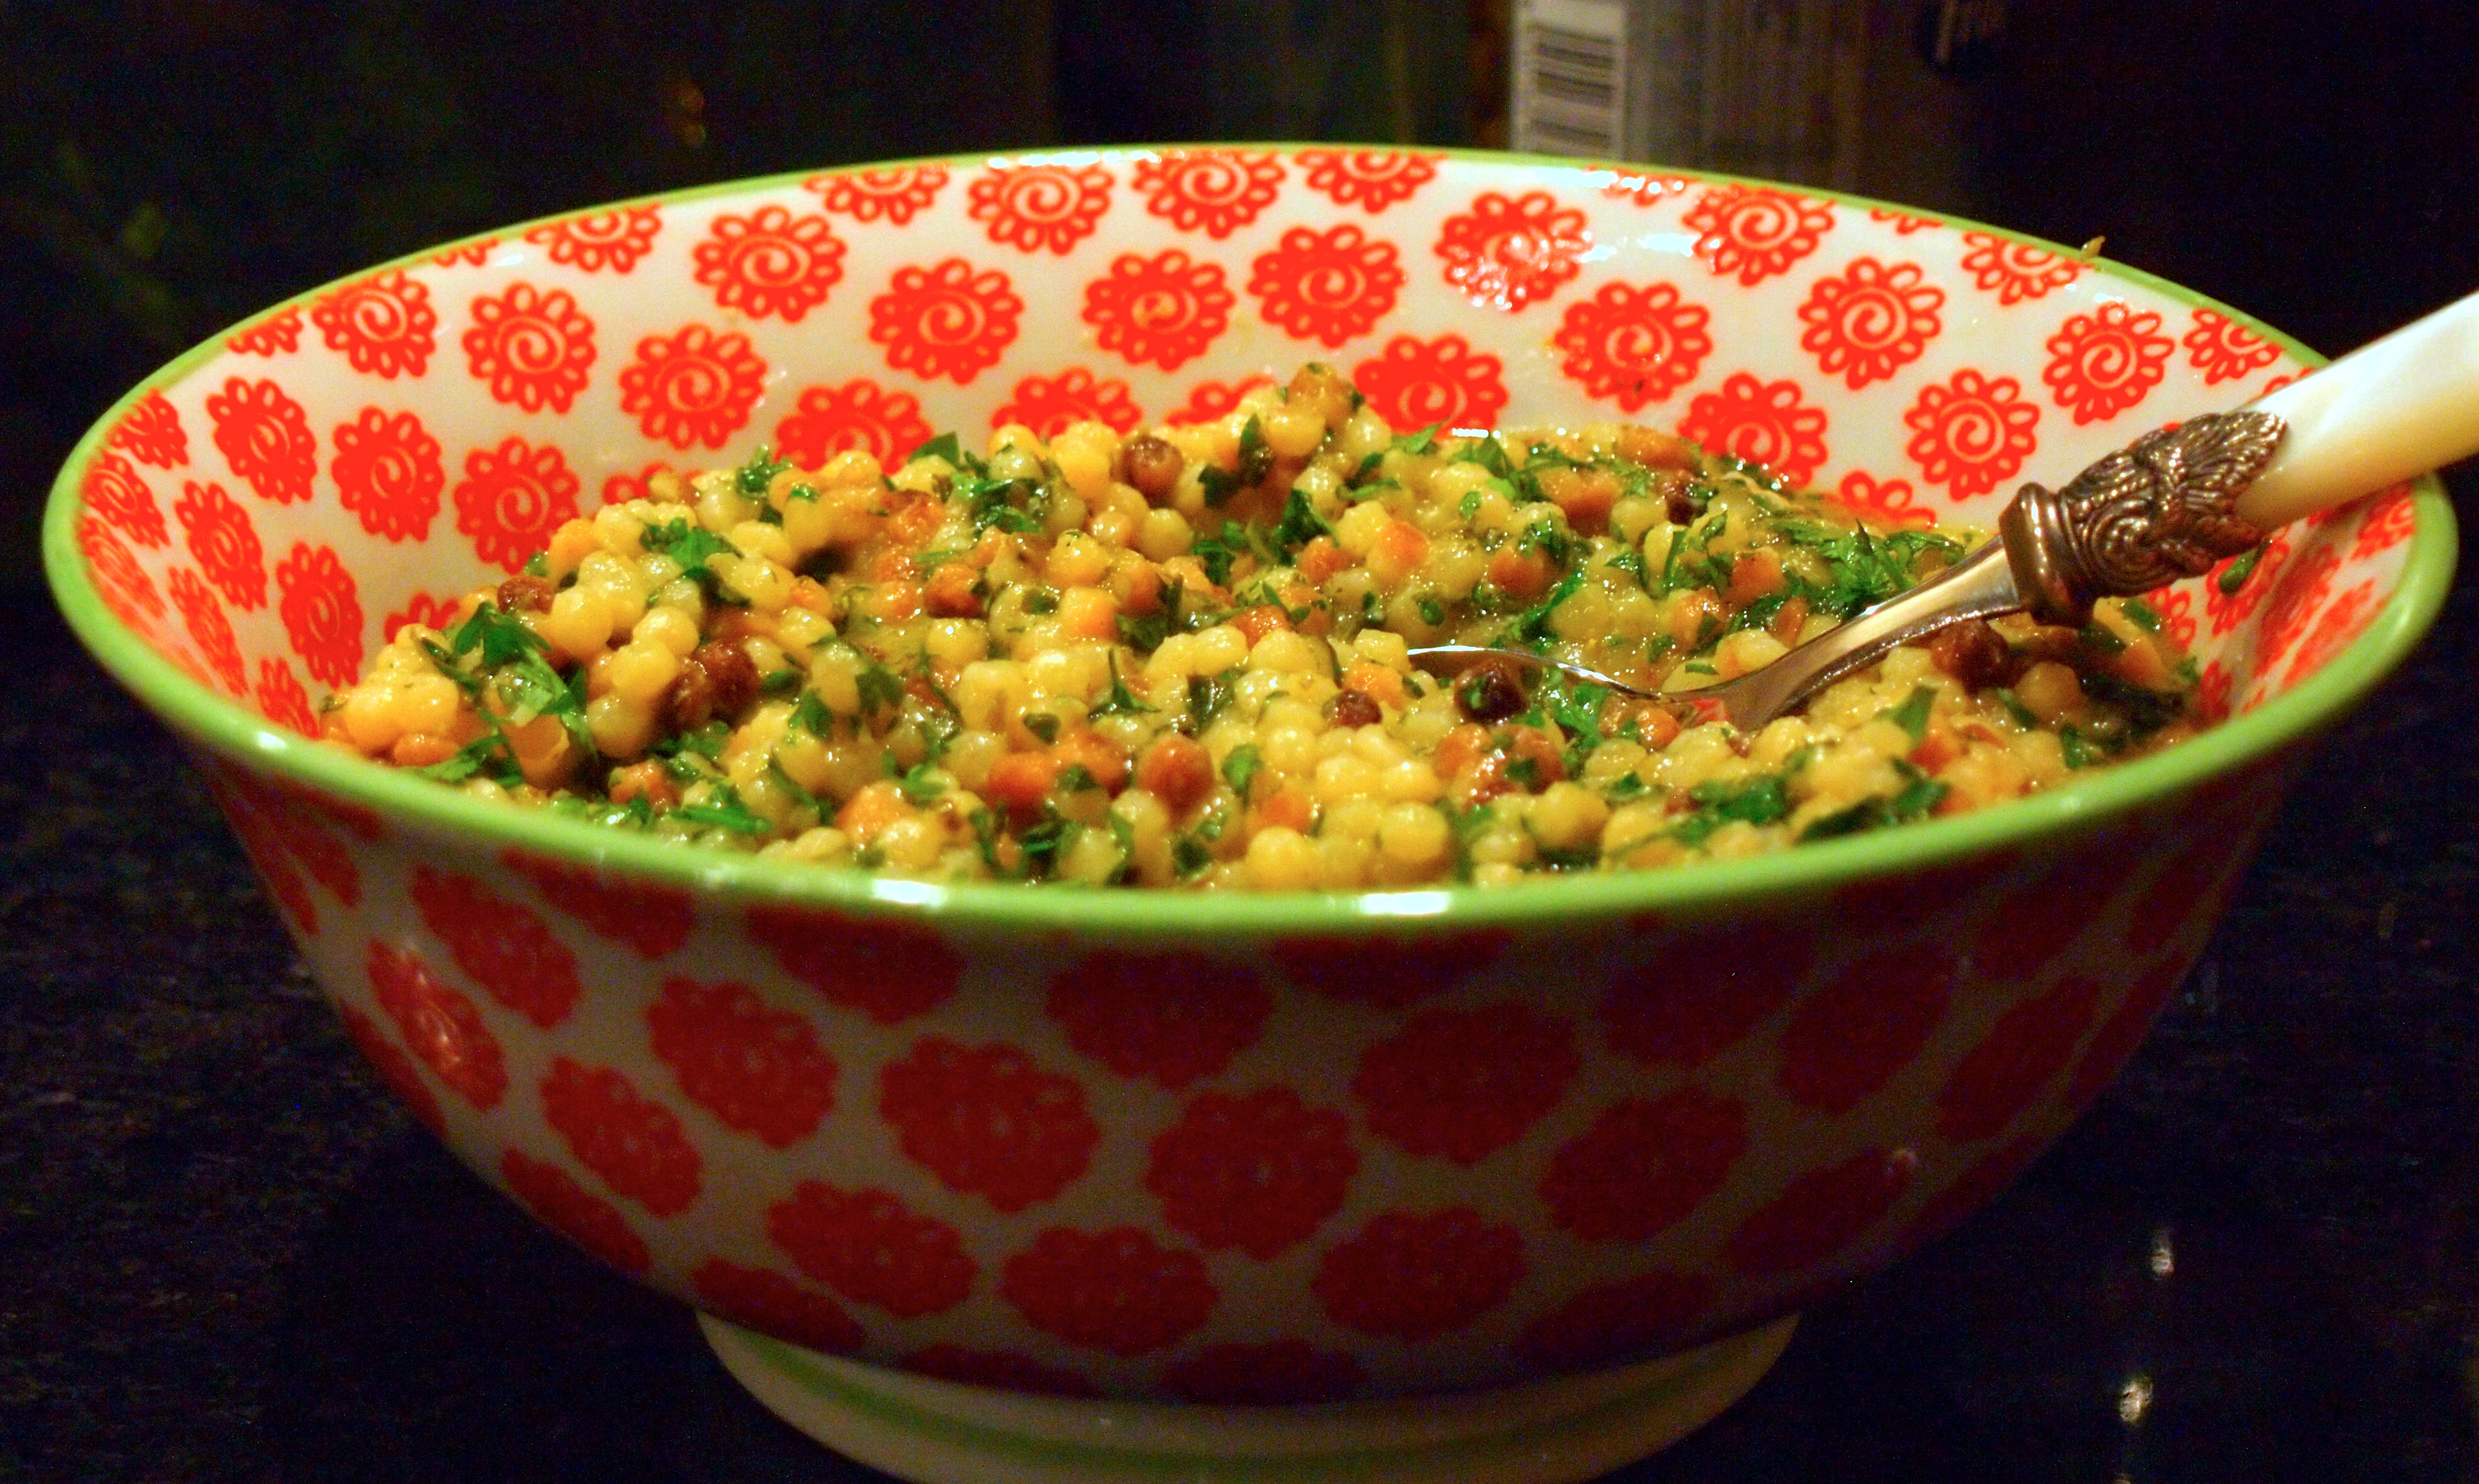
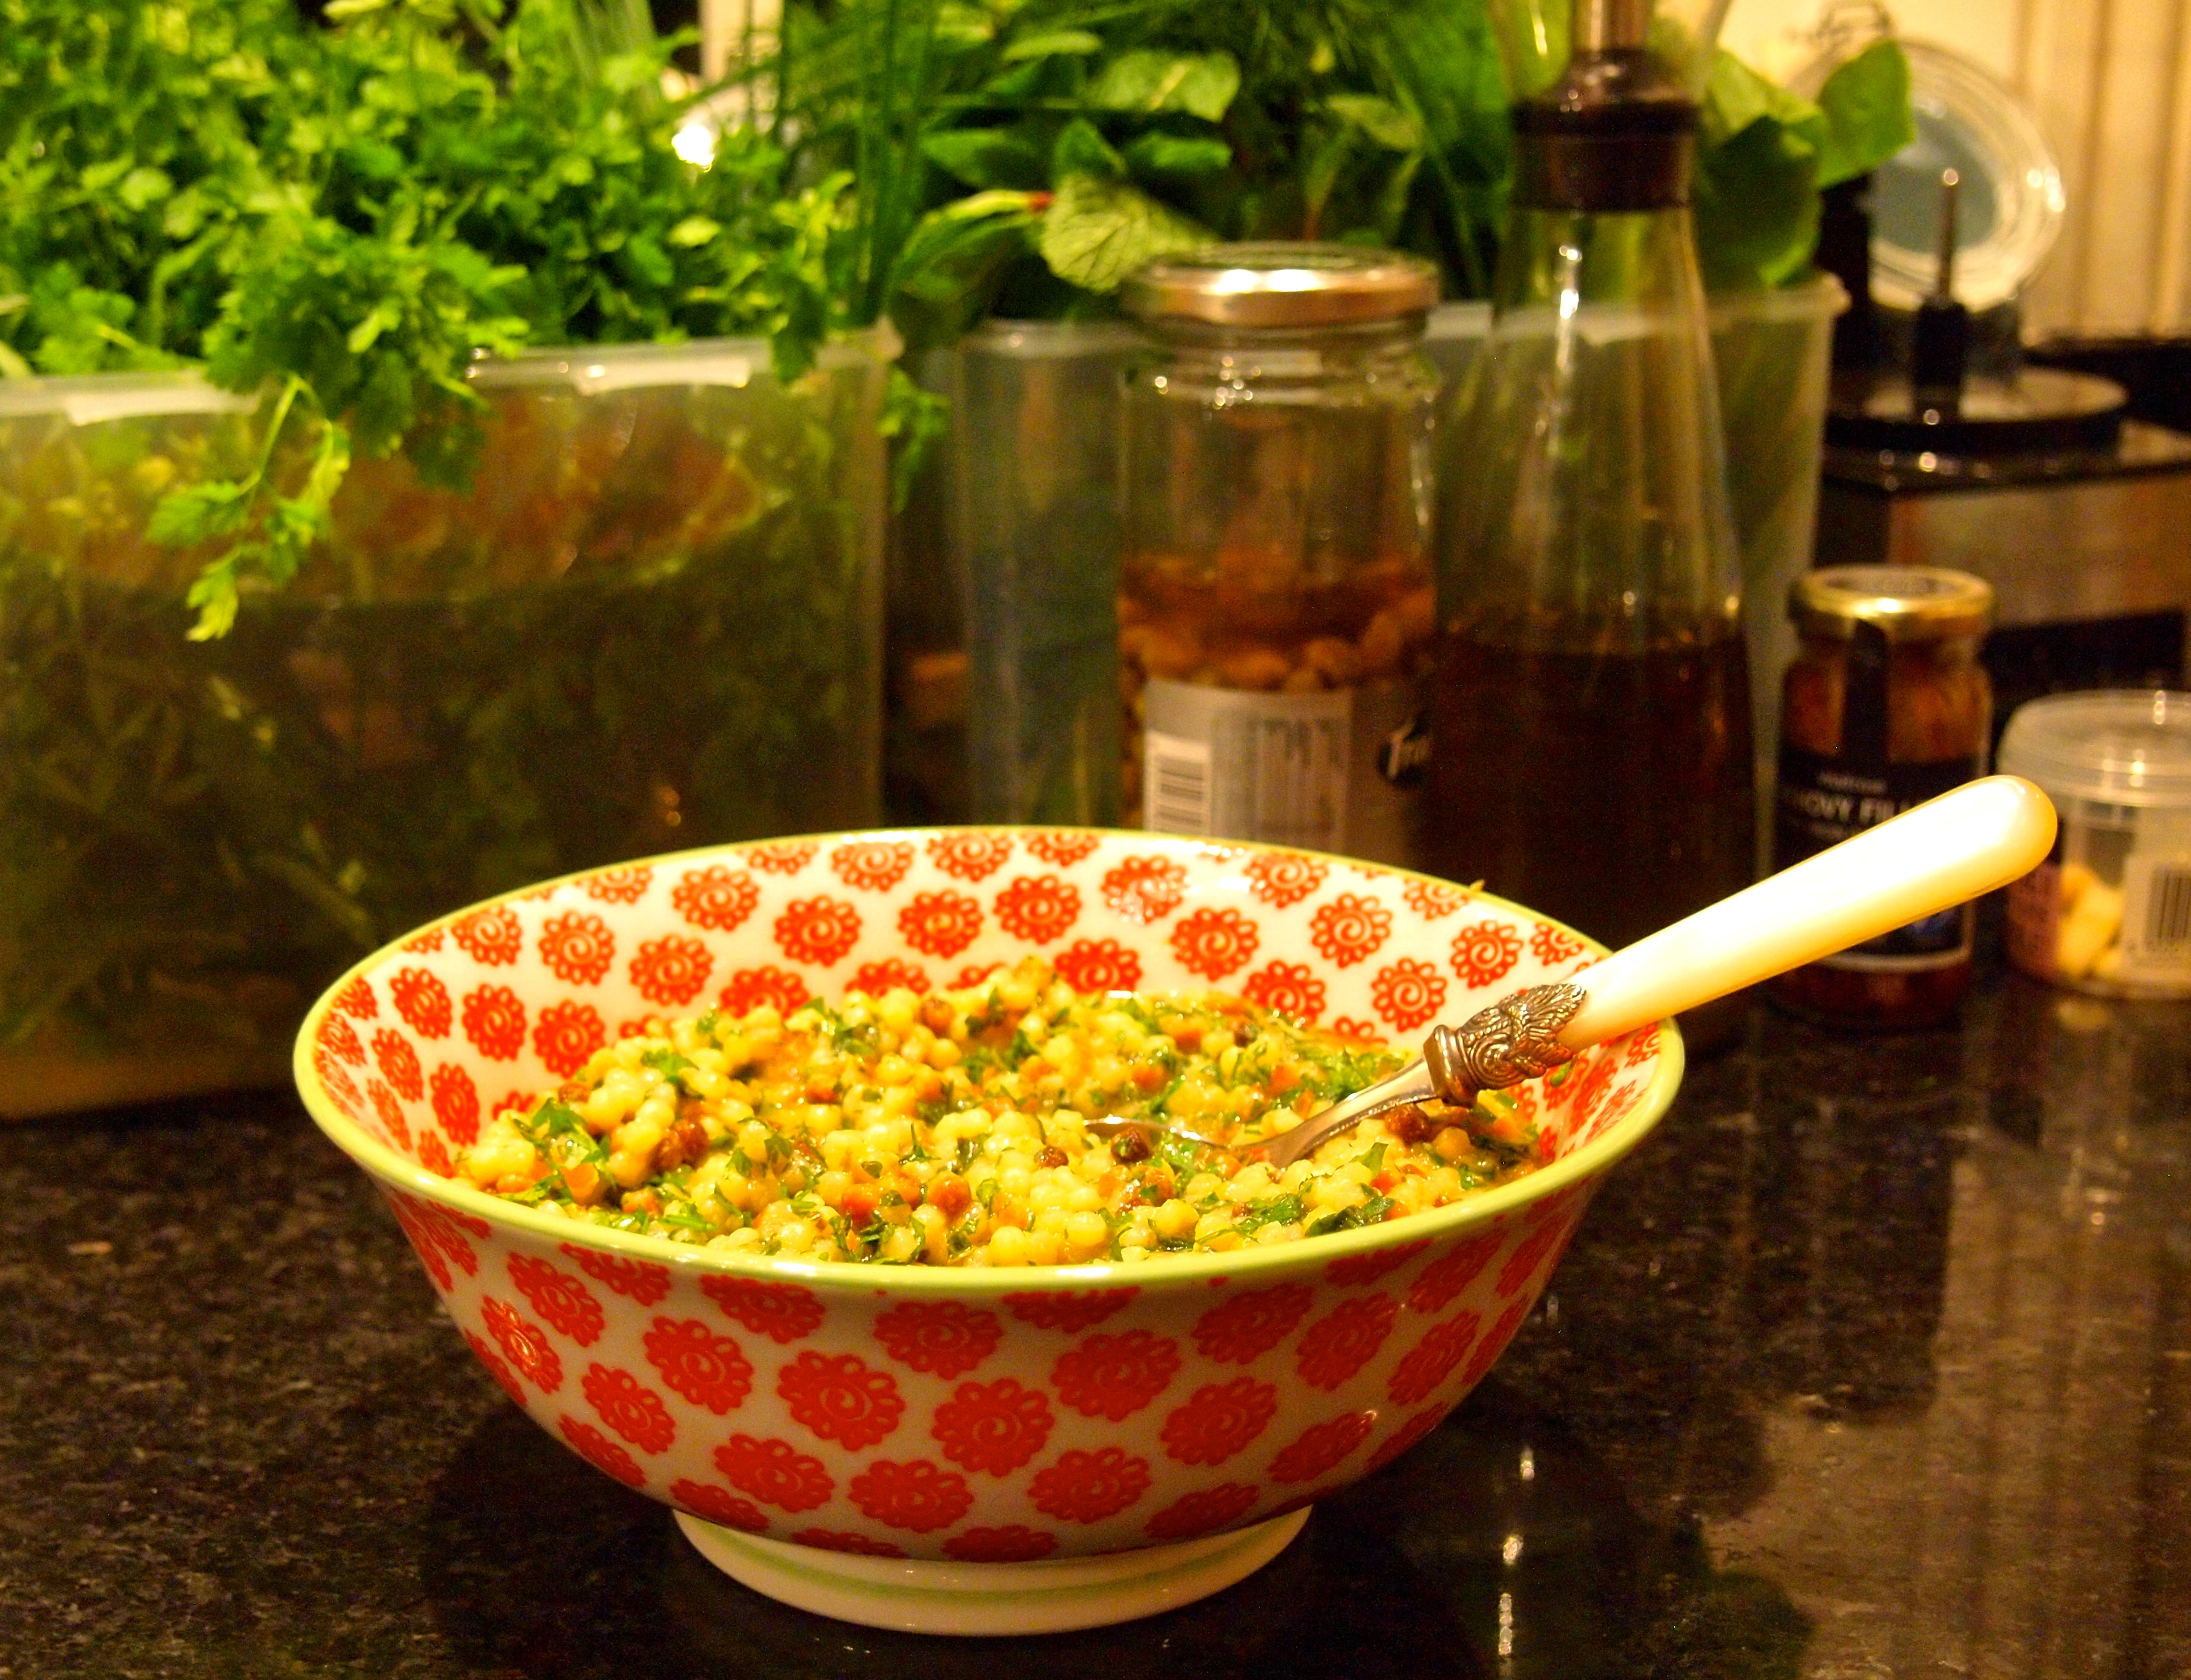
  • When everything is ready, combine your pea-shoots, drained couscous, herbs and vegetable together in a bowl.  If you don’t mind fruit in your couscous, and I realise it’s not for everyone, add around 50g of dried cranberries, or sour cherries.
  • Drizzle with a little good virgin olive oil, and the lemon juice

OLYMPUS DIGITAL CAMERA OLYMPUS DIGITAL CAMERA

October 13, 2014 FrontPage

Crusted pumpkin wedges, with soured cream

This dish is from Yotam Ottolenghi’s Plenty, and he’s quickly becoming my go-to chef… Though I still blog meat and fish dishes, I’m increasingly eating vegetables, and you can guarantee his recipes still pack enough punch to make up for that.  For some reason, an onion squash has appeared in my kitchen… No doubt one of the children has spotted it somewhere, and convinced that halloween is on the way, coerced Hubby into buying it.  Little do they know it’s just become my supper… Well, after all, they can always buy another…  Though the recipe calls for a larger squash than mine, it still tastes magnificent.

Serves 4

Ingredients:

700g pumpkin (skin on, or any other squash)
50g Parmesan, grated
20f dried white breadcrumbs (panko in my case)
6 Tbsp finely chopped parsley
2½ tsp finely chopped thyme
grated zest of 2 large lemons
2 garlic cloves, crushed
60ml olive oil
120g soured cream
1 Tbsp chopped dill
salt and white pepper

Method:

Preheat the oven to 190ºC/Gas Mark 5.  Cut the pumpkin into 1cm thick slices and lay them flat, cut side down, on a baking sheet that has been lined with greaseproof paper.

To make the crust, mix together in a small bowl the Parmesan, breadcrumbs, parsley, thyme, half the lemon zest, the garlic, a tiny amount of salt (there is salt in the Parmesan) and a little pepper.

Brush the pumpkin generously with olive oil and sprinkle with the crust mix, making sure the slices are covered with a few millimetres of the coating.  Gently pack the mix down a little.

Place the tin in the oven and roast for about 30 minutes or until the pumpkin is tender: stick a knife in one wedge to make sure it has softened and is cooked through.  If the topping starts to darken too much, cover loosely with foil.

Mix the soured cream with the dill and some salt and pepper.  Serve the wedges warm, sprinkled with the remaining lemon zest with the soured cream on the side.

Notes:

  • If you have a combination of herbs you prefer, do feel free to use them.  On my counter I had chervil, parsley, dill and thyme, and as I like that aniseed hit, I went with that
  • It would have been nice to use a larger squash to give a larger surface area, but the onion squash worked perfectly well.  It also has the advantage of having a delicious skin when cooked
  • The smell of the garlic and lemon, as soon as this hits the oven, is ridiculous.  It’s worth doing as a side-dish for that alone, your kitchen will smell amazing…  For vegetarians, this is enough of a dish to satisfy your taste-buds
  • We dressed ours with a little extra-virgin olive oil, and some lemon juice

OLYMPUS DIGITAL CAMERA OLYMPUS DIGITAL CAMERA

OLYMPUS DIGITAL CAMERA

October 12, 2014 FrontPage

Fregola Sarda, with Salsa Verde

Fregola Sarda is a form of pasta from Sardinia, similar to Israeli couscous, or giant couscous, but toasted in an oven which gives it an additional dimension.  If you can’t find fregola sarda, you could substitute giant couscous.

Cook as per the cooking instructions – in my case it was simmering in boiling water for around 10 minutes.  Make sure you drain the fregola well, allowing it to sit in a sieve over the pan for 5 minutes, to let off a little of the steam.

Salsa Verde Ingredients:

4 anchovies (in olive oil)
4 large handfuls of herbs (I used parsley, chervil, basil, coriander, and mint)
2 Tablespoons of capers
Extra virgin olive oil (as much as it takes to emulsify the sauce, about 200ml for me)
Juice of 1 lemon
2 cloves of garlic

Method:

I much prefer to chop my herbs and capers by hand, as I hate the texture when I process them, but that doesn’t stop me whizzing my anchovies, olive oil, lemon juice and garlic into an emulsion.  When it’s a near fine consistency, pour over the hand-chopped herbs and capers, and season to taste (it should already be pretty punchy, but don’t forget you’re going to use it to sauce the fregola, so that will dilute it somewhat.

When you’re ready to serve the fregola, mix in the salsa verde thoroughly.

This is an excellent accompaniment to any dish, though I’m not sure I’d have it on its own.

OLYMPUS DIGITAL CAMERA

September 28, 2014 Burrata

Burrata, Tamarillo and Fennel Pollen…

OLYMPUS DIGITAL CAMERAI have a whole post on the delights of tamarillo’s, so I shan’t bore you again, except to say that they must be in your top 100 foods to try before you die… Trust me – they’re stunning…  This particular dish makes the most of the tamarillo’s ridiculously high umami levels, and pairs it with silky smooth, creamy burrata.

For those who’ve not tried it, burrata is a combination of mozzarella and cream, and must be eaten as fresh as possible – make sure you buy when you intend to eat it.  The chef who created this dish is Ollie Dabbous, of the eponymous Dabbous restaurant, and is from his long-awaited cookbook.  If you can’t get a table at the restaurant, at least you can try his food at home…

With a dish this simple, it’s crucial that you buy the best possible ingredients.

Ingredients:
2 large tamarillos
25ml extra virgin olive oil
25g caster sugar

Method:

  • Score the base of each tamarillo with a cross
  • Blanch for 5 seconds in a pan of rapidly boiling water, then drain and plunge into a bowl of iced water
  • Peel, then cut lengthways into quarters
  • Pour the olive oil into a baking tray and sprinkle over half the sugar
  • Place the tamarillos in the tray cut-side down and scatter over the remaining sugar
  • Place in an oven on its lowest setting for about 30 minutes, basting regularly with the pan juices
  • Turn the tamarillos on to the other cut side and repeat the process
  • Finally, place on the exterior side and repeat the process once more
  • Remove from the oven and leave to cool

To assemble:
240ml extra virgin olive oil
32 basil leaves
2 burrata, sliced into 4 pieces each
fennel pollen

  • Divide the olive oil between 8 serving bowls
  • Place 4 basil leaves on the right-hand side of each bowl and top with a slice of burrata
  • Sprinkle a pinch of fennel pollen over each one
  • Place a wedge of confit tamarillo alongside

Notes:

  • Yes, that cooking temperature is a little vague.  I tried it first on 35ºC, and frankly I’d have been there all night.  I moved up to 60ºC, then 120ºC, in each instance I had to up the timing.  Given that this is something you can make ahead, just give yourself loads of time, keep them as low as you can, until you reach the desired colour.  By taking mine up to 120ºC I made them a little more candied than confit, and the second time I just took it really slowly
  • Do sprinkle a tiny bit of salt onto the tamarillo, it just sets it off
  • Do use the best olive oil you can for the plating process – I used one we bought cases of in Italy – you can read about it here
  • I’m not sure I’ll do the whole peeling thing in future, but will just whip of the skin with a knife, as I’ve always done
  • Ollie says raw tamarillos are inedible, actually that’s not true – try them – but the skin should be removed before you do
  • It’s worth making a batch – like confit tomatoes, or sun-blush tomatoes, you could keep these in the fridge until you wanted to use them (perhaps not in quarters, but maybe eighths?
OLYMPUS DIGITAL CAMERA
You can purchase Ollie’s book here:


September 13, 2014 Baking

The Meringue Girls Meringue Kisses…

OLYMPUS DIGITAL CAMERAI love the Meringue Girls on many, many levels – they’re cute, and they’re cute! They’ve taken something basic and created a niche market – good for them… In addition, their cookbook has brilliant little video clips which can be accessed via the cookbook by scanning a special code on your iPhone. They’re fun, informative, simple, and definitely give you a sense of their personalities: that’s often difficult to achieve in a cookbook.

I’m particularly fond of their meringue kisses, because they’re easy to make, they look fabulous, and you can flavour them in all manner of ways.  They’re the perfect little gift, and make a great item for a charity bake sale.  My most popular flavour are the passion fruit, though the cocoa, raspberry and coconut are popular too.  (The coconut variety taste like a Bounty bar, without the additional calories.) I use Aromes, which are professional patisserie flavours, and these do make a difference.  If you’re going to make a large quantity of a particular flavour, an investment in them is well worth while – they also have the advantage of not adding too much liquid into your recipe.

The Meringue Girls technique is a little different to French Meringue (whisked with cold sugar), or Italian (whisked with a hot sugar syrup, and therefore cooked), or even Swiss (which is whisked over a bain marie to cook, then taken off the heat and whisked until cool).  In this method the sugar is heated in the oven while you’re preparing the whites… It does actually work well, so don’t feel it’s necessary to opt for a different technique.

I’m giving you their basic recipe – do look at their book for different flavour ideas…  Although the method section may seem quite long, do watch the videos included below the instructions – I promise you the Meringue Girls will make it all perfectly obvious in those videos

Ingredients:
150g free-range egg whites (5 medium eggs)
300g caster sugar
For flavourings, see Notes

Method:

  • Start by lining a large baking sheet with baking paper (this is the tray onto which you will pipe the meringues.  In reality this volume of ingredients will certainly fill two normal sized baking sheets, and at least one double oven sheet).
  • Pre-heat the oven to 200ºC.  Line a roasting tray with baking paper, pour in the caster sugar and put it in the oven for about 5 minutes until the edges are just beginning to melt. Heating the sugar will help it dissolve in the egg which more quickly to create a glossy stable mixture.
  • Meanwhile, weigh your egg whites in the free-standing mixer bowl, or a non-plastic bowl.  Make sure your bowl and whisk are free from grease.  Whisk slowly at first, allowing small stabilising bubbles to form, then increase the speed until the egg whites form stiff peaks, and the bowl can be tipped upside down without the egg falling out.
  • Keep an eye on the mixture and stop whisking just before it turns into a cotton woolly appearance, at which point the mixture will be over-whisked and will have lost some of the elasticity in the egg white protein
  • At this point, the sugar should be ready to take out of the oven.  Turn down your oven to 100ºC.  Leave the door ajar to speed up the cooling.
  • With the whites stiff and while whisking again at full speed, add one big tablespoon of the hot sugar ager another to the meringue mixture, ensure that it comes back yup to stiff peaks after each spoonful of sugars. Don’t worry about any small clumps of sugar, but avoid any larger chunks of caramelised sugars from the edges of the roasting tray.
  • Once you have added all of the sugar, continue to whisk on full speed for about 5-7 minutes.  Feel a bit of the mitre between your fingers, and if you can still feel the gritty star, keep whisking at full speed until the sugar has dissolved and the mixture is smooth, and the bowl is a little cooler to the touch.  The mixture will continue to thicken up during this stage.  You know when it’s read to use as it will form a nice smooth, shiny peak on the tip of your upturned finger.
  • To pipe the meringue kisses, turn a piping bag inside out, and place it over a jug or bottle, so that it stays in place.  Using natural good colouring and a clean paintbrush, paint 5 thick strips from the tip of your piping bag to halfway down the bag.
  • Then carefully spoon your stiff meringue mixture into the piping back, and turn the bag back the right way around.  You need to pack the meringue mixture in tightly, ensuring there are no air bubbles.
  • With sharp scissors, cut the tip of the piping bag to the size of a 20p coin.
  • To get the piping bag flowing, use some of the mixture to pipe small dollops onto the four corners of your baking sheets, and use like glue to stick your baking paper to the sheet.
  • Hold the piping bag with both hands, placing your dominant hand at the top of the piping bag and your other hand halfway down the bag.  Use the top hand to apply pressure and the lower hand to control the flow of the kisses.  Squeeze the bag (like and udder!) to form the kisses.  They should have a 5cm diameter and a big peak at the top.  You can use different nozzles for different effects.  For example a star nozzle will give you beautiful little star-like kisses.
  • Once you have assembled your meringues into the desired shapes on your lined baking sheet (leaving a couple of centimetres between each shape), bake for approximately 30-40 minutes.  Take them out of the oven as soon as they lift off the baking paper with their bases intact.
  • Leave them to cool on the baking sheet.

Notes:

  • It’s easier to use a liquid egg white, such as Two Chicks, rather than separating and measuring eggs
  • The Meringue Girls use a ratio of 1:2, egg whites to sugar.  I have seen other ratios, but for meringue kisses, this ratio works fine
  • Room temperature whites achieve more volume than cold whites, so once you’ve measured them, allow them to come to room temperature – usually around 30 minutes
  • Your equipment must be clean of grease – if necessary wipe a cut lemon around the inside of the mixing bowl
  • Flavourings can be added by including an ingredient directly into the mixture (for coconut, you stir 25g desiccated coconut into one batch, and sprinkle 25g over the batch – but I also included a few drops of coconut Arome; for chocolate you take 3 Tbsp of cocoa, including half into the mixture, and scattering the remainder over the meringues before cooking (though I did include a little chocolate flavouring in them too).
  • I don’t take my meringues out of the oven straight away, as I found they had a tendency to crack, from being cooled down too quickly.  I turn off the oven, and stick a wooden spoon into the top of the oven door, propping it ajar…
  • Any extra meringues will keep for two weeks in an air-tight container, though I doubt they’ll last that long, particularly if you have children!
You can watch the Meringue Girls in the following clips:
With Paul Hollywood
How to make the mixture
Colouring and piping the mixture
Giant meringues
The Rainbow Cake
Tips and techniques
You can get the Meringue Girls book here – and it’s well worth having a look – there’s much more in there than just the kisses…
I’ve used coconut kisses as an element in a pineapple and coconut dessert:
Coconut meringues, coconut creme pattisserie,
brioche pain perdu, compressed pineapple, lime sorbet
They are also an intrinsic part of my petit-four collection, along with pâte de fruit, marshmallows, peanut butter fudge, macarons, and truffles.
Huge close up of coconut kisses…
A little bit of a joke, deliberately coloured and squat,
to look a little like little hats for some sugar work I was making
Production line for the school Christmas Fayre, along with
pâte de fruit – there are passion fruit, raspberry, cocoa, and blackberry there
Cocoa and chocolate flavoured meringues 

July 13, 2014 Baking

Coconut Milk Creme Patisserie

231d6-p1010309I use the standard Creme Patisserie recipe on the blog a lot, but in a recent recipe (which contained a coconut curd), I thought I might make a coconut milk variation – after all the fat content of coconut milk is quite high, and the consistency can be similar to milk.  I altered the recipe slightly, but that was because I included 30ml of Malibu, and an increased quantity of flour – I wanted to be able to pipe the creme pat into quite stiff peaks on the plate, for a specific dessert.
Ingredients:

300g coconut milk 60g unrefined caster sugar
30g unsalted good quality butter
30 ml Malibu 45g plain flour
3 free range egg yolks
the seeds from 1 vanilla pod
pinch of salt

Method:

Put all the ingredients into the Thermomix bowl and cook for 7 minutes at 90C, speed 4.

Give it a quick whizz at the end to ensure it’s smooth, then pour into a bowl and cover with cling film until it’s cool.
 
Yes – that’s it!  Keep it in your fridge until you require it.

Oh. And if you’re stupid enough to stick in a block of quite cool butter, do put the lid on properly and start the machine quite slowly.

January 2, 2014 FrontPage

CakePops are Dead! Long live the MallowPop!

We’ve all made cake pops – good grief – what a bore!

For starters, who really wants a mouthful of dry cake, mixed with sickly sweet buttercream? Then there’s the fact that they take soooo long to make, fall off if you make them too big, or include too much buttercream… No, no.  The cakepop is dead.

So, what’s the alternative?  Clearly you’re reading my MallowPop post, so the answer must be a MallowPop – yay!

For starters:

  • the basic varieties are much easier to make
  • they actually last for much longer than cake pops, which means you can make them much further in advance – a real boon for those of us baking for cake sales, parties etc
  • anything you can do to a cakepop, you can do to a mallowpop
  • mallowpops can be made gluten-free – a huge boon if you’re creating for the masses
  • they also allow you a huge amount of scope in terms of decoration, flavouring etc.
  • you can make your own marshmallows if you really want to up the flavourings and complexity

I would almost go on to say that they offer the same customisation scope as macaron – and potentially far more flavour impact variations than cake…

But let’s not get ahead of ourselves – let’s start with the basic idea.  Anyone can take a packet of marshmallows, and cover them in chocolate – even using candy melts if you have to…  At this level it’s a great thing for kids to get involved with too, and nowhere nearly as traumatic as cake pops.

So lets begin….

Of course I may have lied a little, when I said I’d press on with the basic MallowPop.  But if you know me, you’d know that I have a mini-aversion to rubbish ingredients… If you’re going to make a decent MallowPop, I think it’s worth spending a little more time and money on decent ingredients.  I promise I will however post shortly using candy-melts, or something of that ilk.

Let’s start with a few basic couveture chocolate rules:

  • chocolate (generally) hates water – if you’re going to use a bain-marie to melt your chocolate, make sure you never drop any water into the melted chocolate – it will seize the mixture
  • all pre-tempered chocolate (which is generally what you’d be buying, already has tempered crystals in it.  We’re not going to talk extensively about that now, just bear that in mind
  • if you melt tempered chocolate to it’s given range (which is usually printed on the packet!), you will not take the chocolate out of temper (that is, remove the crystals)
  • even if you do take the chocolate out of temper, just add a bit more of the tempered chocolate back into it, and that will reseed the chocolate
  • calm down, none of this is as complicated as it sounds
  • very generally speaking, if you keep the temperature of the chocolate between 26ºC and about 38ºC, you will not have any problems
  • if you’re going to melt your chocolate in a microwave (which I do), make sure you only do it in 15 second busts, and check the temperature towards the end
  • always microwave your chocolate in a plastic, not glass bowl, and use a plastic spoon when mixing
  • an infrared / laser thermometer is an absolute god-send for checking the temperature of chocolate, as you don’t have to put it into the chocolate
  • always use fresh marshmallows – even marshmallows which have been out for 12 hours in an airtight box are too old – the chocolate will peel away, and the mallowpop is too dry
  • by far the best thing to set chocolate onto is food-grade acetate, which is inexpensive to buy
  • if you’re lucky enough to have Neff warming drawer ( I adore mine), you can keep several bowls of chocolate in temper while you’re working by keep them at the 1.5 setting – check the temperature again before you begin, and if over 38ºC, you can reseed them with a handful of fresh chocolate
  • I’ve found I can actually keep chocolate in temper overnight in the warming drawer, though it’s probably best to take it down the the 1 setting
MallowPop Method
  • As a basic method, take a freshly opened pack of marshmallows (or make your own, more on that later), and taking a 15cm cake pop stick, dip the stick into the melted chocolate, and plunge into your marshmallow
  • I found it easier to put all the marshmallows vertically onto a chopping board, and then plunge the stick in on that
  • Wait for a few minutes until the chocolate has set-up a little, and then swirl the marshmallow into a bowl of tempered chocolate.
  • Put the MallowPop either onto acetate to set, or using an old piece of polystyrene,  allow the chocolate to set there…  If the chocolate is still in temper, it should set within a couple of minutes


Chocolate Suppliers:

Vantage House
The Chocolate Trading Company

April 10, 2013 Recipe

Chocolate Delice

I realise that I don’t usually pay homage to a chef when making a recipe, but the legendary Monsieur Blanc is no ordinary chef!  Nearly as important to my culinary journey as the Roux Brothers, Raymond is completely self-taught, and his Manoir aux Quat’Saisons has held two Michelin stars since 1985 – no mean feat.  As well as sharing my birthday, Raymond is a most amusing and very brave man – he served both his first and second wife a croquembouche on their wedding day…

This delice was featured on Kitchen Secrets, a most enlightening look at a number of dishes and techniques.  Every time I see an episode, I note another little detail.  You can see this particular recipe on You Tube, which certainly shows you how simple it can be.

Ingredients

For the base
100g/3½oz toasted hazelnuts
100g/3½oz caramelised sugar pieces
150g /5¼oz bran flakes, slightly crushed

For the delice
140ml/5fl oz full-fat milk
325ml/11½fl oz double cream
2 free-range eggs
340g/12oz good-quality dark chocolate, minimum 60 per cent cocoa solids, roughly chopped

For the caramel hazelnuts
125g/4½oz caster sugar
8 hazelnuts, shells removed, lightly toasted in a dry frying pan

For the coffee foam
200ml/7¼fl oz strong black espresso coffee
1 sheet gelatine, soaked in cold water for 10 minutes, drained

To serve
2-3 tbsp cocoa powder
1 tbsp freshly ground coffee beans

Preparation method

  • For the base, blend the hazelnuts and caramelised sugar pieces in a food processor until you have a smooth paste. Heat the paste in a small pan on a gentle heat until warmed through.
  • Place the bran flakes and warmed praline paste into a mixing bowl and scrunch them together, using your hands, until the bran flakes have broken down and been incorporated into the paste.
  • Line a baking tray with a sheet of greaseproof paper, then transfer the praline mixture onto it. Cover the praline mixture with a second sheet of greaseproof paper, then roll the mixture out until it measures at least 14cm x 20cm/5½in x 8in and is 0.5cm/¼in thick.
  • Remove the top sheet of greaseproof paper, then push a 14cm x 20cm x 3cm/5½in x 8in x 1¼in rectangular pastry frame down onto the praline mixture and trim off any excess. (NB: The excess praline mixture can be pressed into any gaps in the mould, if necessary.)
  • Cover the mould with greaseproof paper and chill the praline in the fridge for 30 minutes, or until set.
  • Meanwhile, for the delice, heat the milk and cream in a saucepan and heat gently over a medium heat until it just reaches boiling point.
  • Meanwhile, whisk the eggs in a bowl.
  • As the milk and cream mixture comes to the boil, pour it over the eggs, then whisk the mixture constantly until smooth and thick.
  • Stir in the chopped chocolate and whisk again until the chocolate has melted and the custard is smooth.
  • Remove the base from the fridge and pour in the chocolate delice to fill the mould. Gently tap the sides of the mould to release any trapped air bubbles, then smooth the surface using a palette knife. Chill in the fridge for 6-12 hours, or until completely set.
  • Meanwhile, for the caramel hazelnuts, heat the caster sugar in a pan over a low heat, stirring occasionally until golden-brown and caramelised. Remove from the heat and set aside to cool slightly. (NB: The caramel is cool enough when a cocktail stick dragged across its surface leaves an imprinted trail.)
  • Spear each hazelnut onto a cocktail stick, then dip the hazelnuts into the caramel until coated. Stick a little adhesive putty onto the underside of a shelf or cupboard above a worksurface and secure the cocktail stick into the putty, so that the caramel drips off the hazelnut and creates a tail. (NB: Place a baking tray or sheets of greaseproof paper underneath the hazelnuts to catch any caramel that drips.)
  • Set the caramel hazelnuts aside to cool and harden for at least 30 minutes.
  • For the coffee foam, just before serving, heat half of the coffee in a pan until just hot but not boiling.
  • Squeeze the gelatine sheet dry, then add it to the hot coffee and continue to warm until the gelatine has completely dissolved.
  • Pour the remaining cold coffee into a bowl, then add the hot coffee mixture to it. Whisk well until the mixture starts to foam.
  • To serve, heat the outside of the mould using a chefs’ blow torch to loosen the base of the delice. Carefully remove the pastry frame from the delice.
  • Heat the top of the delice very quickly using a chefs’ blow torch to make the surface glossy. Dust the delice with some of the cocoa powder and ground coffee beans.
  • Smear a teaspoonful of the coffee foam across the width of six to eight serving plates. Plunge the blade of a knife into boiling water to heat the metal, then slice the delice into six to eight pieces and place one onto each smear of foam, at an angle. Rest a caramel hazelnut against each slice. Dust each serving with the remaining cocoa powder.

Whisk the mixture constantly until smooth and thick

Stir in the chopped chocolate and whisk again until the chocolate has melted and the custard is smooth

It will look like this, leaving ribbons on itself…
Pour in the chocolate delice to fill the mould (I didn’t have a rectangular mould to hand)
Watch your caramel, it’s cool enough when a cocktail stick dragged across its surface leaves an imprinted trail
The finished article – a gigantic slice of chocolate delice – I’d recommend a slice about half the size

Primary Sidebar

Categories

  • ▼Recipe
    • Baking
    • Breakfast
    • Cheese
    • Dessert
    • Eggs
    • Fish
    • Heston Blumenthal
    • Italian
    • Jamie Oliver
    • Marcus Wareing
    • Mediterranean
    • Pasta
    • Patisserie
    • Risotto
    • Smoothie
    • Sous Vide
    • Squash
    • Thermomix
    • Vegan
    • Vegetarian
    • Yotam Ottolenghi

Categories

  • ▼Book Review
    • ⭐️⭐️⭐️⭐️
    • ⭐️⭐️⭐️⭐️⭐️
    • Baking
    • Meat
    • Patisserie
    • Restaurant Cookbook
    • Vegetarian
    • Yotam Ottolenghi

Categories

  • ▼Restaurant
    • 1 Michelin Star
    • 2 Michelin Stars
    • 3 Michelin Stars
    • British
    • Fish
    • French
    • Italian
    • Japanese
    • Peruvian

Categories

  • 101 Cookbooks (1)
  • 3 Michelin Stars (1)
  • Advert (1)
  • Alan Murchison (2)
  • Alba Truffle (1)
  • Almond (1)
  • Angela Hartnett (1)
  • Angler (2)
  • Art Journal (2)
  • Artichokes (1)
  • Axis (1)
  • Azelia’s Kitchen (1)
  • Baking (9)
  • Baldwin (1)
  • Bara Brith (1)
  • Basics (1)
  • Beef (1)
  • Beetroot (2)
  • Ben Spalding (2)
  • Blackberry Soufflé (1)
  • Blackening Spice (1)
  • Blood Oranges (4)
  • ►Book Review (75)
    • Baking (10)
    • Meat (1)
    • Patisserie (6)
    • Restaurant Cookbook (3)
    • Vegetarian (3)
    • Yotam Ottolenghi (2)
    • ⭐️⭐️⭐️⭐️ (16)
    • ⭐️⭐️⭐️⭐️⭐️ (8)
  • Bread (3)
  • Breakfast (1)
  • Breakfast Tart (1)
  • brioche (1)
  • Brockhall Farm (1)
  • Bruschetta (1)
  • Bryn Williams (1)
  • Burrata (1)
  • Butter (1)
  • Buttercream (1)
  • Camembert (1)
  • Canapes (1)
  • caraway (2)
  • Casserole (2)
  • Chelsea Buns (1)
  • Chestnuts (1)
  • Chicken (3)
  • Chickpea (1)
  • Chocolate (4)
  • Chocolate Fondant (1)
  • Christmas (1)
  • Ciabatta (1)
  • Cinnamon (1)
  • Citrus (1)
  • Citrus Drizzle Cake (1)
  • Clams (1)
  • Coconut (2)
  • Coconut Milk (1)
  • Confectionary (1)
  • Creme Patisserie (1)
  • Dan Lepard (1)
  • Dessert (1)
  • detox (1)
  • Doughnuts (1)
  • Dried Fruit (1)
  • Drop Scones (1)
  • Ducasse (1)
  • Duck Egg (1)
  • Eggs (3)
  • El Bulli (1)
  • en Cocotte (1)
  • Epi (1)
  • Eric Treuille (1)
  • fennel (2)
  • Fettuccini (1)
  • Fish (1)
  • FrontPage (28)
  • Fruit Tea (1)
  • Glutamate (1)
  • Goat’s Cheese (1)
  • Gỏi Cuốn (1)
  • Granita (1)
  • Herbs (1)
  • Heritage Tomato (1)
  • Hibiscus Flower (1)
  • Hope and Greenwood (1)
  • Ice-Cream (3)
  • Iced Berry Souffle (1)
  • Icing (1)
  • Italian (1)
  • James Martin (1)
  • Jelly (1)
  • Journal (9)
  • Karen Scott (1)
  • King Oyster Mushroom (3)
  • Kummel (1)
  • L’Ortolan (1)
  • Lamb (1)
  • Lavender (1)
  • Laverstoke Park (1)
  • Lemon (3)
  • Lemon Drizzle Cake (1)
  • Lemon Grass (1)
  • Lemon Meringue Tart (1)
  • Lemon Poppy Seed Muffins (1)
  • Lentils (1)
  • Limewood (1)
  • Liquorice (1)
  • Liquorice Ice-Cream (1)
  • Lobster (3)
  • Lucas Hollweg (1)
  • Luke Holder (1)
  • Macarons (1)
  • Mango (1)
  • Marcus Wareing (1)
  • Mark Lloyd (1)
  • Market (1)
  • Mary Berry (1)
  • Meringue (1)
  • Michael Moore (1)
  • Michel Roux (3)
  • Mint (1)
  • Mister Truffle (2)
  • Modernist Cuisine at Home (1)
  • Moroccan (1)
  • Muffins (3)
  • Murano (1)
  • Mushroom (1)
  • Ollie Dabbous (1)
  • Ollie Fararr (1)
  • Ox cheek (1)
  • Palourde Clams (1)
  • Pancetta (1)
  • Panna Cotta (1)
  • Parmesan (1)
  • Passion Fruit (3)
  • Pasta (1)
  • Patisserie (1)
  • Paul Heathcote (1)
  • Pea (1)
  • Peter Reinhart (1)
  • Petit Fours (1)
  • Philip Howard (1)
  • Pierre Koffman (1)
  • Pierre Koffmann (1)
  • Pimms (1)
  • Pistachio (1)
  • Pistachio Soufflé (2)
  • Pistacho (1)
  • Pork (1)
  • Prawn (1)
  • Quiche (1)
  • Rachel Allen’s 30 Day Muffins (1)
  • Raspberry (2)
  • Ravioli (1)
  • Raymond Blanc (1)
  • ►Recipe (192)
    • Baking (17)
    • Breakfast (2)
    • Cheese (1)
    • Dessert (7)
    • Eggs (3)
    • Fish (2)
    • Heston Blumenthal (5)
    • Italian (3)
    • Jamie Oliver (1)
    • Marcus Wareing (2)
    • Mediterranean (3)
    • Pasta (3)
    • Patisserie (7)
    • Risotto (1)
    • Smoothie (1)
    • Sous Vide (1)
    • Squash (1)
    • Thermomix (19)
    • Vegan (1)
    • Vegetarian (20)
    • Yotam Ottolenghi (2)
  • ►Restaurant (124)
    • 1 Michelin Star (17)
    • 2 Michelin Stars (9)
    • 3 Michelin Stars (3)
    • British (19)
    • Fish (4)
    • French (4)
    • Italian (3)
    • Japanese (1)
    • Peruvian (1)
  • Richard Bertinet (1)
  • Risotto (1)
  • Roganic (1)
  • Rolls (1)
  • Roux (3)
  • salad (2)
  • Salmon (2)
  • Sardinian Cookery (1)
  • Scandiliscious (1)
  • Sea Trout (1)
  • Sherbet Dab (1)
  • Signe Johansen (1)
  • Silvana de Soissons (1)
  • Simon Rogan (1)
  • Snail Caviar (1)
  • Soda Bread (1)
  • Sorbet (1)
  • Soufflé (11)
  • Soup (1)
  • Sous Vide (2)
  • Spice (1)
  • Stew (1)
  • Stuffing (1)
  • Sugar Baby (1)
  • Sugarwork (1)
  • Sumosan (1)
  • Supper (1)
  • Sweetcorn (1)
  • Sweetcorn Fritters (1)
  • Tamarillo’s (1)
  • Texturas Fizzy (1)
  • Thai (2)
  • The Bertinet Kitchen (1)
  • The Square (1)
  • Thermomix (10)
  • Toffe Fudge Muffins (1)
  • Tom Kitchin (1)
  • Tomato Bread (1)
  • Tony Fleming (4)
  • Tribute Dish (2)
  • Truffle (1)
  • Truffles (6)
  • Umami (1)
  • Uncategorized (1)
  • Vanilla (2)
  • Vegan (1)
  • Vegetables (1)
  • Vegetarian (3)
  • Verveine (1)
  • Vietname Summer Roll (1)
  • Watermelon (1)
  • William Curley (1)
  • yeasted dough (1)

I’m passionate about food, its provenance and its sustainability. As a technical cook, I like to see what’s happening in the kitchens of Michelin starred restaurants, but you’re just as likely to find me at home making sourdough. You can find some of my recipes in In The Mix 2, an award-winning Thermomix cookbook.

I’m also truly blessed – I can open my fridge at any time and know it’s crammed with all manner of loveliness – but that’s not the case for everyone. There are people all around me in the UK who rely on food banks to feed their kids, and themselves, and every box of cereal or teabag makes a difference. You can donate food to your local food bank, or time, or money, and if you want more information the best starting place is http://www.trusselltrust.org.

You can also find me here:

Foodies100 Index of UK Food BlogsFoodies100
The Renaissance Epicurean... London restaurants
Top Food BlogsUK Food Bloggers Association

The Eleven Madison Park Granola

Copyright © 2025 · Cookd Pro Theme On Genesis Framework · WordPress · Log in

Nourished
  • Home
  • Recipes
  • Book Reviews
  • Restaurants
  • Journal
  • About