• Skip to primary navigation
  • Skip to main content
  • Skip to primary sidebar

Nourished

  • Home
  • Recipes
  • Book Reviews
  • Restaurants
    • 3 Michelin Stars
    • 2 Michelin Stars
    • 1 Michelin Star
  • Journal
    • Art Journal
    • The Renaissance Diary
  • About
    • Contact Me
    • Instagram
    • Loves
    • Suppliers
    • Masterchef Links

Recipe

January 18, 2014 Alba Truffle

Oeufs en Cocotte, Alba Truffle, and King Oyster Mushrooms

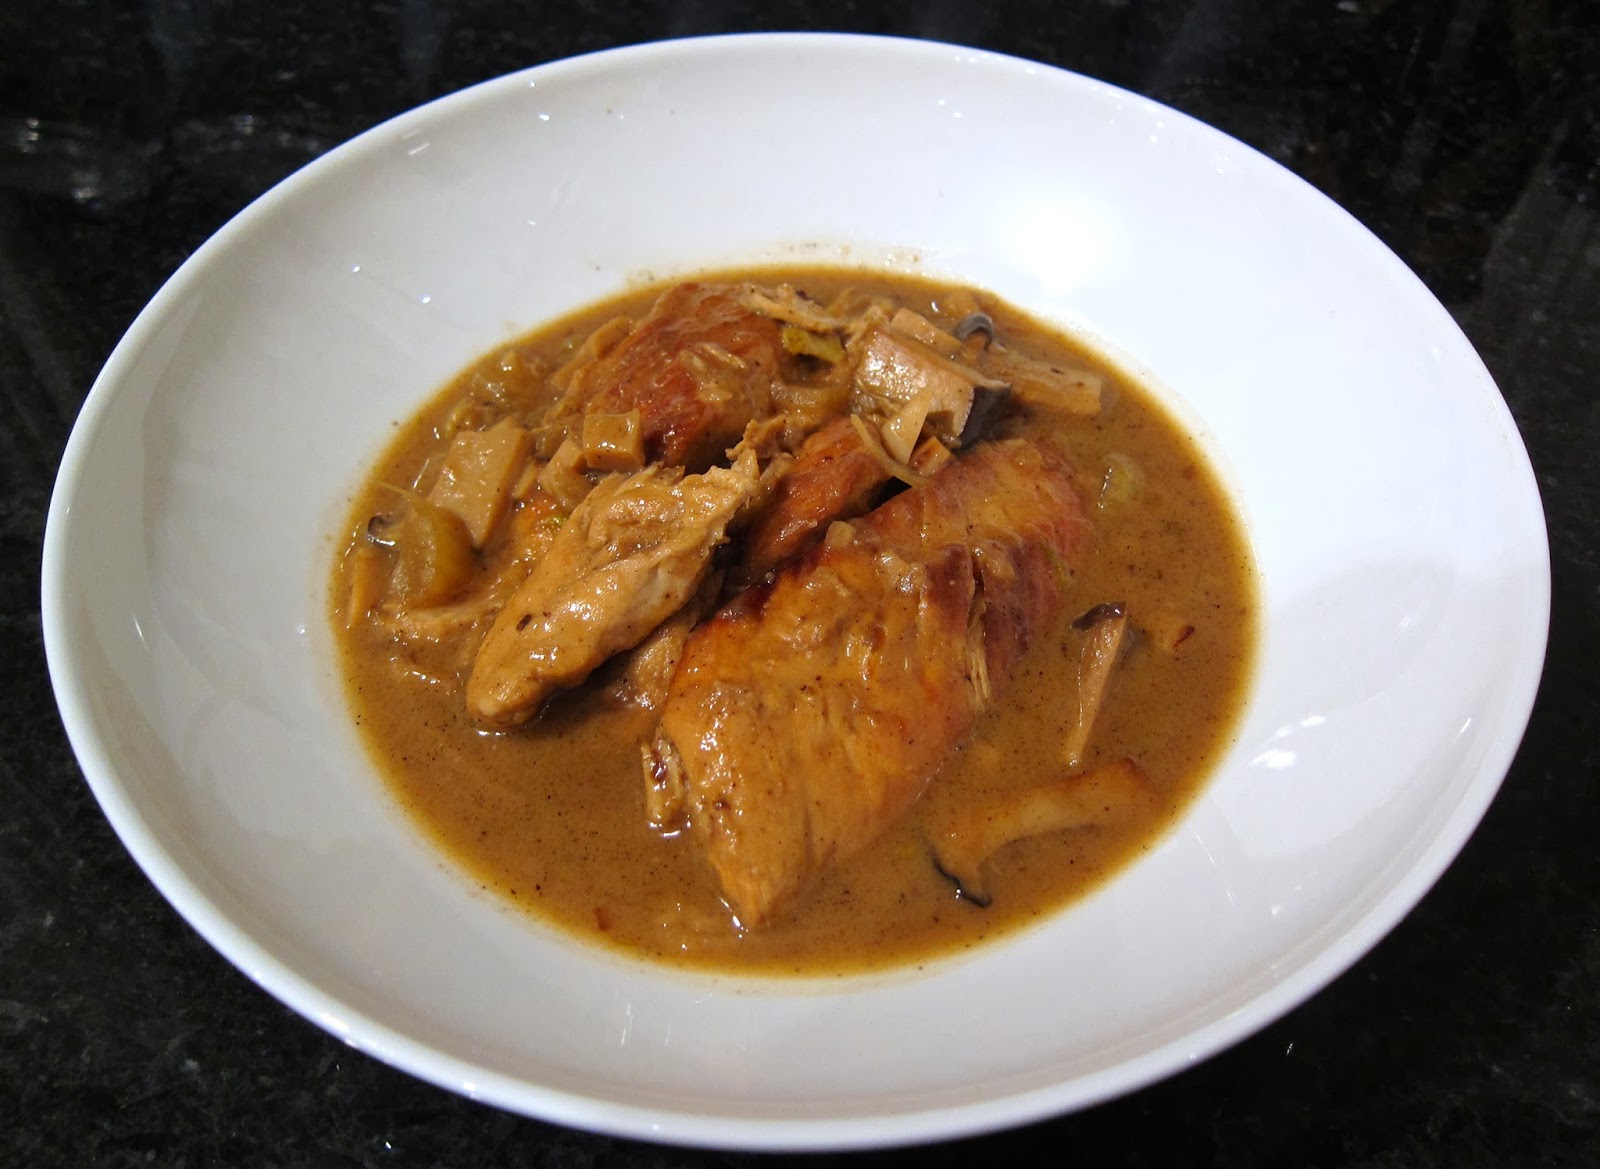
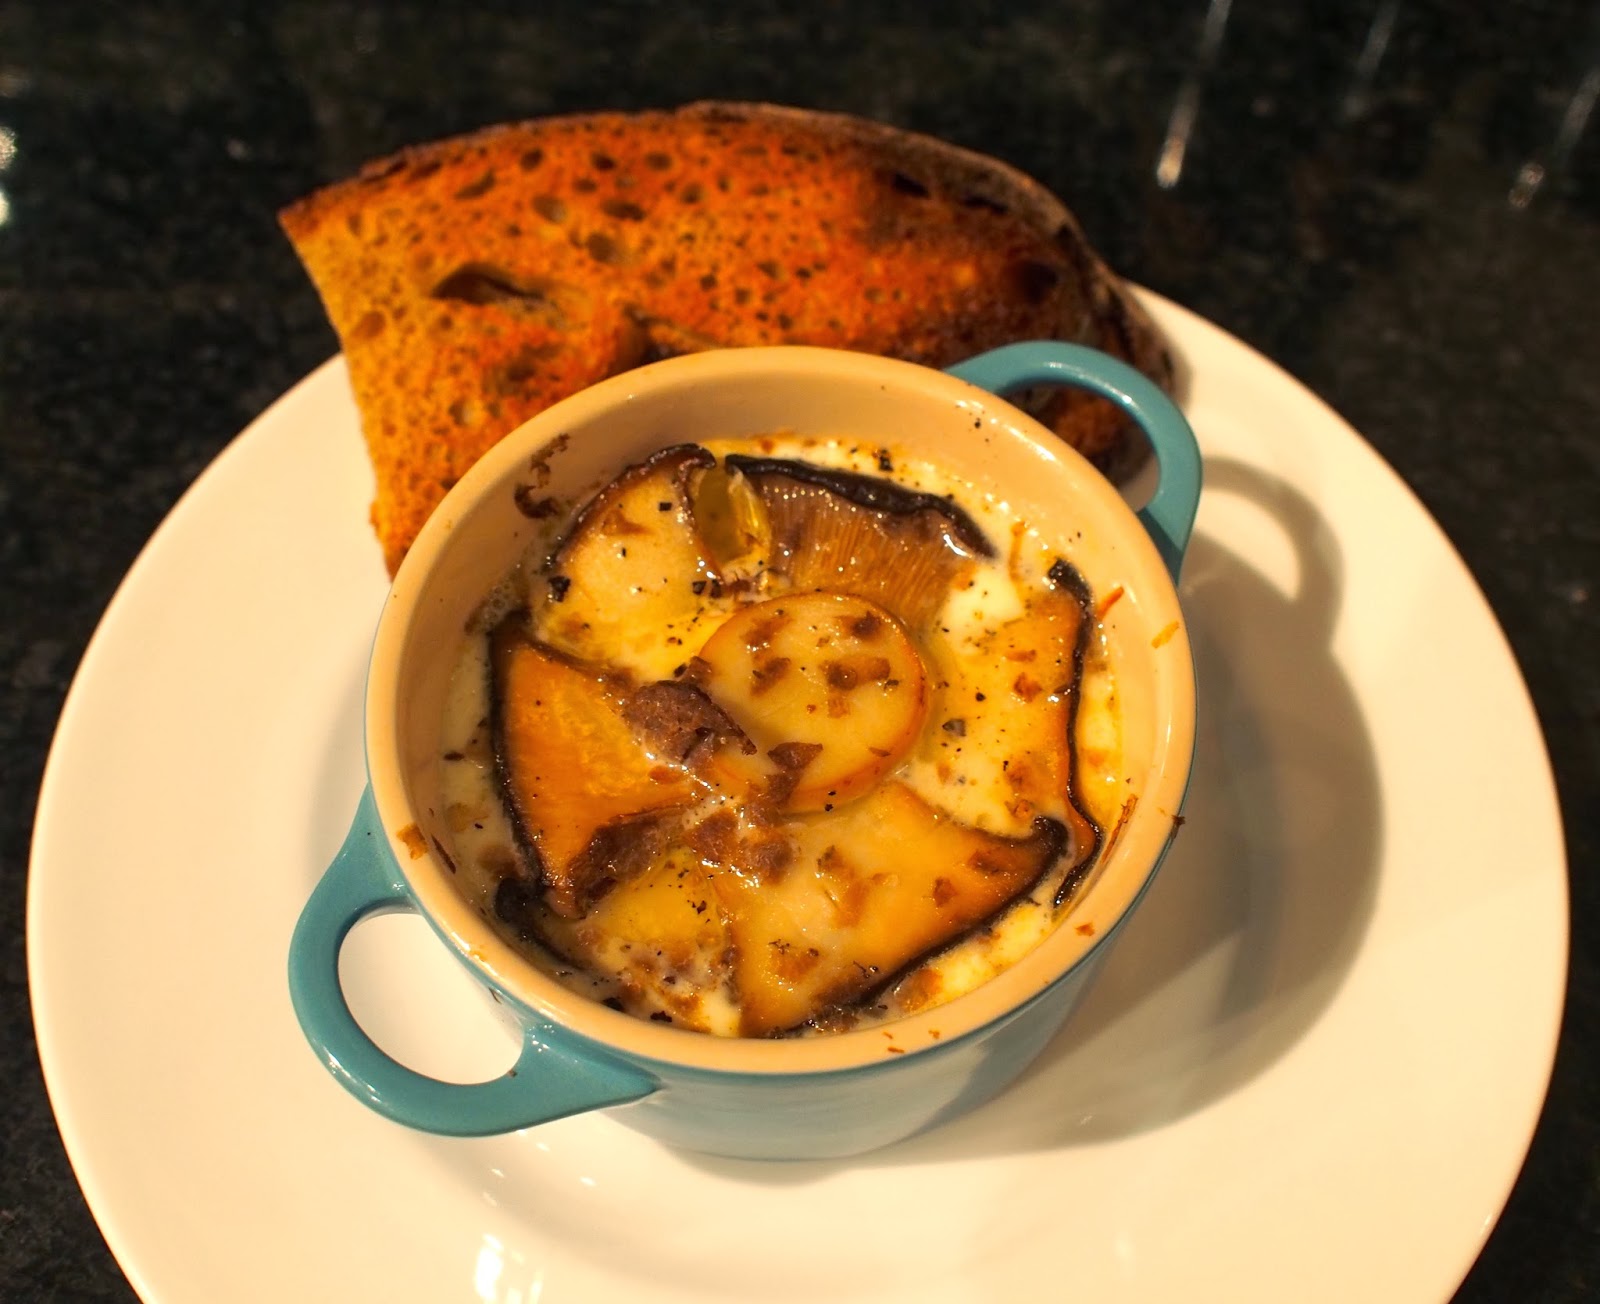
Some supper dishes are so simple that they should be saved until you have some really special ingredients – oeufs en cocotte (baked eggs) are the perfect example.  A quick tour of the fridge reveals lovely Legbar eggs, the remains of an alba truffle from Christmas, and king oyster mushrooms.  Baked together like this it’s not a supper dish but a feast…


Ingredients:

Legbar eggs (at least one per person, depending on their size and your appetite)
Single cream or creme fraiche
1 finely diced shallot
2-3 king oyster mushrooms
Truffle butter, or unsalted butter
Alba or black truffle

Method:

  • Pre-heat the oven to 180ºC (350ºF)
  • Chop the mushroom stems into fine dice (duxelle), but reserve the top of the mushroom to slice finely
  • Cook the diced mushroom and shallot in the truffle butter until they are softened and set aside
  • Gently fry the sliced mushroom tops, making sure they retain their shape
  • Butter the inside of a small ramekin or similar dish
  • Put a quantity of the diced mushroom into the bottom of the ramekin
  • Place a sliced mushroom on top of the duxelle, and a few slices of truffle on top of that
  • Pour a little cream over the mushrooms
  • Season each layer!
  • Break one or two eggs into the ramekin, and place a few slices of the mushroom cap delicately over the egg
  • Top the mixture with single cream, or some creme fraiche thinned with a little milk
  • Top with a little more sliced mushroom and grated truffle
  • Put the ramekins into the bottom of a roasting tin, and fill up the outside of the tin with boiling water, which should reach up to half the height of the ramekin.  It’s much easier to do this on the actual oven shelf, to avoid spilling boiling water all over yourself
  • For Legbar eggs, cook for about 18 minutes
  • Finely slice some more truffle over the cooked egg and serve with either a little toast, or perhaps some asparagus if in season.
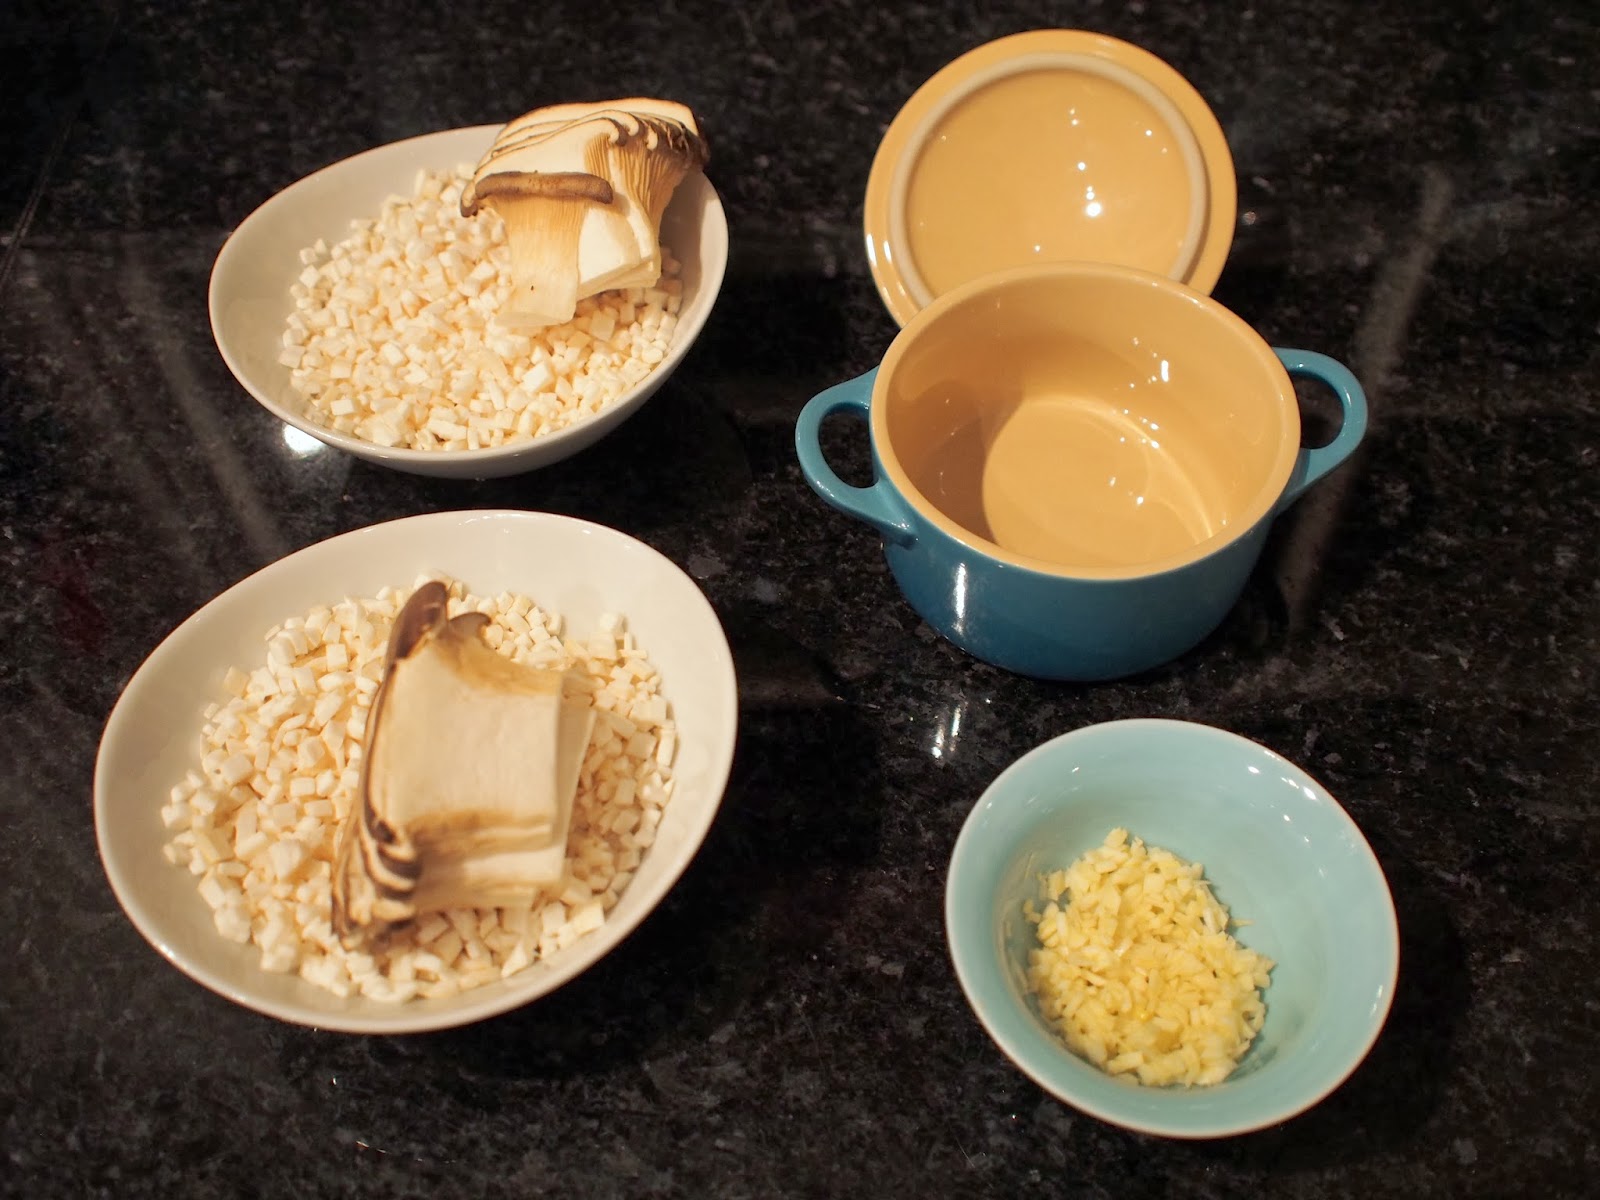
Mushroom duxelle, garlic and finely sliced mushroom top
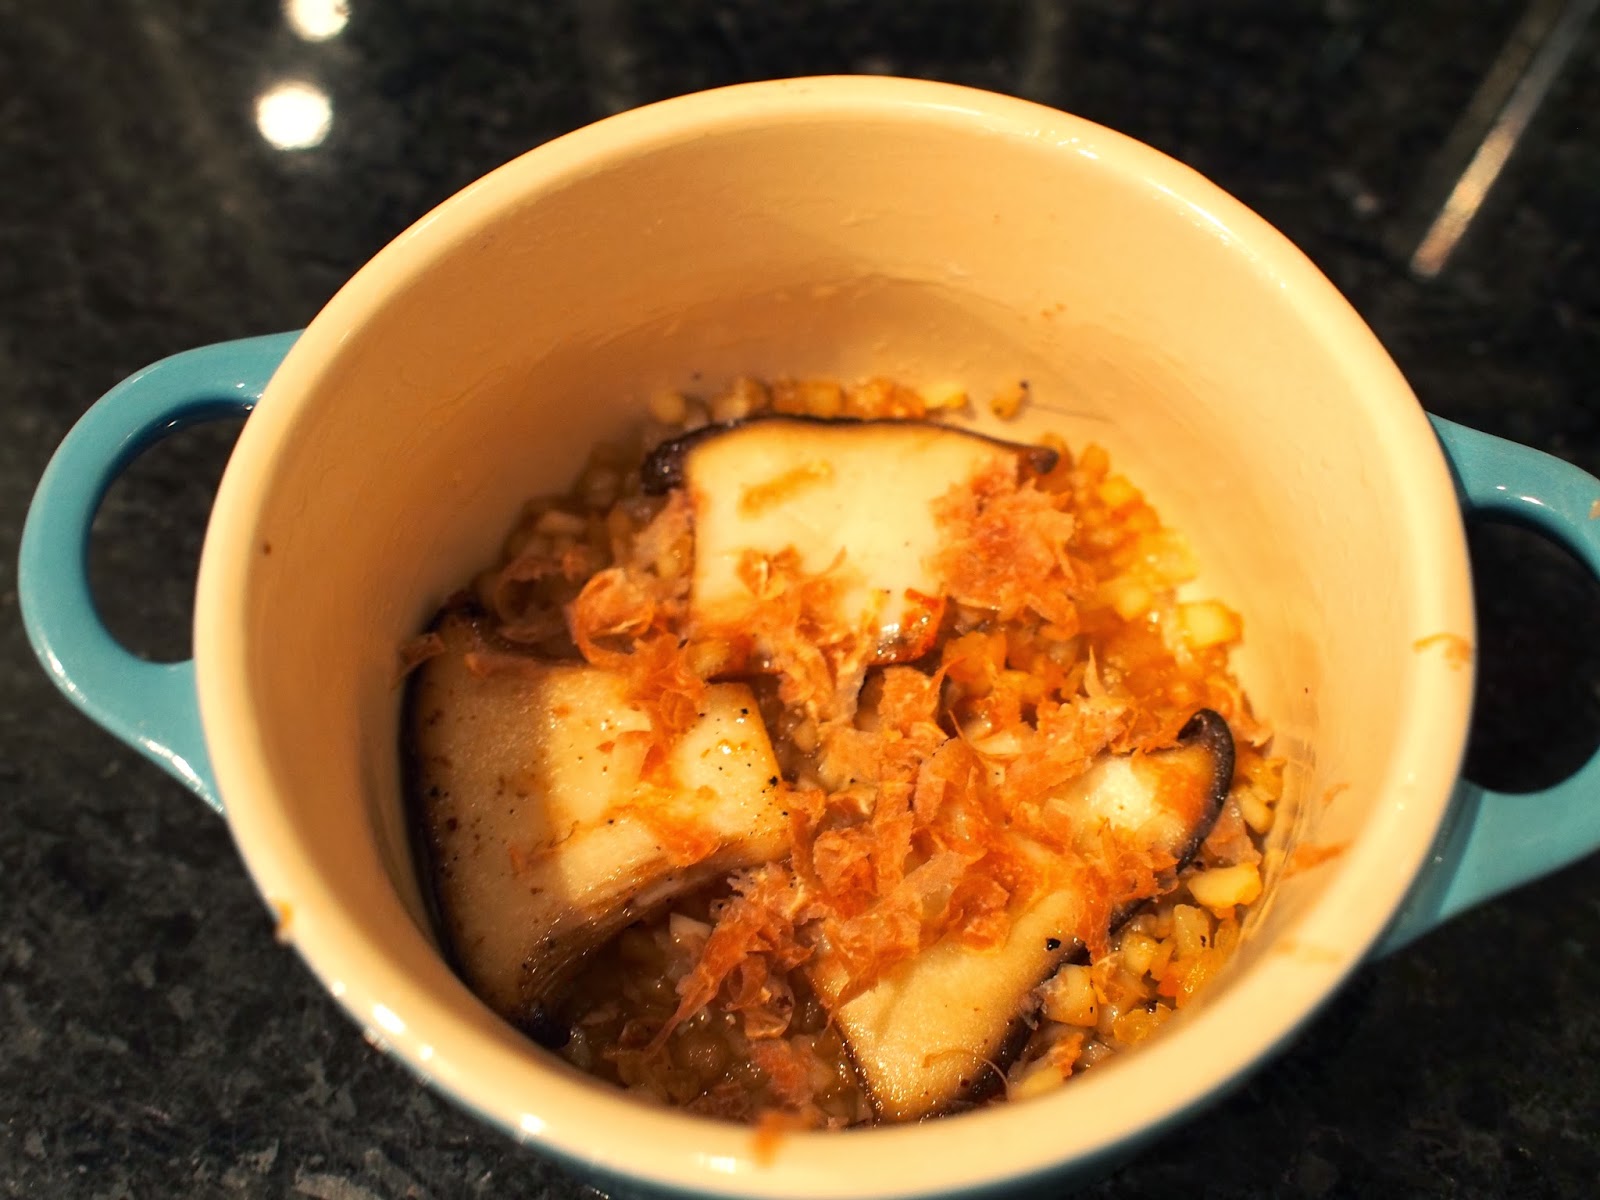
On the bottom, the seasoned mushroom duxelle, topped with slices of mushroom and grated truffle
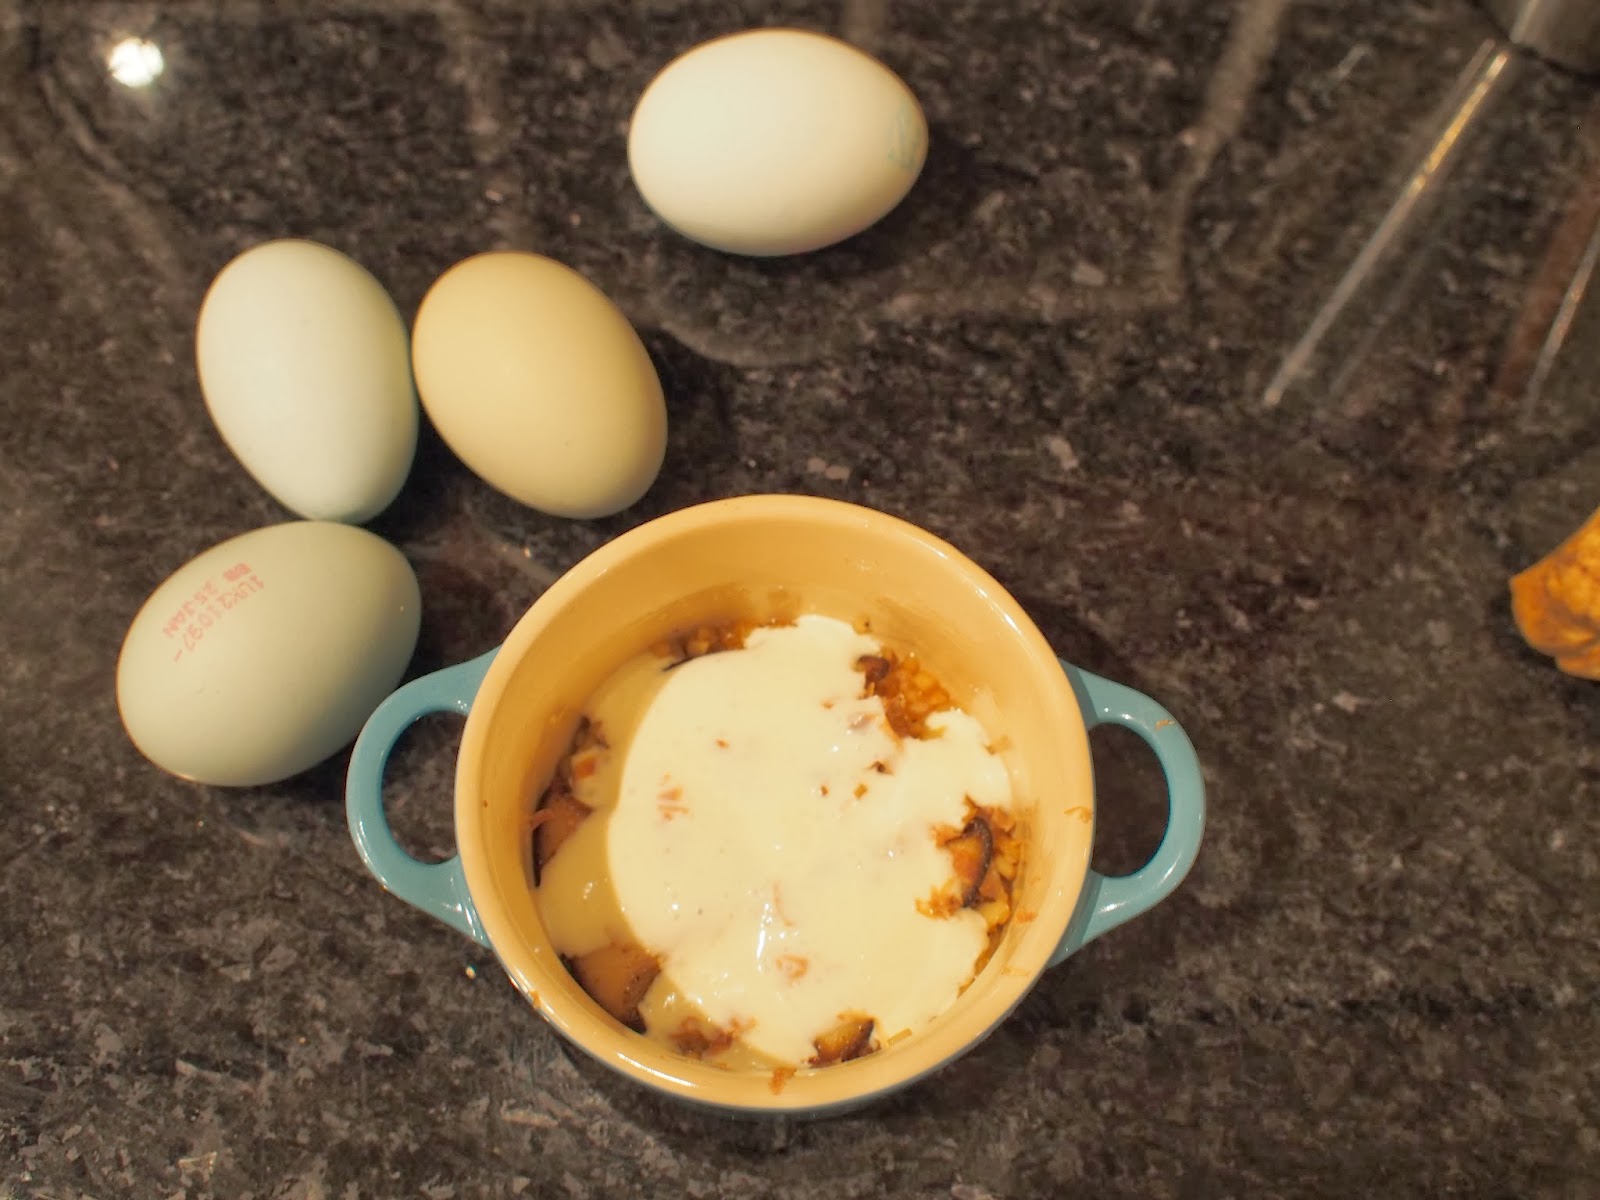
Add a layer of cream or creme fraiche

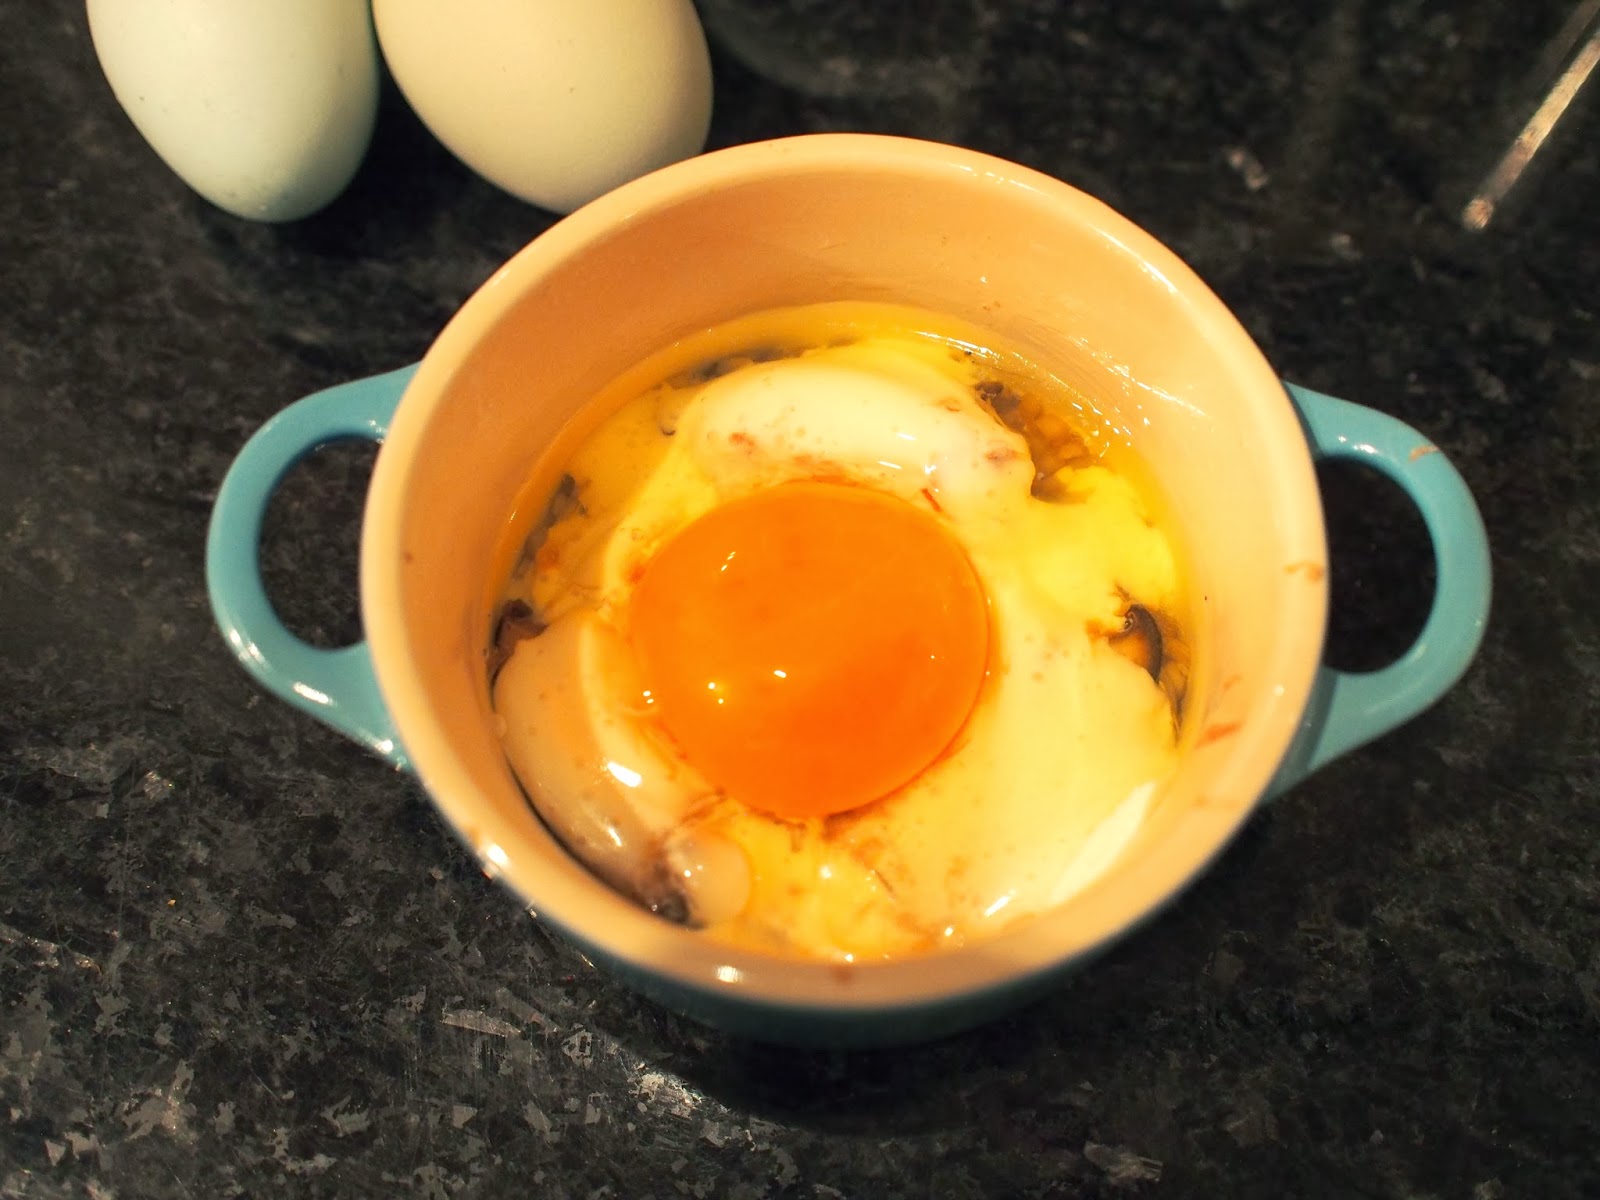
Make a little indent in the mixture, and tip in the egg

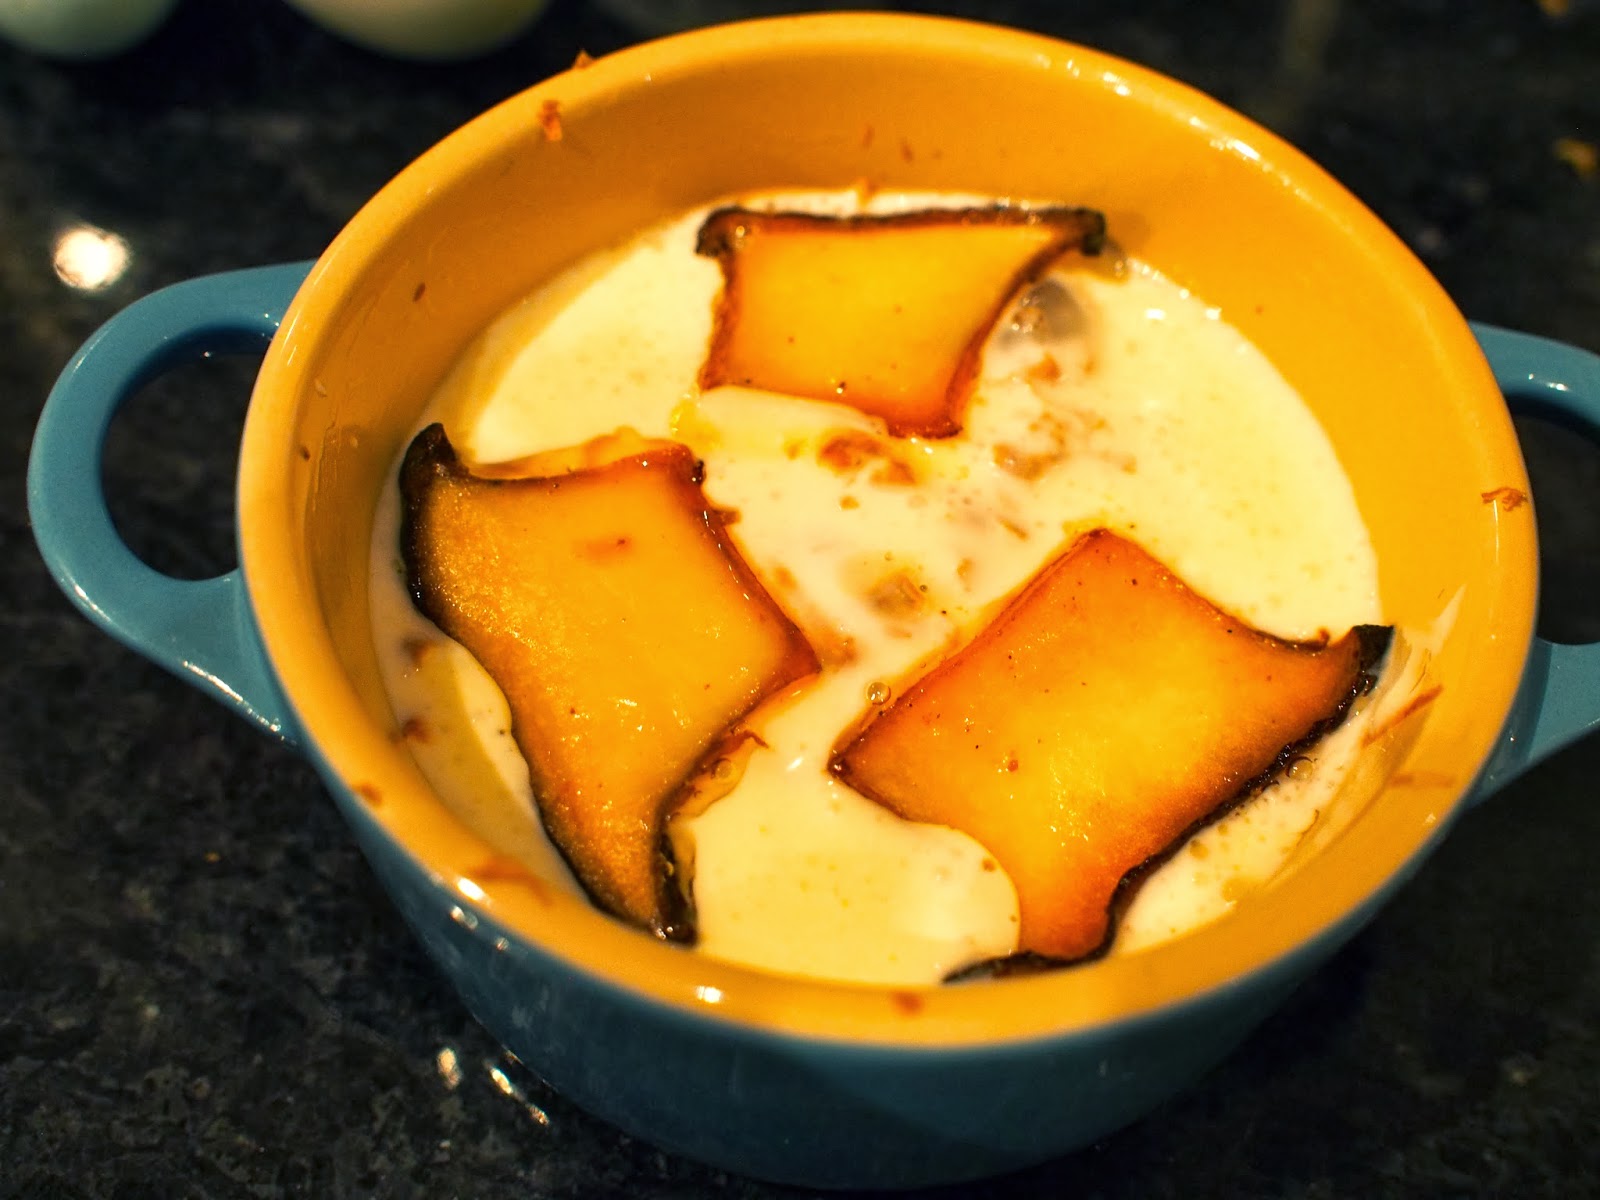
Top again with a little cream, and further layers of mushroom

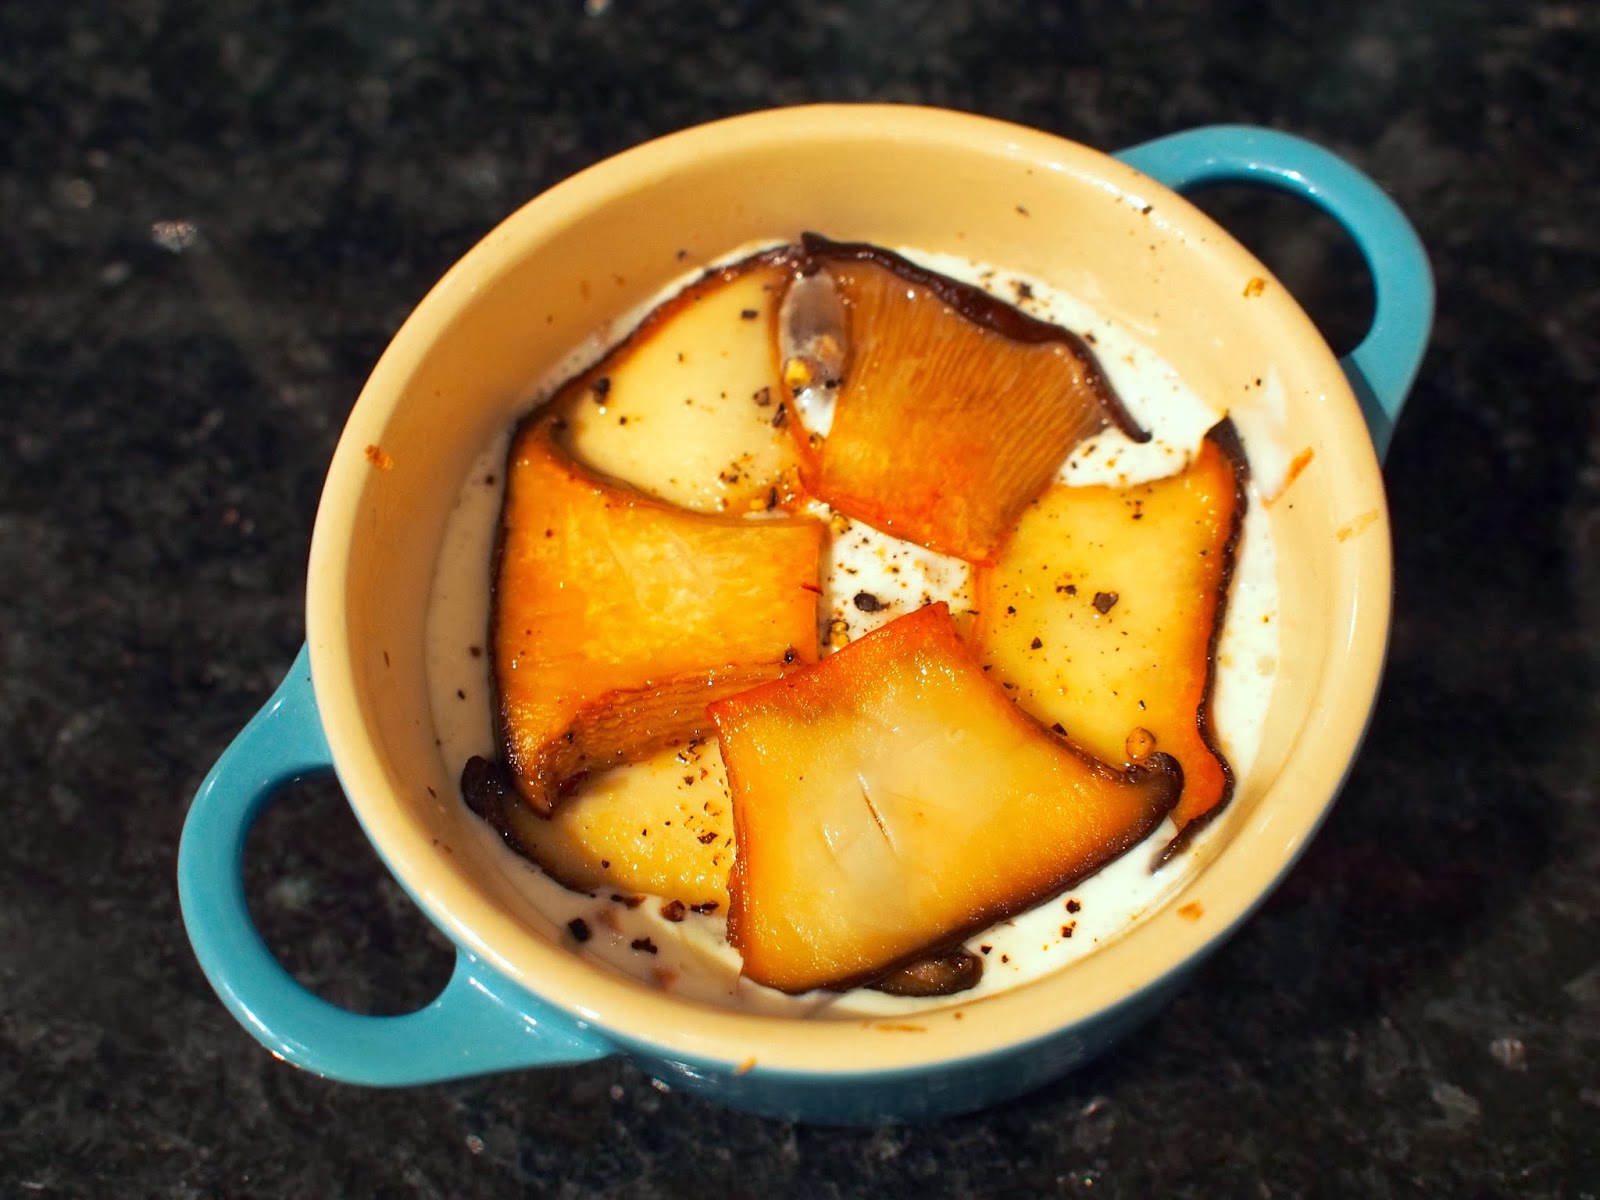
Don’t forget to season the layers

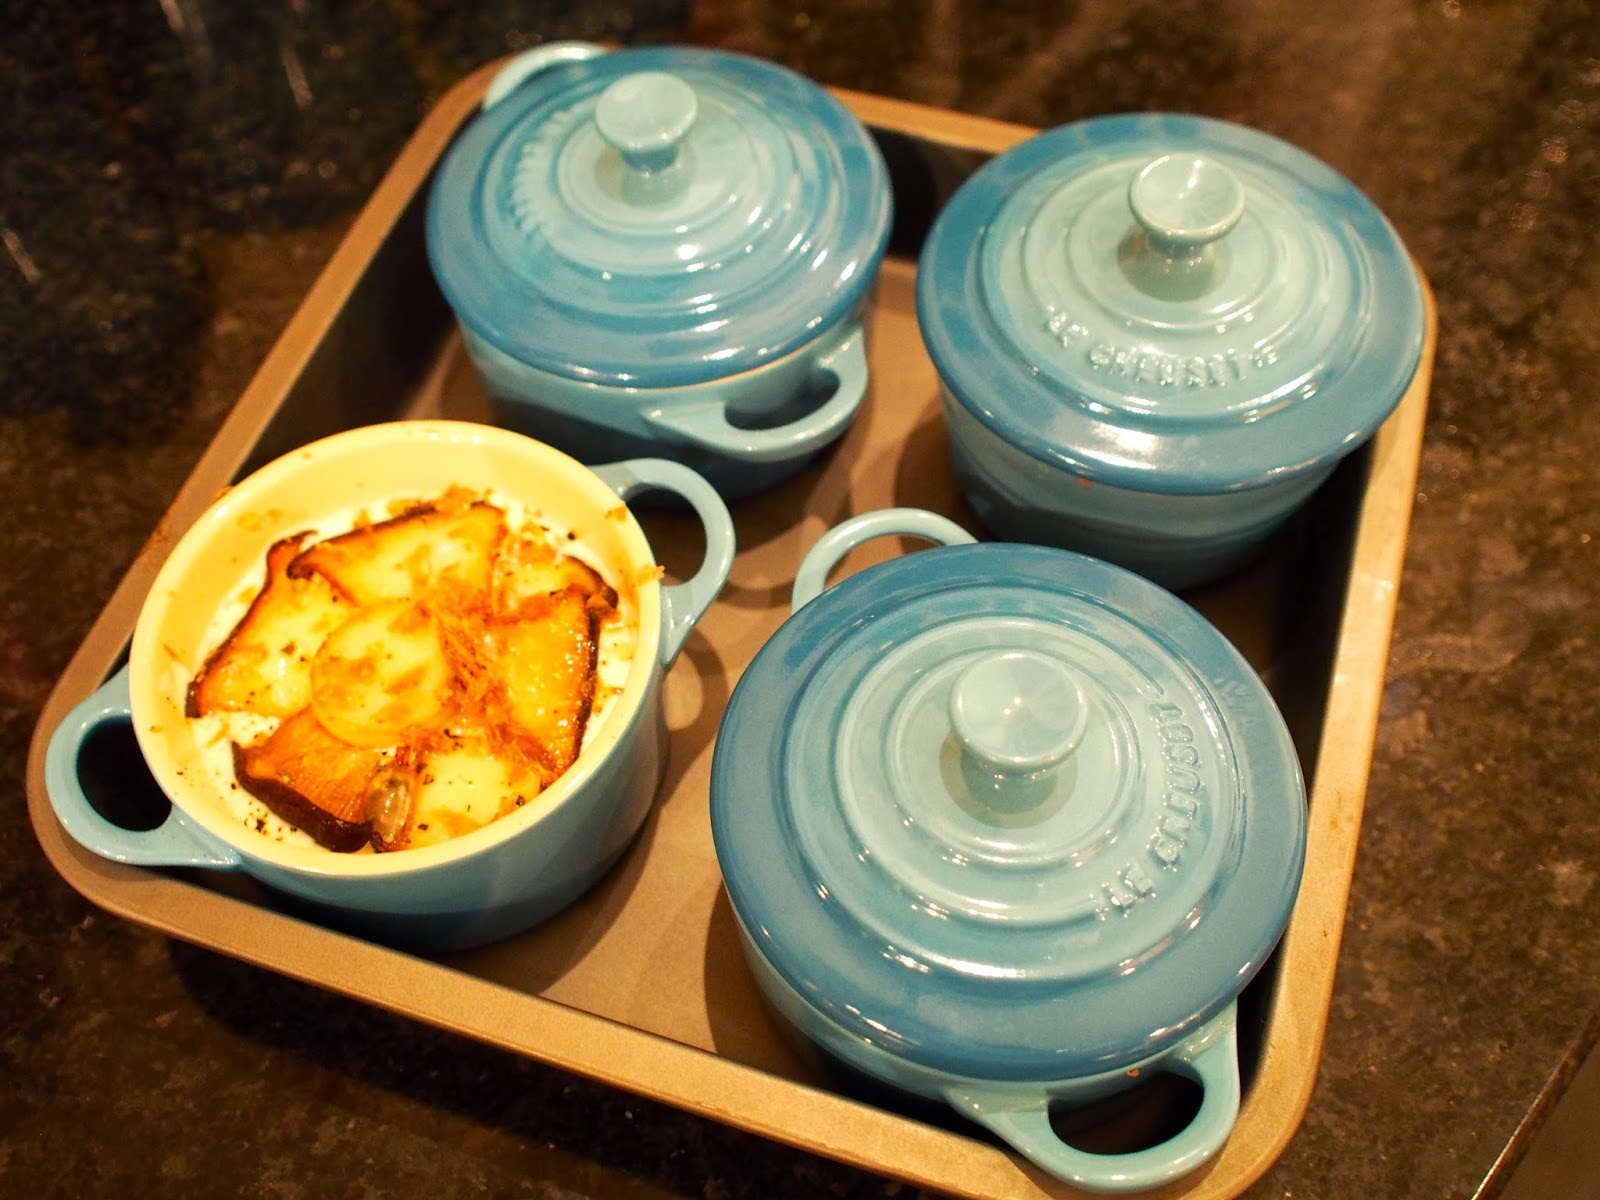
Place the ramekins in a deep pan, and top up with boiling water, up to about half way

Serve with some good toasted sourdough, like Poilaine

January 12, 2014 Casserole

Chicken Casserole with Fennel, Lemon, Garlic and Mushrooms

I’ve no idea where this idea came from, as I’d originally intended to make a chicken chasseur.   When I opened the fridge though, I had an excellent head of fennel, amazing lemons, some beautiful pink garlic and some of my new favourite king oyster mushrooms. It reminded me of one of my absolute favourite summer lunches – finely sliced fennel, served with a garlic and lemon dressing, and seared chicken breasts which have been marinated in garlic and lemon juice.  I think it just seemed logical to give it a go…


Not everything is going to work each time you take a punt, but I’m sure there’s a similar Greek dish that I think contain olives…  As I’ve never been to Greece, it’s not something I’ve tasted, but it seemed to make sense in a Mediterranean kind of way…

Ingredients:

4 good organic chicken breasts
4 king oyster mushrooms
1/2 a large head of fennel
2 shallots
3 tablespoons of plain flour, seasoned with salt and pepper
1 lemon
2 cloves of garlic
800ml good chicken stock

Method:

  • Butterfly the chicken breasts and cut them in half lengthways 
  • Dust the breasts in well-seasoned flour
  • Heat a tablespoon of butter and olive oil in a pan, and fry the breast until crusty and golden – do not move them around in the pan, you want the crust to stay on the chicken.  Only fry up to three breasts at a time too, so that you don’t overcrowd the pan
  • Removed the chicken and set aside 
  • Roughly chop half a large head of fennel into rough dice
  • Cut of about 1/4 of the king oyster mushroom and set the tops aside, roughly dice the remaining 3/4 of the stalk
  • Chop an equivalent amount of shallots roughly, and then sauté the mushrooms, fennel, two garlic cloves finely sliced and shallots in the pan, scraping up the chicken juices.  Do add more butter or oil if the pan is too dry
  • When everything has softened, deglaze the pan with about a glass of marsala
  • Add 1/2 bottle of white wine to the pan 
  • Finely slice the mushroom tops – I didn’t fry them, I poached them in the pan and in the white wine – because king oyster mushrooms are so flesh and meaty, I wanted to keep them tender
  • Peel a lemon and cut into segments – I cut mine lengthways vertically, then into quarters, then cut the quarters into halves horizontally
  • Put the chicken and lemon segments back into the dish, and add 500ml of good chicken stock
  • Put the casserole dish into the oven for at least an hour, I left mine at 160ºC for two hours.  If you needed it faster, you could raise the temperature up to 180ºC
  • I served mine with green beans.
Notes:
  • If you don’t like lemon chicken, you’re going to loathe this, avoid at all costs
  • If you like lemon chicken, you’re going to LOVE this… It’s much more complex than lemon chicken, the chicken stock adds a certain savouriness that rounds out the sourness of the lemon segments
  • You could easily add marinated olives to this, the saltiness would add another flavour dimension (in fact I even have lemon stuffed olives in my pantry, perhaps I’ll add them next time!)
Chop the fennel and 3/4 of the mushroom stalk into rough dice.
Slice the top of the mushroom top into slices.
The chicken, before it goes into the oven
Chicken casserole with fennel, lemon, garlic and mushrooms

January 7, 2014 Baldwin

Sous Vide Fillet of Beef

The sous-vide dish which I prepare most often is actually fillet of beef for a Sunday lunch… Most of my children are addicted to rare beef, but heaven forbid you get it anywhere beyond that and they’ll turn into the biggest critics on the planet.  Given that I’m cooking for six, and that they usually also demand chicken too, or salmon, it’s actually very easy to end up going over by five minutes!  Consequently one of the first things I learnt to do with my water bath was rare beef…

At the time I first start cooking sous vide, practically the only guide on-line was Douglas Baldwin’s website.  Every owner of a water bath at that time bought his Sous Vide for the Home Cook book, which breaks down the process of cooking sous vide… It’s very useful, but has been superseded by many more accessible books and websites, some of which are listed below.

In his book, Baldwin gives a medium-rare temperature for fillet (or tenderloin) of 55ºC, though I note that these days the plethora of sous-vide sides tend to go for 56.5ºC for medium-rare.  Personally I’ve found that delivers rare beef for me, though I’ve found Baldwin’s medium-rare temperature resulted in a texture that was a little too raw-like for the children, so I’ve usually gone for 56ºC, which still comes out as rare for me.

The other number on the sliding-scale of cooking sous vide is actually the time you’ll be cooking for/the thickness of the meat you’ll be cooking… If you’re going to cook for longer periods of time, you can afford to drop the temperature a little, but if you’re going for a fillet of beef you can serve in 2 hours, you’d be better sticking to that higher number – the meat must have an internal temperature of 55-56ºC by the time you’ve finished cooking it.  It can however be held for almost as long as you wish in the water.

It’s still essential to brown your meat once it’s been cooked, as the browning process (the Maillard reaction) adds flavour, aroma and a better texture to your finished joint. Some people sear their meat before putting it into the vac-pac, but I’ve never found that as successful as searing it post the water bath.

You can put any flavours you like into your vac-pac, but bear in mind that they’ll be more intense than just marinading.  I like to cover mine in porcini oil – because you’re only using a little in reality, the expense is justified for me.  Porcini oil has an additional level of umami’ness that I think works well with the seared beef – even if the texture is still quite soft, the extra meaty flavour and aroma work well with the joint.  Today I’ve also added about a tablespoon of worcestershire sauce – hey – it was right next to the pepper and salt, and I thought it would add even more depth to the crust when I sear it.

So.  My beef was cooked for 4 hours, at 56ºC.  The internal temperature was correct when it emerged, and it was seared for just a few minutes on each side.  The beef doesn’t need to be rested in the manner of a conventional joint, so you can slice it as soon as the rest of your meal is ready* :0) Simples.  Rare beef on demand…

In case rare is not your thing, here are the other (most commonly agreed) temperatures.  Please do play around to find the right temperature for you!  As I said, 56ºC should give me closer to medium-rare, but it usually doesn’t.

Rare:                   49°C       (120°F)
Medium Rare:      56.5°C    (134°F)
Medium:              60°C       (140°F)
Medium Well:       65.5°C    (150°F)
Well Done:           71°C       (160°F)

Notes:

  • I use a chamber vacuum machine, though I find it doesn’t entirely expel air compared to a commercial machine, even at 9 Bar!  You can seal your bag having expelled the air using the Archimedes method, or sealing with a normal bag sealer, though again you won’t expel all the air.
  • Trust me, when they say you should wind back your bag to prevent cross-contamination – you actually should fold it back at least twice if you can – the number of times I’ve put a little drop of oil etc on the first fold is ridiculous.  If anything is spilt on the upper edges of the bag, it will result in a substandard seal, and you may find your joint ‘swimming with the fishes’
  • You can’t really do your vegetables at the same temperature, they really do require something closer to 80ºC to cook properly, however you can cook them lightly on the hob, then hold them in a vac pac bag in the water bath – I’ve done some carrots that way today to demonstrate…  If you’re going to make baby carrots, do scrape down the top of the root, you don’t want grit in your vac pac.  I suppose if I was super-organised I could have done the veg at a higher temperature first, and then held them at the lower temperature…
Rare, but consistent throughout
Fillet of beef, sealed with porcini oil, worcestershire sauce, salt and pepper 
The beef really does take seconds to sear, don’t leave it in unattended for too long
The other side
Par-boiled baby carrots, packed with carrot tops, butter and orange juice
Carrots, stil al dente, though held in water for over an hour

January 5, 2014 Recipe

Gordon Ramsay’s Baked Spice Porridge

My predictable January health kick survives* – we’ve reached the 5th – and although it’s a Sunday morning, I’ve managed to stall breakfast long enough to make baked porridge.  I’d caught this recipe earlier in the week on Ramsay’s show, and located the recipe online.  I have to say, it’s so much nicer than perhaps it sounds!  Forget that oats are a good source of soluble fibre, help reduce cholesterol, and provide an invaluable source of manganese and non-meat protein – this thing tastes yummy too!

Ingredients:
Serves 4–6
150g (5oz) jumbo rolled oats
seeds from 1 vanilla pod
1 tsp ground cinnamon
1⁄2 tsp freshly grated nutmeg, plus a little extra to sprinkle
50g (2oz) whole blanched almonds
50g (2oz) blanched hazelnuts
75g (3oz) raisins
1 ripe pear, peeled, cored and chopped into small chunks
500ml (18fl oz) milk, plus extra for serving
200ml (7fl oz) double cream
2 tbsp demerara sugar

Method:

  • Preheat the oven to 180C/Gas 4.
  • Combine the oats and vanilla seeds in a mixing bowl – use your fingers to rub the seeds through the oats. Add the spices, nuts, raisins and pear and mix well. Stir in the milk and cream,
  • and then pour the mixture into a baking dish. Dust with a little extra grated nutmeg.
  • Place in the oven and bake for30–35 minutes, or until the oats are completely softened and the liquid absorbed.
  • Heat the grill on its highest setting. Sprinkle the top of the porridge with the sugar and place under the grill for 3–4 minutes, or until the sugar has melted and created a crust.
  • Serve warm, with a little extra milk on the side if desired

Notes:

  • I omitted the cream from mine, but I used whole milk, and upped it to 600ml
  • Do leave your nuts whole if you can, they will soften in the mix
  • I used 100g dried cranberries instead of raisins – I’m not that keen on raisins these days
  • I forgot to put in the pear – damnation – I have some excellent pears too
  • I used my Thiercelin Pain d’Epices spices, because I’m becoming vaguely addicted to the scent – although Hubby did say that it smelled a little like a Christmas pud, so beware
  • If you’re not going to pop your vanilla bean pod into sugar, you could put it into the porridge to cook alongside the other ingredients
  • Hubby had his porridge without milk on the side, but I did, it’s pretty thick otherwise
  • I cooked mine in a Le Creuset dish, which meant that when it cooled down, I was actually able to cut it into strips – like a soft breakfast bar.  It’s actually even more delicious cold – that’s my breakfast for tomorrow sorted, with some fresh fruit, and a splodge of natural yoghurt I’ll be good to go…

The Porridge and Milk

The Baked Porridge

Delicious, but even nicer when set, and cut into slices


January 2, 2014 FrontPage

CakePops are Dead! Long live the MallowPop!

We’ve all made cake pops – good grief – what a bore!

For starters, who really wants a mouthful of dry cake, mixed with sickly sweet buttercream? Then there’s the fact that they take soooo long to make, fall off if you make them too big, or include too much buttercream… No, no.  The cakepop is dead.

So, what’s the alternative?  Clearly you’re reading my MallowPop post, so the answer must be a MallowPop – yay!

For starters:

  • the basic varieties are much easier to make
  • they actually last for much longer than cake pops, which means you can make them much further in advance – a real boon for those of us baking for cake sales, parties etc
  • anything you can do to a cakepop, you can do to a mallowpop
  • mallowpops can be made gluten-free – a huge boon if you’re creating for the masses
  • they also allow you a huge amount of scope in terms of decoration, flavouring etc.
  • you can make your own marshmallows if you really want to up the flavourings and complexity

I would almost go on to say that they offer the same customisation scope as macaron – and potentially far more flavour impact variations than cake…

But let’s not get ahead of ourselves – let’s start with the basic idea.  Anyone can take a packet of marshmallows, and cover them in chocolate – even using candy melts if you have to…  At this level it’s a great thing for kids to get involved with too, and nowhere nearly as traumatic as cake pops.

So lets begin….

Of course I may have lied a little, when I said I’d press on with the basic MallowPop.  But if you know me, you’d know that I have a mini-aversion to rubbish ingredients… If you’re going to make a decent MallowPop, I think it’s worth spending a little more time and money on decent ingredients.  I promise I will however post shortly using candy-melts, or something of that ilk.

Let’s start with a few basic couveture chocolate rules:

  • chocolate (generally) hates water – if you’re going to use a bain-marie to melt your chocolate, make sure you never drop any water into the melted chocolate – it will seize the mixture
  • all pre-tempered chocolate (which is generally what you’d be buying, already has tempered crystals in it.  We’re not going to talk extensively about that now, just bear that in mind
  • if you melt tempered chocolate to it’s given range (which is usually printed on the packet!), you will not take the chocolate out of temper (that is, remove the crystals)
  • even if you do take the chocolate out of temper, just add a bit more of the tempered chocolate back into it, and that will reseed the chocolate
  • calm down, none of this is as complicated as it sounds
  • very generally speaking, if you keep the temperature of the chocolate between 26ºC and about 38ºC, you will not have any problems
  • if you’re going to melt your chocolate in a microwave (which I do), make sure you only do it in 15 second busts, and check the temperature towards the end
  • always microwave your chocolate in a plastic, not glass bowl, and use a plastic spoon when mixing
  • an infrared / laser thermometer is an absolute god-send for checking the temperature of chocolate, as you don’t have to put it into the chocolate
  • always use fresh marshmallows – even marshmallows which have been out for 12 hours in an airtight box are too old – the chocolate will peel away, and the mallowpop is too dry
  • by far the best thing to set chocolate onto is food-grade acetate, which is inexpensive to buy
  • if you’re lucky enough to have Neff warming drawer ( I adore mine), you can keep several bowls of chocolate in temper while you’re working by keep them at the 1.5 setting – check the temperature again before you begin, and if over 38ºC, you can reseed them with a handful of fresh chocolate
  • I’ve found I can actually keep chocolate in temper overnight in the warming drawer, though it’s probably best to take it down the the 1 setting
MallowPop Method
  • As a basic method, take a freshly opened pack of marshmallows (or make your own, more on that later), and taking a 15cm cake pop stick, dip the stick into the melted chocolate, and plunge into your marshmallow
  • I found it easier to put all the marshmallows vertically onto a chopping board, and then plunge the stick in on that
  • Wait for a few minutes until the chocolate has set-up a little, and then swirl the marshmallow into a bowl of tempered chocolate.
  • Put the MallowPop either onto acetate to set, or using an old piece of polystyrene,  allow the chocolate to set there…  If the chocolate is still in temper, it should set within a couple of minutes


Chocolate Suppliers:

Vantage House
The Chocolate Trading Company

January 2, 2014 detox

Puy lentil salad, with roasted vegetables and king oyster mushrooms

It’s inevitable, as predictable as the rising sun – come the first of January and we all feel the call of the detox. I’ve been craving lentils ever since I caught the Nigel Slater show over Christmas – his dish of warm lentil salad, horseradish and rare beef chimed somewhere with my overloaded palate… However I really wanted to make it meat-free, and to incorporate some roasted king oyster mushrooms. The mushrooms are meaty enough – they’re perfect for roasting and absorb the flavour of anything they’re dressed in.  I coated them in porcini oil, and salt and pepper and roasted them for around 30 minutes.

I also roasted some red and golden beetroot in another dish, with fennel, radish, sweet potato and lemon and lime zest.  The lentils came courtesy of one of those ready packs, always a handy standby.  The juice of the lemon and lime were added to the oil from mushrooms as a dressing, and I left the entirety to meld for half an hour before serving.
The puy lentils were earthy and added to the savouriness of the king oyster mushrooms… Granny smith apples added texture and a touch of acidity, and the roasted vegetables were both sweet and crunchy.  For the first time in days I woke with an appetite, and raring to go! Bring on the detox – I’m ready for it now…

King oyster mushrooms

The mushrooms were sliced, and dipped in porcini oil

Sweet potato, radish, fennel, red and yellow beetroot, and lime and lemon zest

The dressed dish, roasted vegetables, king oyster mushrooms and puy lentils

January 1, 2014 Christmas

Christmas Stuffing

Food bloggers record their recipes for a variety of reasons – sometimes we’ve learnt something that we’d like to share with others, for example the correct range to maintain a gel for Meat Fruit – and on other occasions it really is just a gigantic aide-mémoire!  The more mundane recipes on my blog are in reality the ones I use the most – they make their way onto here so that no matter where I am, I can turn to them time and again…

I realise that Christmas has long since passed, but the reality is that if I don’t write down my recipes, in the fashion of Mr Slater, they’d just disappear from memory! This year I made up a new stuffing recipe, heavy on the dried fruit, and heavy on the pain d’épices spice I’d just acquired.  It was definitely the nicest I’d made to date, and was even nicer in sandwiches!  It remained moist and flavourful, and was being sought out amongst the other leftovers…  So.  I apologise if it’s another 50 weeks until Christmas – I’ll just have to remember that I’ve recorded it on here when the festivities come around again!

Ingredients

900g good quality sausage meat
1tsp salt and 1/2 tsp pepper
1tsp freshly grated nutmeg
1 tablespoon Thiercelin Pain d’épices spice
100g dried cherries
250g dried chopped apricots
100g dried cranberries
50g butter

Method

  • I put everything into my kitchen aid bowl, and beat for five minutes.  I wanted the larger pieces of dried fruit to break down a little.
  • Bake in a large shallow baking tray – I used a half sized disposable foil container, which gave me a depth of about 1 inch
  • Bake in a hot oven for around 1/2 hour until the top is golden and crusty – I used a thermometer to check the temperature was 60ºC for pork
  • If you have time, turn the stuffing over and pop back into the oven for a further 10 minutes to crisp up the other side too
  • Slice into wedges or cut into cubes

Notes:
  • I could see myself using this for other things – it’d make an interesting addition to picnics etc
  • Thiercelin spices are actually very strong – you might need to put in more if using a more typical spice range
Yes. Perhaps not the most flattering of pics, but trust me – it tastes yummy!

November 4, 2013 FrontPage

Butter Poached Lobster (sous vide), with Girolles and Hazelnuts

Girolles and hazelnuts are just the most glorious combination – both sweet, nutty and earthy, they complement each other well.  The lobster was actually just a vehicle for the girolles, and it could just as easily have been baked squash I made last week, or any number of roasted vegetables.

Girolles are a beautiful colour – they look (and are said to smell) like apricots.  They generally grow in a group together, and are best picked a few days after rain, to allow a decent amount of growth.

If you don’t have a pet forager, you can get girolles right now from the lovely people at Natoora, or from them via Ocado.  They require the minimum amount of cleaning, and personally I find them easiest to clean with a filleting knife.  The blade is particularly flexible, and allows you to ‘flick’ the dirt out of the gills, and to lightly ‘scrape’ the top of the mushroom. I’ve tried almost every other method, from a light rinse and spin, brushing with natural bristle, and brushing with silicone bristles – both of which merely drove the dirt further into the gills.
The lobster was sealed in a vacuum bag with butter, a splash of vermouth, about 10 pink peppercorns and sprigs of lemon thyme.  I also put a teaspoon of sumac into the bottom of the pouch.  They were cooked in a water bath at 60ºC for 15 minutes, but frankly they weren’t terribly big.  You might need to adjust your timings accordingly.
Once I’d browned the girolles until golden in some rapeseed oil and butter, I flashed the lobster through the butter just to pick up some more of the girolle scent. Both were served with a few crushed toasted hazelnuts, and a dressing made from the reduced reserved lobster liquor, and a little white balsamic vinegar.

November 4, 2013 Casserole

Braised Ox Cheek

In January I found myself tucking into a braised ox-cheek, in the middle of a horrific snow storm.  We were in Cheltenham to shoot, a shoot which would subsequently be called off due to 5ft snow drifts. We’d lunched at the fabulous Le Champignon Sauvage and were supposed to have an early dinner in the dining room at the Ellenborough hotel.  With the storm raging around us however, the chef had abandoned us in a fit of pique – apparently he had set up for a conference of two hundred people, and the whole thing had been cancelled at the last moment.

Without the dining room, the six remaining guests of the hotel were forced into the bar to make do with the brasserie menu.  You can imagine – you know me well enough by now to know I really wasn’t looking forward to it.  I spotted ox cheek on the menu, and concluding that it was probably being cooked sous vide, figured it couldn’t be ruined by whichever inexperienced soul they’d roped in to cover this shift.

The ox cheek was absolutely gorgeous – unctuous, soft, incredibly meaty, and full of umami savouriness.  Absolutely delicious.

So again we were heading to Cheltenham to shoot, with an obligatory dinner at Le Champignon Sauvage, and this time I actually wanted to go to the brasserie! Alas! The braised cheek was no longer on the menu…. I was so desperate for a hit of meaty richness that I headed to Waitrose as soon as we got back – Waitrose is one of the few places to get ox cheeks easily.  I did debate cooking them sous vide, but in the end decided to braise them.  I also marinated them overnight in my favourite marinade (that of Heston’s Meat Fruit), and the result was exactly what I’m looking for.  Ox cheek is currently £7.49 per kilo – an absolute bargain.  I always make make stew for our Christmas Quiz Night, and from now on, I will be using ox cheek!

Ingredients:
1kg of ox cheeks, trimmed of fat
1litre of chicken stock
2 carrots, diced
2 sticks celery, diced
2 cleaned leeks, diced
1 small onion, diced
1 tablespoon tomato paste

For the marinade:
100g shallots, finely sliced
3g minced garlic
15g sprigs of thyme
150g dry Madeira
150g ruby port
75g white port
50g brandy

Method:

  • Trim the ox cheek but do not remove the lines of sinew running through the centre, they will breakdown during cooking.  Cut the cheeks into large wide slices, or leave whole
  • Put the ox cheek and all of the marinade ingredients into a container, and marinate overnight
  • Chop the celery, onion, and carrots to give you a classic mirepoix or soffritto.  I added leeks to mine too
  • Put a little olive oil into a casserole dish, and add a little butter when it’s heating up
  • Brown the cheek in the casserole dish, then set aside
  • Add the mirepoix / soffritto to the pan, and brown the vegetables
  • Add two tablespoons of tomato paste to the vegetables and cook for a few minutes
  • Add the reserved meat back into the pan, and add the chicken stock, and the marinade
  • Bring back to the boil and when simmering put into the oven for approximately four hours
  • You can adjust the seasoning once the sauce is reduced, adding a little worcestershire sauce if appropriate, or perhaps a little pomegranate molasses or balsamic vinegar if the balance of flavours requires it

Notes:

  • You can serve the braised cheeks with any number of accompaniments – perhaps buttered leeks, puy lentils, parmesan polenta or champ (mashed potato with spring onions chopped through it)…  A crisp salad of baby gem lettuce and parsley would brighten the dish too.
  • This is an incredibly rich and meaty stew – the flavour is almost akin to oxtail – you certainly don’t need very much of it, so don’t overdo the portions

November 4, 2013 Recipe

Sweetcorn Fritters


442b6-pb040429It must be autumn, I’m craving all manner of autumnal veg, from pumpkin to sweetcorn, and every variety of squash and mushroom I can find.  I genuinely think we eat too much meat in our diets, and there is no reason not to have a delicious warm lunch, where the star is the vegetable.


One of my favourites is sweetcorn fritters – but I tend to mix an additional ingredient in, just to add a little variety.  Today’s variation was raw orange pepper.  I love raw peppers, but some people find it indigestible, so you could add anything else you fancy.  Crab perhaps? Always delicious. Spring onions? Grated courgettes?

The ingredients for the batter are a bit of a work in progress – I usually eyeball the batter depending on how many people I’m cooking for, and how wet the ingredients are.

Ingredients

1/2 cup of plain flour
1/4 teaspoon baking powder
Salt and pepper to taste
1/4 teaspoon smoked paprika (optional)
1 egg
About 40ml of buttermilk (or milk)
100g sweetcorn
1 small orange pepper, finely chopped

Method:

  • Chop the pepper finely if using, and remove the sweetcorn from the cob (or tin :0)
  • Pop the dry ingredients into one bowl, and mix the wet ingredients in a separate bowl or jug
  • Gradually add enough of the liquid to form a thick batter – do not overwork it
  • Incorporate enough of the batter into the vegetables to just thickly coat it
  • Cook the fritters on a moderate heat, in a little rapeseed oil
  • Like pancakes and drop scones, when the bubbles start to pop through, turn the fritter over
  • Serve with the sauce of your choice – sometimes I have tzatziki, but today it was chill jelly!

  • « Go to Previous Page
  • Go to page 1
  • Go to page 2
  • Go to page 3
  • Go to page 4
  • Go to page 5
  • Interim pages omitted …
  • Go to page 11
  • Go to Next Page »

Primary Sidebar

Categories

  • ▼Recipe
    • Baking
    • Breakfast
    • Cheese
    • Dessert
    • Eggs
    • Fish
    • Heston Blumenthal
    • Italian
    • Jamie Oliver
    • Marcus Wareing
    • Mediterranean
    • Pasta
    • Patisserie
    • Risotto
    • Smoothie
    • Sous Vide
    • Squash
    • Thermomix
    • Vegan
    • Vegetarian
    • Yotam Ottolenghi

Categories

  • ▼Book Review
    • ⭐️⭐️⭐️⭐️
    • ⭐️⭐️⭐️⭐️⭐️
    • Baking
    • Meat
    • Patisserie
    • Restaurant Cookbook
    • Vegetarian
    • Yotam Ottolenghi

Categories

  • ▼Restaurant
    • 1 Michelin Star
    • 2 Michelin Stars
    • 3 Michelin Stars
    • British
    • Fish
    • French
    • Italian
    • Japanese
    • Peruvian

Categories

  • 101 Cookbooks (1)
  • 3 Michelin Stars (1)
  • Advert (1)
  • Alan Murchison (2)
  • Alba Truffle (1)
  • Almond (1)
  • Angela Hartnett (1)
  • Angler (2)
  • Art Journal (2)
  • Artichokes (1)
  • Axis (1)
  • Azelia’s Kitchen (1)
  • Baking (9)
  • Baldwin (1)
  • Bara Brith (1)
  • Basics (1)
  • Beef (1)
  • Beetroot (2)
  • Ben Spalding (2)
  • Blackberry Soufflé (1)
  • Blackening Spice (1)
  • Blood Oranges (4)
  • ►Book Review (75)
    • Baking (10)
    • Meat (1)
    • Patisserie (6)
    • Restaurant Cookbook (3)
    • Vegetarian (3)
    • Yotam Ottolenghi (2)
    • ⭐️⭐️⭐️⭐️ (16)
    • ⭐️⭐️⭐️⭐️⭐️ (8)
  • Bread (3)
  • Breakfast (1)
  • Breakfast Tart (1)
  • brioche (1)
  • Brockhall Farm (1)
  • Bruschetta (1)
  • Bryn Williams (1)
  • Burrata (1)
  • Butter (1)
  • Buttercream (1)
  • Camembert (1)
  • Canapes (1)
  • caraway (2)
  • Casserole (2)
  • Chelsea Buns (1)
  • Chestnuts (1)
  • Chicken (3)
  • Chickpea (1)
  • Chocolate (4)
  • Chocolate Fondant (1)
  • Christmas (1)
  • Ciabatta (1)
  • Cinnamon (1)
  • Citrus (1)
  • Citrus Drizzle Cake (1)
  • Clams (1)
  • Coconut (2)
  • Coconut Milk (1)
  • Confectionary (1)
  • Creme Patisserie (1)
  • Dan Lepard (1)
  • Dessert (1)
  • detox (1)
  • Doughnuts (1)
  • Dried Fruit (1)
  • Drop Scones (1)
  • Ducasse (1)
  • Duck Egg (1)
  • Eggs (3)
  • El Bulli (1)
  • en Cocotte (1)
  • Epi (1)
  • Eric Treuille (1)
  • fennel (2)
  • Fettuccini (1)
  • Fish (1)
  • FrontPage (28)
  • Fruit Tea (1)
  • Glutamate (1)
  • Goat’s Cheese (1)
  • Gỏi Cuốn (1)
  • Granita (1)
  • Herbs (1)
  • Heritage Tomato (1)
  • Hibiscus Flower (1)
  • Hope and Greenwood (1)
  • Ice-Cream (3)
  • Iced Berry Souffle (1)
  • Icing (1)
  • Italian (1)
  • James Martin (1)
  • Jelly (1)
  • Journal (9)
  • Karen Scott (1)
  • King Oyster Mushroom (3)
  • Kummel (1)
  • L’Ortolan (1)
  • Lamb (1)
  • Lavender (1)
  • Laverstoke Park (1)
  • Lemon (3)
  • Lemon Drizzle Cake (1)
  • Lemon Grass (1)
  • Lemon Meringue Tart (1)
  • Lemon Poppy Seed Muffins (1)
  • Lentils (1)
  • Limewood (1)
  • Liquorice (1)
  • Liquorice Ice-Cream (1)
  • Lobster (3)
  • Lucas Hollweg (1)
  • Luke Holder (1)
  • Macarons (1)
  • Mango (1)
  • Marcus Wareing (1)
  • Mark Lloyd (1)
  • Market (1)
  • Mary Berry (1)
  • Meringue (1)
  • Michael Moore (1)
  • Michel Roux (3)
  • Mint (1)
  • Mister Truffle (2)
  • Modernist Cuisine at Home (1)
  • Moroccan (1)
  • Muffins (3)
  • Murano (1)
  • Mushroom (1)
  • Ollie Dabbous (1)
  • Ollie Fararr (1)
  • Ox cheek (1)
  • Palourde Clams (1)
  • Pancetta (1)
  • Panna Cotta (1)
  • Parmesan (1)
  • Passion Fruit (3)
  • Pasta (1)
  • Patisserie (1)
  • Paul Heathcote (1)
  • Pea (1)
  • Peter Reinhart (1)
  • Petit Fours (1)
  • Philip Howard (1)
  • Pierre Koffman (1)
  • Pierre Koffmann (1)
  • Pimms (1)
  • Pistachio (1)
  • Pistachio Soufflé (2)
  • Pistacho (1)
  • Pork (1)
  • Prawn (1)
  • Quiche (1)
  • Rachel Allen’s 30 Day Muffins (1)
  • Raspberry (2)
  • Ravioli (1)
  • Raymond Blanc (1)
  • ►Recipe (192)
    • Baking (17)
    • Breakfast (2)
    • Cheese (1)
    • Dessert (7)
    • Eggs (3)
    • Fish (2)
    • Heston Blumenthal (5)
    • Italian (3)
    • Jamie Oliver (1)
    • Marcus Wareing (2)
    • Mediterranean (3)
    • Pasta (3)
    • Patisserie (7)
    • Risotto (1)
    • Smoothie (1)
    • Sous Vide (1)
    • Squash (1)
    • Thermomix (19)
    • Vegan (1)
    • Vegetarian (20)
    • Yotam Ottolenghi (2)
  • ►Restaurant (124)
    • 1 Michelin Star (17)
    • 2 Michelin Stars (9)
    • 3 Michelin Stars (3)
    • British (19)
    • Fish (4)
    • French (4)
    • Italian (3)
    • Japanese (1)
    • Peruvian (1)
  • Richard Bertinet (1)
  • Risotto (1)
  • Roganic (1)
  • Rolls (1)
  • Roux (3)
  • salad (2)
  • Salmon (2)
  • Sardinian Cookery (1)
  • Scandiliscious (1)
  • Sea Trout (1)
  • Sherbet Dab (1)
  • Signe Johansen (1)
  • Silvana de Soissons (1)
  • Simon Rogan (1)
  • Snail Caviar (1)
  • Soda Bread (1)
  • Sorbet (1)
  • Soufflé (11)
  • Soup (1)
  • Sous Vide (2)
  • Spice (1)
  • Stew (1)
  • Stuffing (1)
  • Sugar Baby (1)
  • Sugarwork (1)
  • Sumosan (1)
  • Supper (1)
  • Sweetcorn (1)
  • Sweetcorn Fritters (1)
  • Tamarillo’s (1)
  • Texturas Fizzy (1)
  • Thai (2)
  • The Bertinet Kitchen (1)
  • The Square (1)
  • Thermomix (10)
  • Toffe Fudge Muffins (1)
  • Tom Kitchin (1)
  • Tomato Bread (1)
  • Tony Fleming (4)
  • Tribute Dish (2)
  • Truffle (1)
  • Truffles (6)
  • Umami (1)
  • Uncategorized (1)
  • Vanilla (2)
  • Vegan (1)
  • Vegetables (1)
  • Vegetarian (3)
  • Verveine (1)
  • Vietname Summer Roll (1)
  • Watermelon (1)
  • William Curley (1)
  • yeasted dough (1)

I’m passionate about food, its provenance and its sustainability. As a technical cook, I like to see what’s happening in the kitchens of Michelin starred restaurants, but you’re just as likely to find me at home making sourdough. You can find some of my recipes in In The Mix 2, an award-winning Thermomix cookbook.

I’m also truly blessed – I can open my fridge at any time and know it’s crammed with all manner of loveliness – but that’s not the case for everyone. There are people all around me in the UK who rely on food banks to feed their kids, and themselves, and every box of cereal or teabag makes a difference. You can donate food to your local food bank, or time, or money, and if you want more information the best starting place is http://www.trusselltrust.org.

You can also find me here:

Foodies100 Index of UK Food BlogsFoodies100
The Renaissance Epicurean... London restaurants
Top Food BlogsUK Food Bloggers Association

The Eleven Madison Park Granola

Copyright © 2025 · Cookd Pro Theme On Genesis Framework · WordPress · Log in

Nourished
  • Home
  • Recipes
  • Book Reviews
  • Restaurants
  • Journal
  • About