• Skip to primary navigation
  • Skip to main content
  • Skip to primary sidebar

Nourished

  • Home
  • Recipes
  • Book Reviews
  • Restaurants
    • 3 Michelin Stars
    • 2 Michelin Stars
    • 1 Michelin Star
  • Journal
    • Art Journal
    • The Renaissance Diary
  • About
    • Contact Me
    • Instagram
    • Loves
    • Suppliers
    • Masterchef Links

Recipe

November 4, 2013 Baking

Lemon Drizzle Cake

All bow to Mary Berry, the queen of baking.  And it’s true, if I’m looking for a traditional bake, I’ll usually look at her recipe first and then move on to check out any variations.  In this case we’ve never moved beyond Mary’s recipe, and it’s the cake the children ask for most.  If made using the all-in-one method in a food processor, it literally can be in the oven in five minutes… C’mon – who doesn’t have time for a five minute cake???

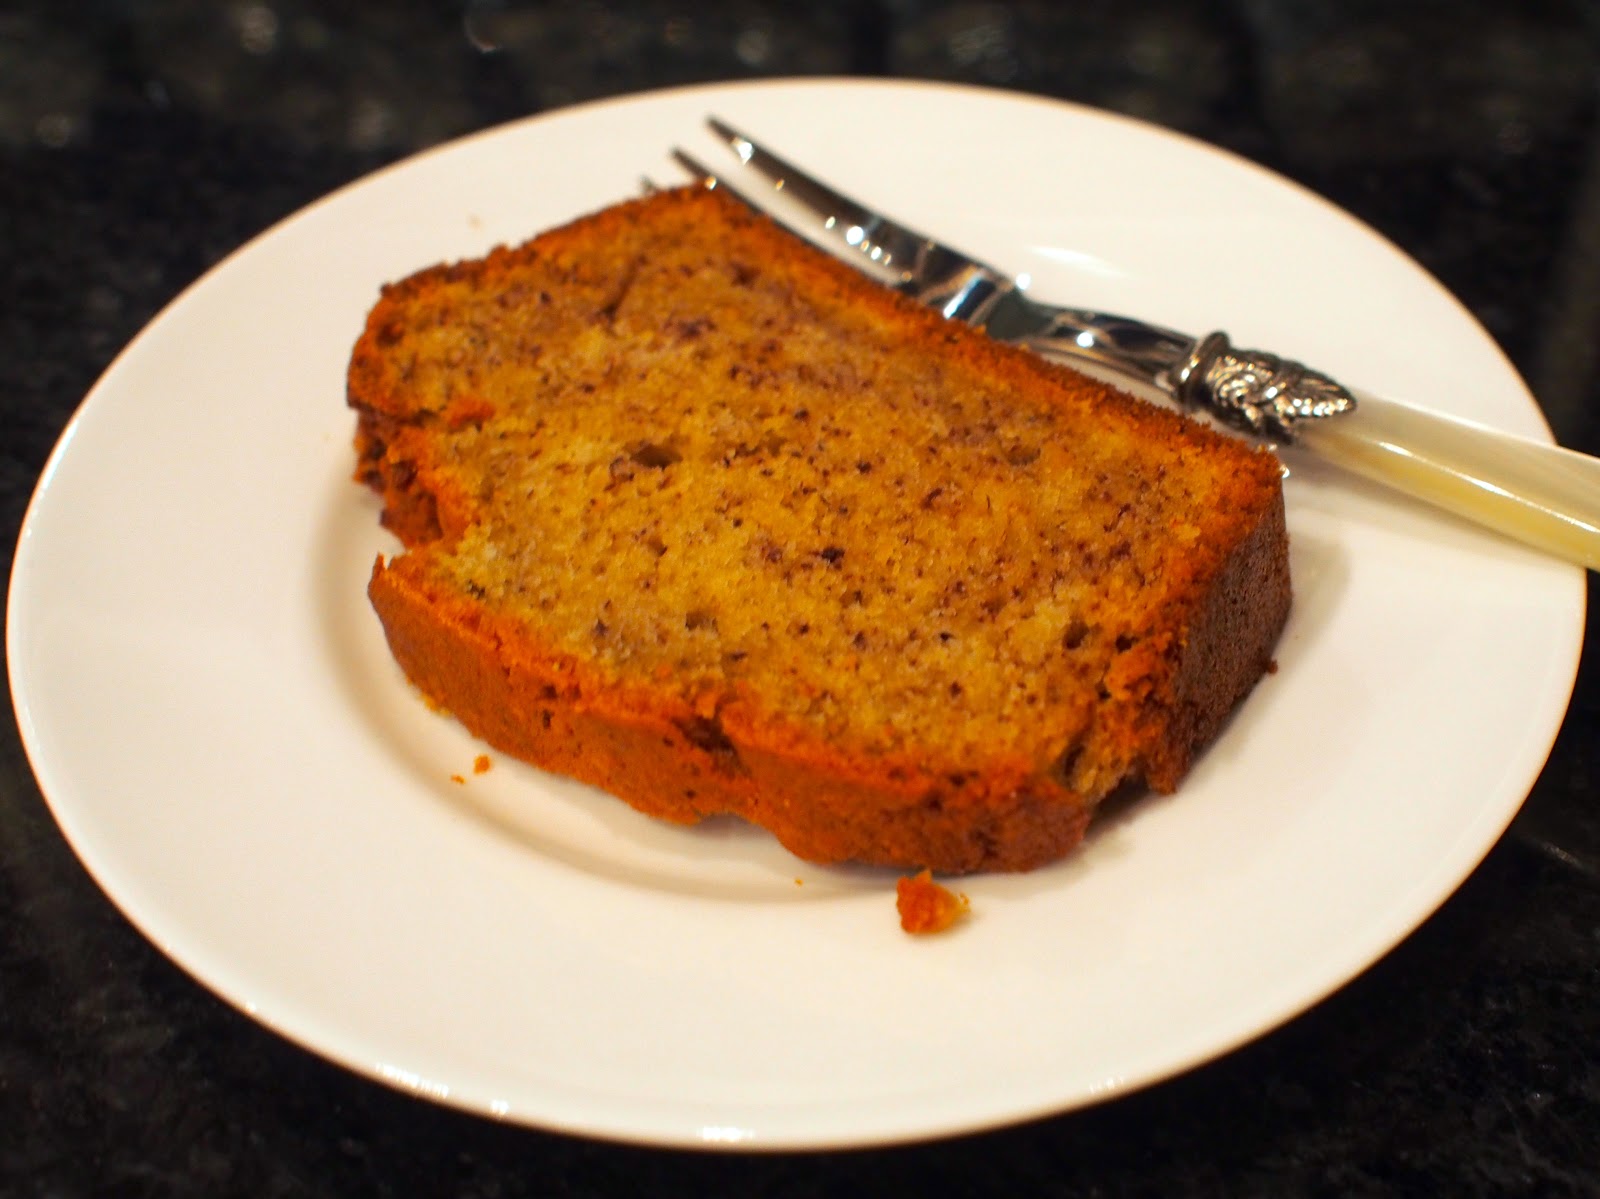
The basic mixture is what the Americans call pound cake – that is that the four main ingredients weigh the same as each other.  Although this can result in a slightly heavier cake than others, it is here lightened with a little baking powder.  The sugar glaze also sinks into the cake, and forms a crust which keeps the moisture inside the cake.

For the cake:
3 large eggs
175g (6 oz) self-raising flour
175g (6 oz) caster sugar
175g (6 oz) softened butter
1.5 level tsp baking powder
Finely grated zest of 1 lemon

For the crunchy lemon icing:
100g (4 oz) granulated sugar
Juice of 1 lemon

You’ll also need:
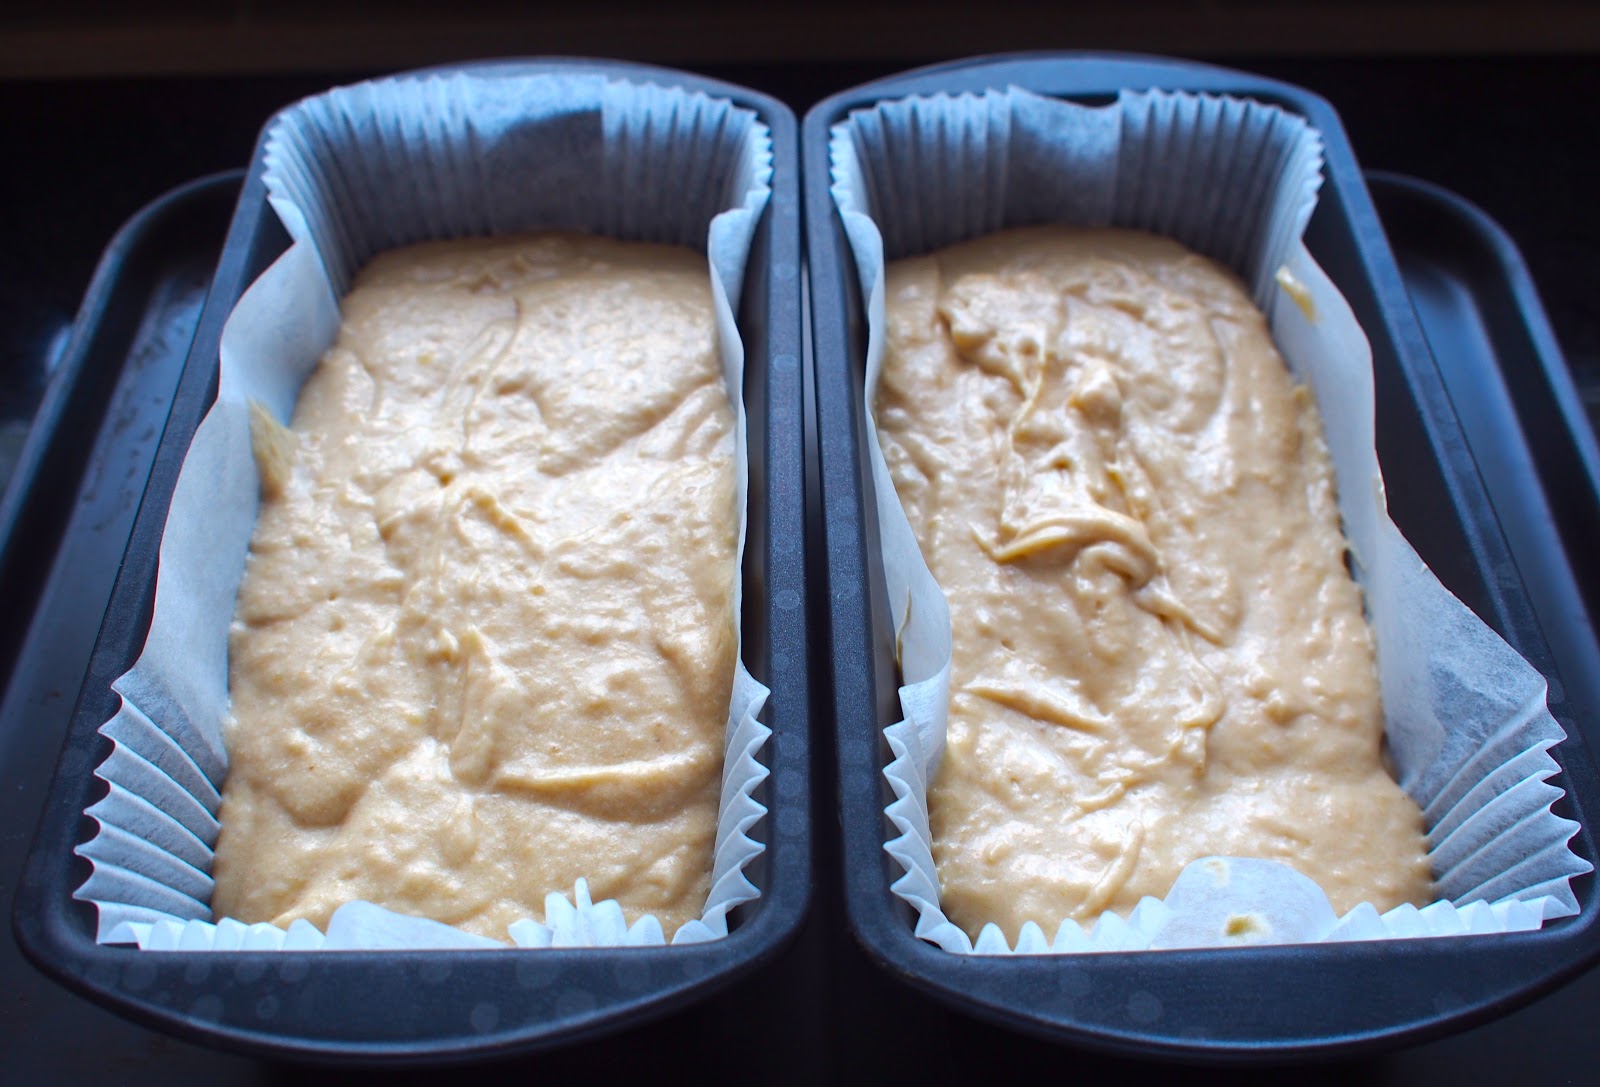
900g (2lb) loaf tin, greased and lined (or smaller presentation cases, as I have used)

Method

  • Preheat the oven to 180ºC / 350ºF / Gas Mark 4.
  • Beat together the eggs, flour, caster sugar, butter, baking powder and lemon zest until smooth in a large mixing bowl and turn into the prepared tin
  • Bake in the pre-heated oven for about 35 mins, or until golden brown, shrinking away from the sides of the tin and springy to the touch.
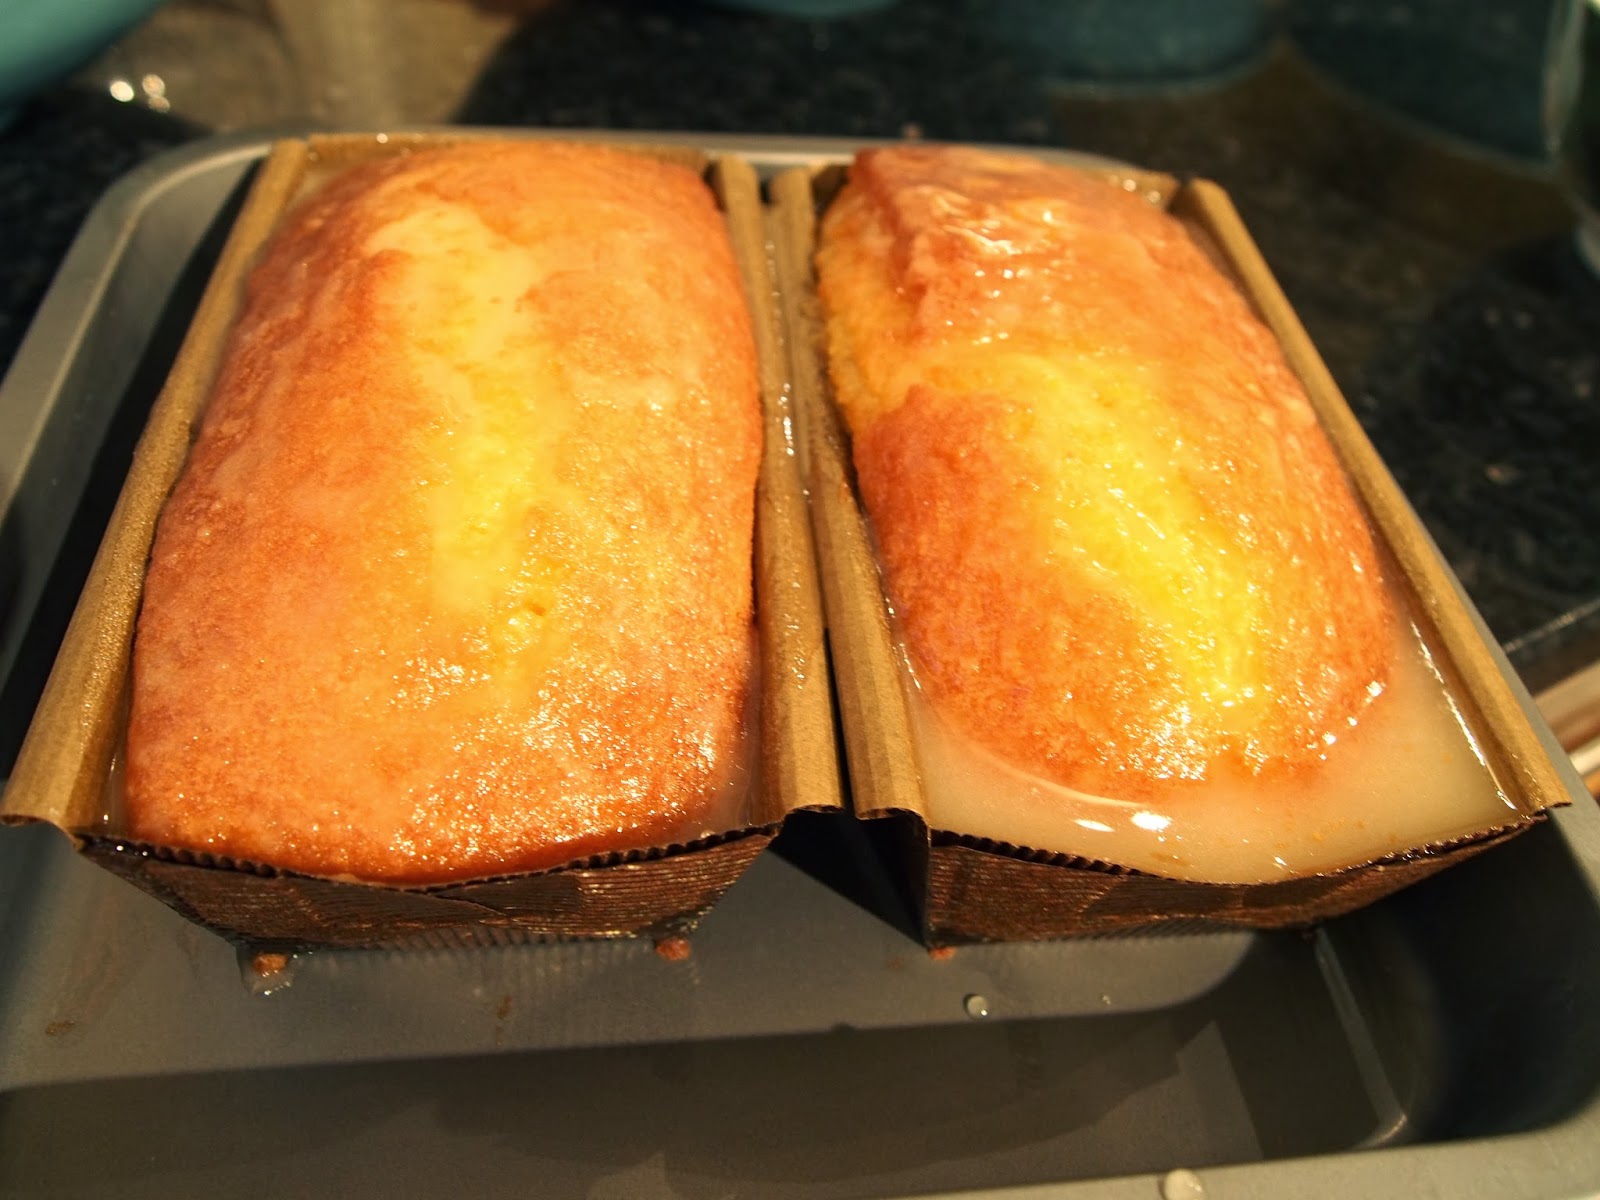
  • While the cake is still warm, make the lemon drizzle topping. Mix together the sugar and lemon juice, and pour over the warm cake
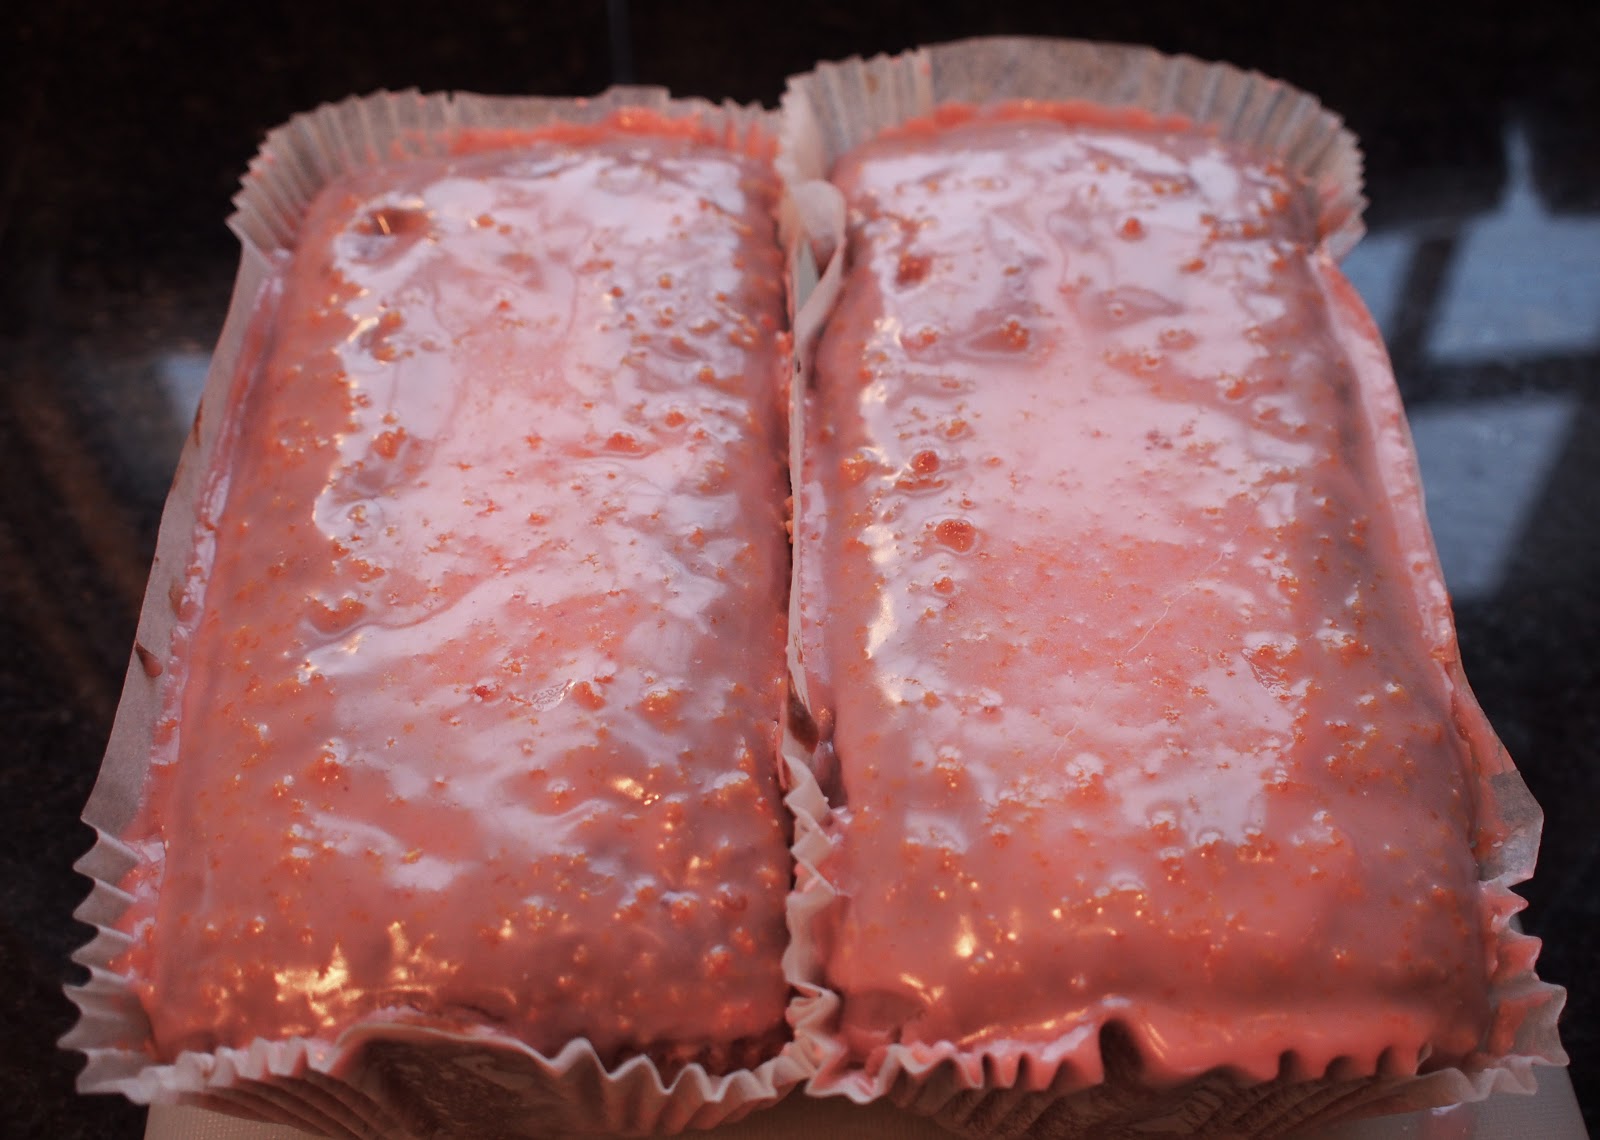
  • Do keep going back to top up the glaze until you can see it isn’t being absorbed any more.  In my photographs, the cake on the left was glazed a couple of minutes before that on the right – both had the same amount of glaze, but you can see that the one on the left has absorbed more glaze
  • Leave to cool a little and loosen the sides of the cake, then lift the cake out of the tin (or, if using presentation cases, clearly you can leave the cake alone until you need it.  This will keep it fresher for longer
Notes
  • If the mixture looks too thick, add a little milk to slacken it
  • If using a food processor, try not to over mix the batter, as it will over-develop the gluten – just mix the batter for long enough to bring it together
  • If you do make it in the traditional way (beating the butter and sugar) you will get a better cake – depends how much of a purist / sadist you are – I now do it the full form way!
  • My batter looks a little orange.  Because I was using small eggs, I’d put in four to make it up to the right quantity, giving me one extra yolk.  I was also using Clarence Court eggs, and their yolks are a very rich colour
  • I don’t use the recommended quantities for the glaze, as I often have very large lemons (from lovely Natoora – yummy Amalfi lemons!).  So, I juice my lemon, and then add enough sugar to give you a firm enough glaze.  Works perfectly well, and doesn’t seem to overdo the sugar glaze – of course this may be because I’m putting it across two smaller cakes
  • If using slightly smaller cases, do reduce the cooking time accordingly
  • The mixture makes two cakes in the cases I use, and they take around 25 minutes to cook
  • The little presentation cases are available in bulk from Bakery Bits
  • This makes an excellent tray bake too – if using the tray bake size from Lakeland, give the cake about 20-22 minutes…


This recipe is taken from Mary Berry’s Stress-free Kitchen

    May 6, 2013 Heston Blumenthal

    Heston Blumenthal’s Perfect Burger

    Yay, it’s finally BBQ season… It may look like I only cook chocolate delice and frangipane tarts, but hey, my kids like a burger as much as the next person.  Of course that wouldn’t be a generic supermarket burger, and so finally the opportunity to try Heston’s perfect burger recipe.  I’d seen this recipe on his How to Cook Like Heston show, but we didn’t fire our BBQ at all last year, and so the itch grew and grew.

    Why this recipe in particular? Well, to cut to the chase, Heston lines the minced meat in such a way that when you bite into the burger, the burger breaks down in your mouth… Confused?  Trust me – this is one technique that’s worth having in your BBQ arsenal.  I’ve subsequently added additional flavourings to the burger, but the basic principle remains the same. You can watch the technique here.

    To go with the perfect burger, the best burger bun recipe I’ve found to date.  This enriched dough recipe comes courtesy of The Fabulous Baker Brothers, and really is an incredibly simple dough to make.  On the second occasion I used the same recipe to make hot dog bus too, just leave off the egg glaze and shape them into longer batons.  I quick dusting with flour will ensure that you end up with a soft bun.

    The one thing I have learnt after a weekend barbecuing, don’t spend hours making all those sides.  I soon realised that all people were interested in were the burgers, hot dogs and ribs… Soul destroying – my amazing coleslaw with grated apple and a touch of orange zest will end up as tomorrow’s lunch.  Even jacket potatoes were jettisoned by most people as they headed straight for the protein.  And let’s face it – this protein overload won’t matter in the long run – because this weather won’t last…  So – get your BBQ on and get baking…

    For the buns:
    500g strong white flour
    1 tbsp caster sugar
    25g lard [I substituted butter]
    10g salt
    200ml tepid milk
    5g dried yeast
    100ml tepid water
    1 egg, beaten
    Sesame seeds, to sprinkle over

    [Additions: I added an egg to the dough, and used golden caster sugar.  I also used poppy seeds rather than sesame seeds because one guest had an allergy] 

    Method

    • Weigh the flour, sugar, lard and salt into a large bowl and add the milk. Mix the yeast with the tepid water and mix thoroughly into a dough. Turn it out onto a lightly floured surface and knead for 10 minutes until your dough is soft and elastic. Leave to rise for 1 hour in a covered bowl left in a warm place.
    • Divide the dough into 10 pieces and on a lightly floured surface roll into balls with your hands. Then using a rolling pin flatten into 10cm baps on a floured surface. Place on baking trays lined with baking paper and brush beaten egg over each bap. Cover loosely with cling film and leave them in a warm place for 30 minutes
    • Brush with a second coat of beaten egg and sprinkle a pinch of sesame seeds onto each bap. Cover loosely with cling film and leave for a final 30 minutes to rise.
    • Meanwhile preheat your oven to 200°C/fan 180°C/gas mark 6. Bake the baps until they are perfectly golden, about 10-15 minutes

    For the burgers
    1.8kg sirloin, cut into 3x3cm cubes
    13g salt

    For the sauce

    90g tomato ketchup
    145g mayonnaise
    15g French’s mustard

    To serve

    10 sliced burger buns, toasted
    10 slices gruyère cheese
    2 baby gem lettuces, broken into leaves
    2 vine-ripened tomatoes, sliced
    ½ sweet onion, peeled and finely sliced
    2 dill pickles, sliced lengthways

    Method

    • Place 600g of the cubed sirloin in a bowl and sprinkle with the salt. Mix together, cover with clingfilm then place in the fridge for 4 hours. The salt will penetrate the meat during this time and begin to draw out some of the moisture.
    • Using a meat grinder fitted with a 3mm plate, grind the unsalted sirloin then refrigerate this meat until very cold. Combine the cold ground meat with the cold, salted sirloin cubes and mix well.
    • Before you begin the final grinding, place two layers of clingfilm across a chopping board or baking sheet and position it under the mouth of the grinder. Using a coarser, 8mm grinding plate, pass the meat mixture through the grinder. This will retain some larger pieces of the sirloin.
    • As the meat comes out of the grinder, have a second person use their hands to lay out the strands of meat on the clingfilm. Try to keep the grain of the individual strands running lengthwise in the same direction without getting tangled together. To do this, start laying the meat down at the edge of the sheet furthest from the grinder and work towards the closest edge.
    • Wrap the meat up tightly in the clingfilm, twisting the ends tightly to form a log. Prick a few holes in the clingfilm with a pin to release any air pockets trapped inside, then continue to twist the ends to tighten until the log is about 12cm in diameter.
    • Wrap the log in another layer of clingfilm to keep it from coming apart, and refrigerate for at least 2 hours, or until needed.
    • When ready to cook, place the still-wrapped log on a cutting board and use a very sharp knife to cut slices that are approximately 2cm in thickness. (The clingfilm helps to keep the meat from falling apart.) Place the finished burgers on a baking tray and refrigerate until needed. If you have more burgers than you need, they can be individually wrapped in clingfilm at this point and frozen until needed.
    • To cook the burgers, rub each one with a little oil and place them on the barbecue or a really hot frying pan, and flip them every 15–20 seconds. Cook to your liking or for medium rare, take the burger to 45ºC in the centre. Immediately after the last flip, place a slice of cheese on top of each burger and allow to melt for the final 15 seconds.
    • To make the sauce, combine the ketchup, mayonnaise and mustard in a bowl and mix thoroughly.
    • To serve, place the bottom half of a bun on a plate and put a burger with melted cheese on top. Place a couple of slices of tomato and onions followed by a couple of leaves of lettuce and a couple of slices of pickles. Finish with a spoon full of sauce. Place the top half of the bun on top and serve.
    Notes
    • The structure of the burger really does work as you bite into it, but you still have the distinct texture of mince. Not sure how to get around that… I think the method works well because it allows you to get a really good crispy crust on the outside, but it looks a little… unusual…  I think worth a go to see for yourself.
    • The bun will now be my default bun.  I have made these on just one prove – they’ll be okay at a push, but they’re much nicer if given the full treatment.
    • I did make the sauce Heston uses too – delicious, though mine was a little sloppy, as you’ll see from the photographs… Yummy though…
    The buns, before the second prove
    Light, fluffy and soft – great burger buns
    You can see the structure of the burger

    April 21, 2013 Recipe

    Prawns, Pork and Squid Noodle Salad

    Noodle SaladThe sun is coming out, and so it’s time to eat ‘cleaner’ food.  I’m a huge fan of Japanese cuisine, but there’s something very appealing in Asian noodle salads from all over the continent.  This Cambodian salad, from Rick Stein’s Far Eastern Odyssey, really hits my buttons.  Best of all, it can be made in advance – perfect for Sunday evening when you’re trying to recover from the post-Sunday lunch blow-out!

    Ingredients:
    vegetable oil for frying
    100g shallots
    200g glass noodles
    200g large raw peeled prawns
    200g squid, sliced into 5mm-thick rings
    100g minced pork (or meatballs, see the Notes)
    25g dried shrimp
    3 Tbsp fish sauce
    4 Tbsp lime juice
    20g mint leaves
    1 Tbsp palm sugar
    50g peanuts
    1 red bird’s eye chillies
     
    Method:
    • Pour 1cm oil into a large, deep, frying-pan.  Add the shallots and fry over a medium heat until they are crisp and golden brown.  Lift them out with a slotted spoon onto plenty of kitchen paper and leave to drain.  Reserve the frying oil.
    • Bring a large pan of unsalted water to the boil, add the noodles, take the pan off the heat and leave them to soak for 2 minutes.  Drain well, roughly cut the noodles into a manageable length and set aside to drain even further. If there is a lot of excess water in the noodles, place some folded sheets of kitchen paper into the bottom of a bowl and tip the noodles on top.
    • Heat 2 tablespoons of the shallot-flavoured oil in a wok or large deep frying pan, add the prawns, season lightly with salt and stir-fry for 2 minutes or until just cooked.  Lift onto a plate, add another 1-2 tablespoons oil to the pan and add the squid, season lightly with salt and stir-fry for 1-11/2 minutes until nicely caramelised.  Add to the plate with the prawns.  Finally, heat another 1-2 tablespoons il in the pan, add the minced pork and stir-fry for 1-11/2 minutes, breaking it up with a wooden spoon into small pieces as it browns.
    • Put the noodles into a large bowl and add the pork, prawns, squid, peanuts, mint, dried shrimp and chilli, and toss together well.  Mix the lime juice, sugar and fish sauce together, toss through the salad and serve at room temperature.
    Notes:
    • I had to use those fresh rice noodles, but they come with an oily film over them.  I’ve tried washing it off in the past, but the result is not ideal.  I’ve tried soaking them in juice too, but it’s not much better… The easiest solution I’ve found is to toss them for a few minutes in about a tablespoon of sesame oil.  This compliments the overall dish, and adds a further level to the flavour combinations.
    • I didn’t use the squid, didn’t have any :0)
    • I found the pork mince a little… flaccid… I popped it into a hot oven for 5 minutes or so just to really give it a more roasted, and crispy edge – it much improved the texture
    • I did add some halved baby gem leaves too, for a little more texture, clearly that’s not authentic, but does improve the texture overall
    • The next time I made this, I bought mini meatballs instead, and pressed them down in the pan as I was shallow-frying them.  I then popped them into the oven for 15 minutes.  Chopped into quarters, they form a much better crunch than the mince (imho)

    Noodle Salad


    There are lots of other interesting recipes in Rick’s book >

    April 10, 2013 Recipe

    Chocolate Delice

    I realise that I don’t usually pay homage to a chef when making a recipe, but the legendary Monsieur Blanc is no ordinary chef!  Nearly as important to my culinary journey as the Roux Brothers, Raymond is completely self-taught, and his Manoir aux Quat’Saisons has held two Michelin stars since 1985 – no mean feat.  As well as sharing my birthday, Raymond is a most amusing and very brave man – he served both his first and second wife a croquembouche on their wedding day…

    This delice was featured on Kitchen Secrets, a most enlightening look at a number of dishes and techniques.  Every time I see an episode, I note another little detail.  You can see this particular recipe on You Tube, which certainly shows you how simple it can be.

    Ingredients

    For the base
    100g/3½oz toasted hazelnuts
    100g/3½oz caramelised sugar pieces
    150g /5¼oz bran flakes, slightly crushed

    For the delice
    140ml/5fl oz full-fat milk
    325ml/11½fl oz double cream
    2 free-range eggs
    340g/12oz good-quality dark chocolate, minimum 60 per cent cocoa solids, roughly chopped

    For the caramel hazelnuts
    125g/4½oz caster sugar
    8 hazelnuts, shells removed, lightly toasted in a dry frying pan

    For the coffee foam
    200ml/7¼fl oz strong black espresso coffee
    1 sheet gelatine, soaked in cold water for 10 minutes, drained

    To serve
    2-3 tbsp cocoa powder
    1 tbsp freshly ground coffee beans

    Preparation method

    • For the base, blend the hazelnuts and caramelised sugar pieces in a food processor until you have a smooth paste. Heat the paste in a small pan on a gentle heat until warmed through.
    • Place the bran flakes and warmed praline paste into a mixing bowl and scrunch them together, using your hands, until the bran flakes have broken down and been incorporated into the paste.
    • Line a baking tray with a sheet of greaseproof paper, then transfer the praline mixture onto it. Cover the praline mixture with a second sheet of greaseproof paper, then roll the mixture out until it measures at least 14cm x 20cm/5½in x 8in and is 0.5cm/¼in thick.
    • Remove the top sheet of greaseproof paper, then push a 14cm x 20cm x 3cm/5½in x 8in x 1¼in rectangular pastry frame down onto the praline mixture and trim off any excess. (NB: The excess praline mixture can be pressed into any gaps in the mould, if necessary.)
    • Cover the mould with greaseproof paper and chill the praline in the fridge for 30 minutes, or until set.
    • Meanwhile, for the delice, heat the milk and cream in a saucepan and heat gently over a medium heat until it just reaches boiling point.
    • Meanwhile, whisk the eggs in a bowl.
    • As the milk and cream mixture comes to the boil, pour it over the eggs, then whisk the mixture constantly until smooth and thick.
    • Stir in the chopped chocolate and whisk again until the chocolate has melted and the custard is smooth.
    • Remove the base from the fridge and pour in the chocolate delice to fill the mould. Gently tap the sides of the mould to release any trapped air bubbles, then smooth the surface using a palette knife. Chill in the fridge for 6-12 hours, or until completely set.
    • Meanwhile, for the caramel hazelnuts, heat the caster sugar in a pan over a low heat, stirring occasionally until golden-brown and caramelised. Remove from the heat and set aside to cool slightly. (NB: The caramel is cool enough when a cocktail stick dragged across its surface leaves an imprinted trail.)
    • Spear each hazelnut onto a cocktail stick, then dip the hazelnuts into the caramel until coated. Stick a little adhesive putty onto the underside of a shelf or cupboard above a worksurface and secure the cocktail stick into the putty, so that the caramel drips off the hazelnut and creates a tail. (NB: Place a baking tray or sheets of greaseproof paper underneath the hazelnuts to catch any caramel that drips.)
    • Set the caramel hazelnuts aside to cool and harden for at least 30 minutes.
    • For the coffee foam, just before serving, heat half of the coffee in a pan until just hot but not boiling.
    • Squeeze the gelatine sheet dry, then add it to the hot coffee and continue to warm until the gelatine has completely dissolved.
    • Pour the remaining cold coffee into a bowl, then add the hot coffee mixture to it. Whisk well until the mixture starts to foam.
    • To serve, heat the outside of the mould using a chefs’ blow torch to loosen the base of the delice. Carefully remove the pastry frame from the delice.
    • Heat the top of the delice very quickly using a chefs’ blow torch to make the surface glossy. Dust the delice with some of the cocoa powder and ground coffee beans.
    • Smear a teaspoonful of the coffee foam across the width of six to eight serving plates. Plunge the blade of a knife into boiling water to heat the metal, then slice the delice into six to eight pieces and place one onto each smear of foam, at an angle. Rest a caramel hazelnut against each slice. Dust each serving with the remaining cocoa powder.

    Whisk the mixture constantly until smooth and thick

    Stir in the chopped chocolate and whisk again until the chocolate has melted and the custard is smooth

    It will look like this, leaving ribbons on itself…
    Pour in the chocolate delice to fill the mould (I didn’t have a rectangular mould to hand)
    Watch your caramel, it’s cool enough when a cocktail stick dragged across its surface leaves an imprinted trail
    The finished article – a gigantic slice of chocolate delice – I’d recommend a slice about half the size

    March 24, 2013 Almond

    Almond and Citrus Drizzle Cake

    The girls are always asking me for lemon drizzle cake – it seems that the school makes a fabulous one for snack time.  Of course I couldn’t go with a standard version, and wanted to incorporate a couple of different ideas. As well as lemons, I wanted to use blood oranges for a fuller scent load, and a pink icing.  And given my recent obsession with frangipane and nut flours, I also wanted to include a little ground almond into the cake, though I suspect you could probably swap that for polenta too.

    Ingredients:
    Cake:
    300g butter, softened
    300g caster sugar
    zest of 2 unwaxed lemons
    zest of 2 blood oranges
    5 eggs
    200g self-raising flour
    1 tsp bicarbonate of soda
    100g ground almonds

    Sugar glaze:
    juice of 2 unwaxed lemons
    juice of 2 blood oranges
    100g caster sugar
    icing sugar

    Method:

    • Pre-heat the oven to 180ºC/160ºC fan. Using a 2lb loaf tin, either grease and line it, or pop-in a liner.  (I made two smaller cakes)
    • Zest all of the citrus fruits, and then juice them.  Keep separately
    • Cream the butter and caster sugar together until light and doubled in volume and pale.  Add half of the zest, then add the eggs, one at a time, and beat thoroughly in between
    • Add the ground almonds, and combine
    • Add the flour, and mix until just combined
    • You want the mixture to have a soft dropping consistency, so if required add a little milk.  This may not be necessary, depending on how dry your almonds are
    • Pour into the tin(s) and bake for 50-55 minutes or so (35-40 minutes for smaller tins).  A toothpick or cake tester should come out clean, although there may be a few (almonds) crumbs stuck to the tester.
    • For the icing, mix together the caster sugar and the juice.  Warm briefly to allow the sugar to dissolve.  
    • Pour the glaze over the top of your cake, piercing it with holes if you want it to saturate the cake
    • Mix the remaining glaze with some icing sugar, to your chosen consistency, and mix in the remaining zest.  Coat or pipe or zigzag as appropriate
    • Allow to cool in the tin before turning out.
    Notes:

    • The mixture may look curdled – this is the impact of the zest – don’t worry about it
    • I like to combine the almond before the flour, as you don’t want to overwork the gluten in the flour
    • The bicarbonate of soda reacts with the acid, adding further lift to the batter.  You could use baking powder, but I used this specifically because of the acid reaction
    • I spooned the glaze on top of the cake and allowed it to soak it.  Having thoroughly saturated the cake, I mixed the remaining juice with icing sugar, until reaching a spooning consistency.  This is obviously a lot of sugar, but let’s not forget I’m making this for the kids… Because I used blood orange juice, it was also pink, but that was part of my plan! If you want a more professional teatime finish, you can either use just lemon juice, or pipe it onto the cake in a more zig-zag pattern
    The cake batter before baking
    Spoon the cooled syrup over the cake, having pierced several holes into it
    The finished article, you can see the moisture layer all around the edge of the cake

    Yes it’s garish and pink – if you don’t want pink icing, don’t use the blood
    orange juice in the icing layer.  You can still use it in the syrup for flavour.

    March 19, 2013 Journal

    Beautiful bergamots

    I’m going to shamelessly copy an article
    by Sudi in the Independent, not just
    because it’s an interesting piece on the
    versatility of bergamot, but also because
    I’m mentioned.

    The original article can be found here

    The fruit is the chefs’ citrus of choice this spring, says Sudi Piggott in the Independent.

    We’re playing pass the “orange”, perched on stalls at the counter of James Knappett’s intimate Kitchen Table within his Bubbledogs restaurant, where he creates tasting menus in full view of his guests. Except this is not a variation on the nostalgic adolescent game of transferring oranges under the chin and it is not a conventional citrus.

    Knappett likes to challenge his guests with unfamiliar ingredients and new flavours. They inhale appreciatively the heady, familiar yet elusive fragrance of the orange-shaped yellow/green skinned citrus quizzically. This is Catalan bergamot, a sour orange crossbreed, closer to a lemon, and it is better known for giving Earl Grey its distinctive taste, though stealthily it has become the citrus of choice this spring, certainly upstaging the blood orange among chefs and fanatical foodies.

    Knappett adds bergamot aromatic rind and acidic (yet sweeter and more delicate and floral than lemon) juice to flavour yoghurt and mixes with charred cucumber, fresh dill and dill oil, then serves it with raw salmon topped with crispy salmon skin. Its citrus element is “softer” than lemon and it is unwaxed and untreated because the skin is so important, so the flavour is really true and clear. It is an excellent partner to fish. Well in the vanguard, Ashley Palmer-Watts‘s launch menu at Dinner by Heston Blumenthal featured bergamot – and lime-cured mackerel – and Watts is now working on a new dish highlighting bergamot as he can’t get enough of its “beguiling intensity”.

    Tweeting about my discovery of the manifest charms of bergamot, I unleashed a swathe of creativity. The Renaissance Girl adds bergamot to Asian-style marinades with soy, ginger and rice wine vinegar and cautions: “It is important to get the balance right as too much can be intoxicating. I tend to use bergamot alongside other citrus to subtly up the citrus quota.” Bergamot juice can also be substituted for vinegar in vinaigrettes for a perfumed tartness.

    Persian cookery writer and private chef Sabrina Ghayour explains bergamot is an essential ingredient in Persian cuisine, “as we Persians love all things sour and bitter”. She’s been experimenting with honey-soaked bergamot flesh with pork fillet or chicken, candied bergamot in exotic salads and even adding bergamot zest to madeleines. Bergamot is likely to feature in her Norooz Persian New Year dinner (celebrated on the first day of spring) on 22 March at Peyton and Byrne at The National Gallery, in both savoury guises and preserves served with petits fours.

    Private chef Bruno Breillet adds bergamot zest to meringues and finds it lifts marmalade to another level (rinse the rind before use to tame its tartness). Bergamot and mint make for a refreshing sorbet at London’s hottest restaurant Dabbous, a sure sign that it is the citrus of the moment. Ollie Dabbous advises to use the zest more like a spice alongside lemon juice to subtly up the zing. Bergamot even features as one of the icing flavours on the old-fashioned doughnut menu at The Electric, says Soho House executive chef Jake Rigby-Wilson: “The bergamot’s vibrant, distinctive aroma is transforming and confounds expectations, which makes it such a pleasure to use.”

    Patricia Michelson of La Fromagerie, one of the few retail stockists of bergamot, recommends making bergamot syrup to add to prosecco or sparkling water. She also makes a variation with warm spices of cinnamon, cardamom, vanilla, star anise and chilli to glaze lemon (and bergamot) polenta cake. Michelson even likes to use slices of bergamot in Earl Grey and single- estate Ceylon teas, besides infusions such as Verbena and Chamomile.

    I’m intrigued to discover that, historically, Calabrians favoured bergamot as a fruit known to have a beneficial effect in promoting cardiovascular health. It has an exceptional content of citrus polyphenols, which also give the fruit its bitterness. Recent Italian medical research reaffirms that bergamot capsules of extract and pulp may be helpful in inhibiting cholesterol biosynthesis with a natural statin-like effect in reducing bad and raising good cholesterol and lowering blood sugars.

    Though for a more immediate lift bergamot is, according to Nick Strangeway, consultant to Mark’s Bar, the distinctly nuanced flavour of the moment for cocktails: he recommends steeping the zest in high-proof alcohol to make bergamot bitters, infusing it in vodka or gin or simply using the juice to make a Sidecar or Julep of extraordinary intensity and claims a Martini is incomplete without a twist of bergamot. Will James Bond insist on the enigmatic bergamot in his next movie?

    Bergamots are available from natoora.co.uk, wholefoods.co.uk, solstice.co.uk, lafromagerie.co.uk Other exotic citrus by special request only fromnatoora.co.uk.

    Bergamot sorbet

    Serves: 4-6 people

    The refreshing, fragrant flavour of bergamot makes the perfect palette cleanser so try this sorbet at the end of a rich meal.

    Ingredients

    4 Natoora unwaxed bergamots, juiced and zested
    150g caster sugar
    2 egg whites
    300ml water

    Dissolve the sugar in the water over a low heat, before gently bringing to the boil for a couple of minutes. Remove from the heat and add the bergamot zest, cover and leave to infuse for half an hour.

    Add the bergamot juice to the sugar syrup, then strain and place in a shallow container. Freeze for 2 hours until slushy.

    Whisk the egg whites until fluffy and mix into the sorbet. The sorbet must be only semi-frozen to be able to do this. Freeze for at least 6 hours. Remove from the freezer 10 minutes before serving.

    More exotic citrus fruits to try:

    CEDRO

    I’d always known cedro as etrog lemon, an essential part of Jewish Sukkot rituals, and was bemused to come across a Yiddish expression for something that has no value as being like “an etrog after Sukkot”. How very misguided. Its elongated lemon shape is awesome – sometimes as large as a melon – with a textured yellowy-green skin. Cedro has an exceptionally large ratio of soft, white, surprisingly sweet pith that can be used with the bitter-sweet, prized rind. In Sicily, where cedros are grown, it is thinly sliced and sprinkled with salt or sugar as a snack with aperitifs (or candied) or combined with fennel in a salad.

    DIAMANTE CITRON

    Chris Golding at Apero at The Ampersand is another chef who takes great pleasure in using ingredients that are a talking point for guests. He uses diamante citron, sweeter than a conventional lemon and similar to a cedro. He adds its juice besides lemon to cure wild sea bass served with fennel and purple potatoes.

    BUDDHA’S HAND

    A fragrant citron whose fruit is segmented into finger-like sections. The origin of Buddha’s hand is north-eastern India and China though it is now grown in California. It has no juice and is mainly valued for its zest. The inner white pith is not bitter so the fingers can be longitudinally sliced, peel, pith, and all, and used in salads. Not least by Michel Roux Jnr at Le Gavroche in a crab salad with spring onions, roasted hazelnut oil and spicy tomato mousse.

    SHATKORA LEMON

    Indian citrons identifiable by their large “wings” on the stalk attaching the leaf to the stem, they have smooth yellow rind, dry, greenish-yellow flesh and a very sour, bitter juice. At Trishna, segments of Shaktora lemon are added to give extra verve to a masala chicken curry.

    LIMEQUAT

    Tiny round citrus related to both kumquat and lime. Look for the more yellow-skinned limequat as its intense sourness and tartness is more mellow. Use sparingly in dressings and desserts. Sometimes seen in larger branches of Sainsbury’s.

    FINGER LIME

    The ultimate, decadent citrus burst, often called lime caviar as the interior pulp has a caviar-like appearance and pops and bursts on the roof of the mouth, exploding with vivid lime flavour. Wonderful as a seafood garnish and relatively less expensive than caviar though still a huge treat. Available from efoodies.co.uk

    March 18, 2013 Baking

    Caraway Blini

    I happened to have some smoked salmon which needed using up – you know, like you do – and I wanted a new blini recipe.  The problem with blini is that by about the third, you’re feeling their leaden grip in your stomach.  They stop being a vehicle for the topping and become a hindrance.  I’d had my eye on Felicity Cloake’s recipe for a while now, as it’s a variation on Richard Bertinet’s, and I think we all know I love Richard’s gallic charm (and his excellent online baking shop).

    Felicity trialled a number of batters, and gives her verdict – go have a look – it’s an interesting article and it may well be that the beer batter she mentions appeals more to you…
    I liked this one because of the inclusion of the egg whites, which I thought would add an airy lightness to the batter, and it does.  Felicity also includes caraway seeds: I’m a definite fan – there are a few recipes on here which include caraway.  The batter does take a little longer to make than some variations, but the steps really do require the minimum of work, so it’s really not onerous!
    Ingredients:
    150ml milk
    70g buckwheat flour
    70g strong white flour
    1 tsp salt
    2 tsp caraway seeds
    2 free-range eggs, separated
    4g dried yeast
    100g sour cream
    25g butter
    Makes about 35

    Method:
    • Heat the milk in a small pan until it just boils. While it heats, put the flours, the salt and the caraway seeds in a large bowl and separate the eggs.
    • When the milk begins to boil, take it off the heat and stir in the yeast, followed by the egg yolks and the sour cream – you’ll need to stir vigorously with each addition.
    • Pour the contents of the pan slowly into the bowl of flour, stirring as you do so. When you have a smooth paste, cover and leave in a warm place for an hour, or until spongy – it won’t rise dramatically, but it should have expanded slightly, and have developed a few bubbles on the surface.
    • Whisk the egg whites to soft peaks and then very gently fold them into the mixture using a rubber spatula or metal spoon. Once thoroughly mixed, cover, and leave for another 2 hours.
    • When ready to cook, melt the butter in a large frying pan over a medium high heat, then add the batter in teaspoonfuls to the pan and cook until bubbles rise to the top, then flip them over and cook for another minute or so on the other side, until golden brown. You’ll probably need to do this in batches, so keep them warm while you cook the rest – these are best hot from the pan.
     
    Notes:
    • I only left the second rise for an hour, but it was in a warming drawer.  The results were fine, but when I came back later to tidy up, the remaining batter in the bowl was even lighter and more voluminous.  Do try to leave it for the full rise if you have the time
    • I have a Staub crepe pan, which I should have used, but it’s a heavy beast to dig out late on a Sunday night… These actually worked just as well in a non-stick pan
    • I slightly whisked my egg whites at stage one – stop – they go in at stage two!  They were fine take on from there though…
    • The caraway worked perfectly with the salmon, but it’s not necessary if you don’t like it


    March 16, 2013 Goat's Cheese

    Pea, Goat’s Cheese and Mint Quiche…

    It’s the annual School Quiz, and the endless battle to create something that can be transported like a picnic, but is more gourmet than soggy sandwiches… I made the mistake of asking Hubby what he fancied, and he requested quiche… Quiche!  I’ve never made quiche, primarily because my mother-in-law makes such a fantastic one, and, well, just because… But if I was going to have to make quiche, I wanted something really unusual, vibrant and delicious…


    I do love the web – instantly thousands of choices at my fingertips… I found a fantastic recipe on the BBC site (of course) which consisted of a layer of peas, with goat’s cheese, mint and spring onions… Perfect, and just passably vegetarian for those allowed eggs and cheese.  This is absolutely going to be on my summer repertoire, and the girls loved it!

    Ingredients:

    300g frozen peas
    3 tbsp olive oil
    handful mint leaves
    2 eggs
    284ml pot double cream
    4 spring onions, finely sliced
    200g mild goat’s cheese, crumbled
    280g plain flour, plus extra for dusting
    140g cold butter, cut into pieces

    Method:

    • Heat oven to 200C/fan 180C/gas 6. Follow steps 1 and 2 of the Sticky onion & cheddar quiche recipe, opposite page. 2 While the pastry is chilling, cook the peas in boiling water for 3 mins, then drain and refresh under cold water. Use a hand blender to purée the peas with the olive oil, then stir in the chopped mint and season.
    • Lightly prick the base of the tart with a fork, line the tart case with a large circle of greaseproof paper or foil, then fill with baking beans. Blind-bake the tart for 20 mins, remove the paper and beans, then continue to cook for 5-10 mins until biscuit brown.
    • While the tart is cooking, beat the eggs in a large bowl. Gradually add the cream and stir in the onions. Season. When the case is ready, spoon and spread the peas over the base, pour over the egg mix, then finally scatter over the goat’s cheese. Bake for 20-25 mins until set and golden brown. Leave to cool in the case, trim the edges of the pastry, then remove and serve in slices

    Notes:
    • Clearly I did not make my own pastry – I was preparing a meal for eight people – I’m not bonkers…  I use a very thin pastry, which doesn’t require baking blind, but here I should have done – I definitely had a soggy bottom and had to pop the tart into the warming drawer to head from the bottom! Not helped by the fact I put my tart case onto a layer of foil in case of leakages, which actually then covered the perforated base of my case… Whoops…
    • Don’t forget to put the mint into the pea, rather than trying to scatter it on top (I forgot to put it in at first – but the mint will just float up in your egg mixture! Not ideal, though not the end of the world…)
    • The opening photograph is from the BBC website – clearly I forgot to photograph my finished quiche in the rush
    • Be careful which goat’s cheese you use – the first time I used this, but the second this – the second took longer to cook, was ‘moussier’ and slightly more ‘curdled’.  I’ve included a photo of the second, you can see the cheese fluffing up…

      Spread the pea and mint mixture over the base of the BLIND BAKED tart
      Then scatter the goat’s cheese and spring onions over the pea base…
      Definitely not happy with this one – not as good as the first!

      March 16, 2013 Baking

      Frangipane Tarts

      Pistachio frangipane, with figs

      There’s something about the scent of frangipane which has haunted me for decades. We have relatives on the French side of the Swiss-France border, and on our very first visit, we had a plum and frangipane tart. The memory has stuck with me for twenty years – served at room temperature – the tart was luscious, creamy, delicately scented – just adorable.

      Spotting some nectarines which needed using up, I thought it would make a delicious variation.  A quick trawl through some of my favourite chefs revealed a recipe on the BBC site by Angela Hartnett…

      That first tart was consumed by the multitudes in my household within twenty-four hours.

      Luckily, the quantity of frangipane in the recipe allowed me to make two tarts – so the second tart was a plum and frangipane one…  The plums hold up better than the nectarines, though surprisingly they do make the mixture more moist (I would have assumed the nectarines would offer up more water).  The scent load is also greater with the plums.

      Having everything to hand, the second tart only took about 10 minutes to prepare, so well worth keeping some frangipane in your fridge (bring it back to room temperature, and give it a quick re-fluffing with a fork – et voila – instant tart…).

      The next time I made a bakewell tart, and then another for my chum Sarah… And then we moved on to pistachio and fig tarts, with a further tart for another chum, Nicole…

      Once you have the basic frangipane recipe in your back-pocket, the possibilities are endless :0)

      Ingredients:
      For the pastry:
      375g/13¼oz plain flour, plus extra for dusting
      15g/½oz sugar
      225g/8oz unsalted butter, cut into cubes, plus extra for greasing
      1 free-range egg
      4 tbsp ice-cold water
      For the frangipane:
      200g/7¼oz unsalted butter
      200g/7¼oz caster sugar
      2 free-range eggs
      200g/7¼oz ground almonds
      For the tart filling:
      5-6 ripe plums, each cut into eighths, stones removed
      To serve:
      icing sugar, for dusting
      whipped cream or crème fraîche

      Method:
      • For the pastry, sieve the flour and sugar into a large mixing bowl. Tip the cubed butter into the bowl. Rub the butter and the flour between your thumb and fingertips until the mixture resembles fine breadcrumbs.
      • In a jug or small bowl, beat the egg together with four tablespoons of ice-cold water. Pour into the flour mixture.
      • Slowly bring the ingredients together with your hands to form a dough, being careful not to overwork it.
      • Knead the dough lightly on a clean, floured work surface, then wrap it in cling film and refrigerate until firm, at least 30 minutes.
      • For the frangipane, beat the butter and sugar together in a bowl until light and fluffy. Crack the eggs into the bowl one at a time, beating well after each addition. Add the ground almonds and mix well until combined. Set aside.
      • Preheat the oven to 180C/350F/Gas 4. Dust the work surface with flour and roll the chilled dough out thinly. Use it to line one large 25cm/10in tart ring or 6-8 individual tartlet rings 8cm/3¼in in diameter. Trim away any excess.
      • Spoon the frangipane into the tart case so that it comes about halfway up the sides. Smooth over the surface with a spatula and cover the frangipane evenly with the plums.
      • Bake for 30-40 minutes (15-25 minutes for the tartlets), or until the pastry is crisp and golden-brown and the fruit is tender.
      • Remove the tart(s) from the oven. Dust with icing sugar and serve warm with whipped cream or crème fraîche.
      Notes:
      • I used a pre-rolled pastry sheet made by Marie – it’s the best I’ve used, comes in a circle, and is rolled super-fine!  Because it’s so fine, I always brush it with beaten egg and allow to dry in the fridge, before putting any filling in
      • Don’t push your figs too far into the batter, it will rise up around them.  For maximum visual effect, just lightly lodge them in

      Lay the fruit in a pattern of your choosing – you can see from the plum chart that I chose a different layout that time

      Fig and pistachio frangipane

      Nectarine and frangipane

      Plum and frangipane

      Bakewell Tart: spread jam  spread a layer of frangipane, and top with almonds halfway through cooking #simples

      March 2, 2013 Baking

      Banana Bread [Thermomix]

      c3885-p3020127I’m a mother of four – you have to be able to knock-up banana bread to use up all those mushy bananas.  I don’t know what happens – some weeks they go through many bunches, others none…  Still, banana bread is a favourite of the 11yo, so it’s never a wasted effort.

      I’ve found that making cake batter in the Thermomix is speedy, but can result in too much gluten development, resulting in a leaden batter.  Here I’ve put everything else in together and blitzed, before adding the flour by hand at the last moment.   The Thermomix does give you a finer puree of bananas, but that’s not necessarily a bad thing from my point of view!

      This recipe is based on the one on the BBC website…

      Ingredients


      285g/10oz plain flour
      1 tsp bicarbonate of soda
      ½ tsp salt
      110g/4oz butter, plus extra for greasing
      225g/8oz caster sugar
      2 free-range eggs
      4 ripe bananas, mashed
      85ml/3fl oz buttermilk (or normal milk mixed with 1½ tsp lemon juice or vinegar)
      1 tsp vanilla extract

      Thermomix Preparation Method:
      • Preheat the oven to 180C/350F/Gas 4.
      • In the thermomix bowl, cream the butter and sugar together until light and fluffy – I do this using the butterfly…  Bring it slowly up to Speed 4 / 5 minutes – this stops the sugar mixture from splashing all over the TM bowl.
      • Remove the butterfly, and add the eggs, mashed bananas, buttermilk, and vanilla extract to the butter and sugar mixture. Mix on Speed 4 / 2 minutes.
      • Sift the flour, bicarbonate of soda and salt into the TM bowl, and fold the wet ingredients into the dry by hand.  When mostly combined, pulse briefly for around ten seconds until more thoroughly mixed – try not to overwork the batter.  Once you have removed 90% of the batter, you can briefly pulse again for just a few seconds – this will spin the remaining batter out of the blade an onto the side of the TM bowl.
      • Grease a 20cm x 12.5cm/8in x 5in loaf tin and pour the cake mixture into the tin.
      • Transfer to the oven and bake for about an hour, or until well-risen and golden-brown.
      • Remove from the oven and cool in the tin for a few minutes, then turn out onto a wire rack to cool completely before serving.
       
      Normal Preparation Method:

      • Preheat the oven to 180C/350F/Gas 4.
      • Sift the flour, bicarbonate of soda and salt into a large mixing bowl.
      • In a separate bowl, cream the butter and sugar together until light and fluffy.
      • Add the eggs, mashed bananas, buttermilk and vanilla extract to the butter and sugar mixture and mix well. Fold in the flour mixture.
      • Grease a 20cm x 12.5cm/8in x 5in loaf tin and pour the cake mixture into the tin.
      • Transfer to the oven and bake for about an hour, or until well-risen and golden-brown.
      • Remove from the oven and cool in the tin for a few minutes, then turn out onto a wire rack to cool completely before serving.

      • « Go to Previous Page
      • Go to page 1
      • Go to page 2
      • Go to page 3
      • Go to page 4
      • Go to page 5
      • Go to page 6
      • Interim pages omitted …
      • Go to page 11
      • Go to Next Page »

      Primary Sidebar

      Categories

      • ▼Recipe
        • Baking
        • Breakfast
        • Cheese
        • Dessert
        • Eggs
        • Fish
        • Heston Blumenthal
        • Italian
        • Jamie Oliver
        • Marcus Wareing
        • Mediterranean
        • Pasta
        • Patisserie
        • Risotto
        • Smoothie
        • Sous Vide
        • Squash
        • Thermomix
        • Vegan
        • Vegetarian
        • Yotam Ottolenghi

      Categories

      • ▼Book Review
        • ⭐️⭐️⭐️⭐️
        • ⭐️⭐️⭐️⭐️⭐️
        • Baking
        • Meat
        • Patisserie
        • Restaurant Cookbook
        • Vegetarian
        • Yotam Ottolenghi

      Categories

      • ▼Restaurant
        • 1 Michelin Star
        • 2 Michelin Stars
        • 3 Michelin Stars
        • British
        • Fish
        • French
        • Italian
        • Japanese
        • Peruvian

      Categories

      • 101 Cookbooks (1)
      • 3 Michelin Stars (1)
      • Advert (1)
      • Alan Murchison (2)
      • Alba Truffle (1)
      • Almond (1)
      • Angela Hartnett (1)
      • Angler (2)
      • Art Journal (2)
      • Artichokes (1)
      • Axis (1)
      • Azelia’s Kitchen (1)
      • Baking (9)
      • Baldwin (1)
      • Bara Brith (1)
      • Basics (1)
      • Beef (1)
      • Beetroot (2)
      • Ben Spalding (2)
      • Blackberry Soufflé (1)
      • Blackening Spice (1)
      • Blood Oranges (4)
      • ►Book Review (75)
        • Baking (10)
        • Meat (1)
        • Patisserie (6)
        • Restaurant Cookbook (3)
        • Vegetarian (3)
        • Yotam Ottolenghi (2)
        • ⭐️⭐️⭐️⭐️ (16)
        • ⭐️⭐️⭐️⭐️⭐️ (8)
      • Bread (3)
      • Breakfast (1)
      • Breakfast Tart (1)
      • brioche (1)
      • Brockhall Farm (1)
      • Bruschetta (1)
      • Bryn Williams (1)
      • Burrata (1)
      • Butter (1)
      • Buttercream (1)
      • Camembert (1)
      • Canapes (1)
      • caraway (2)
      • Casserole (2)
      • Chelsea Buns (1)
      • Chestnuts (1)
      • Chicken (3)
      • Chickpea (1)
      • Chocolate (4)
      • Chocolate Fondant (1)
      • Christmas (1)
      • Ciabatta (1)
      • Cinnamon (1)
      • Citrus (1)
      • Citrus Drizzle Cake (1)
      • Clams (1)
      • Coconut (2)
      • Coconut Milk (1)
      • Confectionary (1)
      • Creme Patisserie (1)
      • Dan Lepard (1)
      • Dessert (1)
      • detox (1)
      • Doughnuts (1)
      • Dried Fruit (1)
      • Drop Scones (1)
      • Ducasse (1)
      • Duck Egg (1)
      • Eggs (3)
      • El Bulli (1)
      • en Cocotte (1)
      • Epi (1)
      • Eric Treuille (1)
      • fennel (2)
      • Fettuccini (1)
      • Fish (1)
      • FrontPage (28)
      • Fruit Tea (1)
      • Glutamate (1)
      • Goat’s Cheese (1)
      • Gỏi Cuốn (1)
      • Granita (1)
      • Herbs (1)
      • Heritage Tomato (1)
      • Hibiscus Flower (1)
      • Hope and Greenwood (1)
      • Ice-Cream (3)
      • Iced Berry Souffle (1)
      • Icing (1)
      • Italian (1)
      • James Martin (1)
      • Jelly (1)
      • Journal (9)
      • Karen Scott (1)
      • King Oyster Mushroom (3)
      • Kummel (1)
      • L’Ortolan (1)
      • Lamb (1)
      • Lavender (1)
      • Laverstoke Park (1)
      • Lemon (3)
      • Lemon Drizzle Cake (1)
      • Lemon Grass (1)
      • Lemon Meringue Tart (1)
      • Lemon Poppy Seed Muffins (1)
      • Lentils (1)
      • Limewood (1)
      • Liquorice (1)
      • Liquorice Ice-Cream (1)
      • Lobster (3)
      • Lucas Hollweg (1)
      • Luke Holder (1)
      • Macarons (1)
      • Mango (1)
      • Marcus Wareing (1)
      • Mark Lloyd (1)
      • Market (1)
      • Mary Berry (1)
      • Meringue (1)
      • Michael Moore (1)
      • Michel Roux (3)
      • Mint (1)
      • Mister Truffle (2)
      • Modernist Cuisine at Home (1)
      • Moroccan (1)
      • Muffins (3)
      • Murano (1)
      • Mushroom (1)
      • Ollie Dabbous (1)
      • Ollie Fararr (1)
      • Ox cheek (1)
      • Palourde Clams (1)
      • Pancetta (1)
      • Panna Cotta (1)
      • Parmesan (1)
      • Passion Fruit (3)
      • Pasta (1)
      • Patisserie (1)
      • Paul Heathcote (1)
      • Pea (1)
      • Peter Reinhart (1)
      • Petit Fours (1)
      • Philip Howard (1)
      • Pierre Koffman (1)
      • Pierre Koffmann (1)
      • Pimms (1)
      • Pistachio (1)
      • Pistachio Soufflé (2)
      • Pistacho (1)
      • Pork (1)
      • Prawn (1)
      • Quiche (1)
      • Rachel Allen’s 30 Day Muffins (1)
      • Raspberry (2)
      • Ravioli (1)
      • Raymond Blanc (1)
      • ►Recipe (192)
        • Baking (17)
        • Breakfast (2)
        • Cheese (1)
        • Dessert (7)
        • Eggs (3)
        • Fish (2)
        • Heston Blumenthal (5)
        • Italian (3)
        • Jamie Oliver (1)
        • Marcus Wareing (2)
        • Mediterranean (3)
        • Pasta (3)
        • Patisserie (7)
        • Risotto (1)
        • Smoothie (1)
        • Sous Vide (1)
        • Squash (1)
        • Thermomix (19)
        • Vegan (1)
        • Vegetarian (20)
        • Yotam Ottolenghi (2)
      • ►Restaurant (124)
        • 1 Michelin Star (17)
        • 2 Michelin Stars (9)
        • 3 Michelin Stars (3)
        • British (19)
        • Fish (4)
        • French (4)
        • Italian (3)
        • Japanese (1)
        • Peruvian (1)
      • Richard Bertinet (1)
      • Risotto (1)
      • Roganic (1)
      • Rolls (1)
      • Roux (3)
      • salad (2)
      • Salmon (2)
      • Sardinian Cookery (1)
      • Scandiliscious (1)
      • Sea Trout (1)
      • Sherbet Dab (1)
      • Signe Johansen (1)
      • Silvana de Soissons (1)
      • Simon Rogan (1)
      • Snail Caviar (1)
      • Soda Bread (1)
      • Sorbet (1)
      • Soufflé (11)
      • Soup (1)
      • Sous Vide (2)
      • Spice (1)
      • Stew (1)
      • Stuffing (1)
      • Sugar Baby (1)
      • Sugarwork (1)
      • Sumosan (1)
      • Supper (1)
      • Sweetcorn (1)
      • Sweetcorn Fritters (1)
      • Tamarillo’s (1)
      • Texturas Fizzy (1)
      • Thai (2)
      • The Bertinet Kitchen (1)
      • The Square (1)
      • Thermomix (10)
      • Toffe Fudge Muffins (1)
      • Tom Kitchin (1)
      • Tomato Bread (1)
      • Tony Fleming (4)
      • Tribute Dish (2)
      • Truffle (1)
      • Truffles (6)
      • Umami (1)
      • Uncategorized (1)
      • Vanilla (2)
      • Vegan (1)
      • Vegetables (1)
      • Vegetarian (3)
      • Verveine (1)
      • Vietname Summer Roll (1)
      • Watermelon (1)
      • William Curley (1)
      • yeasted dough (1)

      I’m passionate about food, its provenance and its sustainability. As a technical cook, I like to see what’s happening in the kitchens of Michelin starred restaurants, but you’re just as likely to find me at home making sourdough. You can find some of my recipes in In The Mix 2, an award-winning Thermomix cookbook.

      I’m also truly blessed – I can open my fridge at any time and know it’s crammed with all manner of loveliness – but that’s not the case for everyone. There are people all around me in the UK who rely on food banks to feed their kids, and themselves, and every box of cereal or teabag makes a difference. You can donate food to your local food bank, or time, or money, and if you want more information the best starting place is http://www.trusselltrust.org.

      You can also find me here:

      Foodies100 Index of UK Food BlogsFoodies100
      The Renaissance Epicurean... London restaurants
      Top Food BlogsUK Food Bloggers Association

      The Eleven Madison Park Granola

      Copyright © 2025 · Cookd Pro Theme On Genesis Framework · WordPress · Log in

      Nourished
      • Home
      • Recipes
      • Book Reviews
      • Restaurants
      • Journal
      • About