• Skip to primary navigation
  • Skip to main content
  • Skip to primary sidebar

Nourished

  • Home
  • Recipes
  • Book Reviews
  • Restaurants
    • 3 Michelin Stars
    • 2 Michelin Stars
    • 1 Michelin Star
  • Journal
    • Art Journal
    • The Renaissance Diary
  • About
    • Contact Me
    • Instagram
    • Loves
    • Suppliers
    • Masterchef Links

Thermomix

November 2, 2014 FrontPage

Wild Rice and Roasted Vegetable Soup

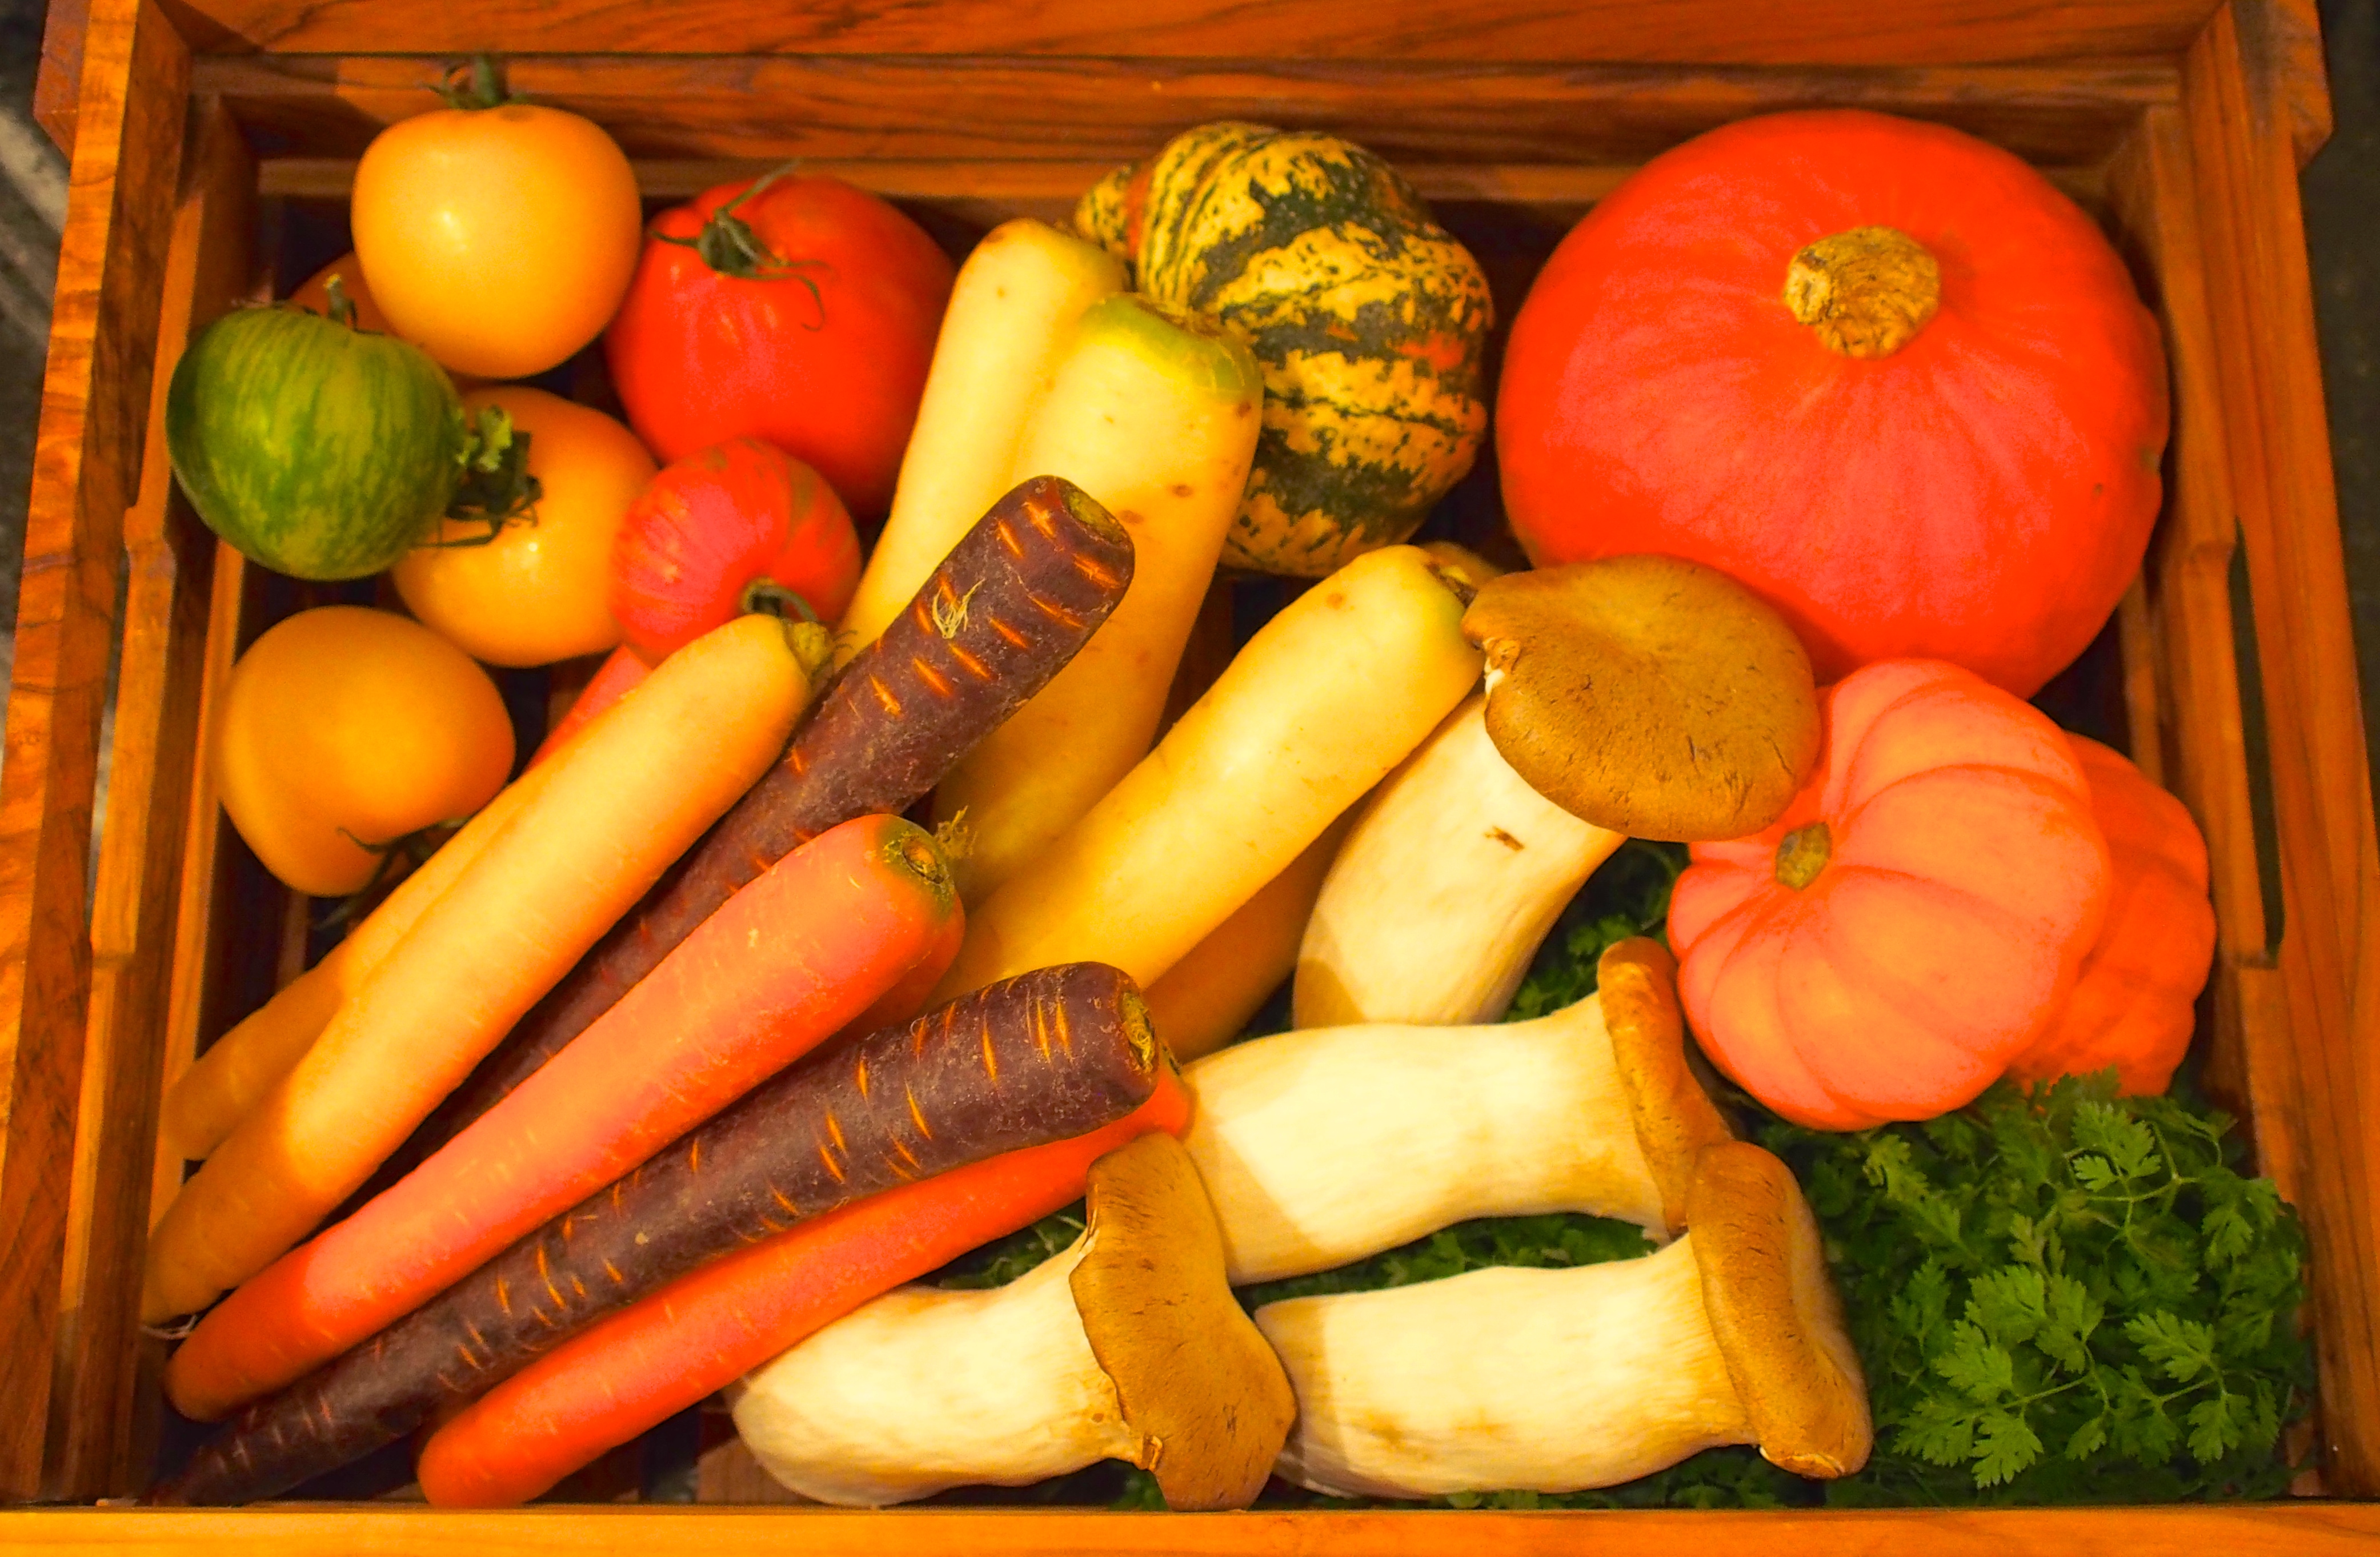
Autumn is a glorious time for cooks, although we’ve had the bounty of spring and summer, it’s now time for pumpkins, squash, and spicy soups in front of a roaring fire. This recipe is very definitely a two for one – it begins as a roasted vegetable and wild rice salad, and the following day becomes a delicious soup!

Ingredients:
1 tsp garam masala
2 cloves garlic
300g soffritto or mirepoix (2 red onions, 2 carrots, 2 large celery stalks, all  fined diced)
olive oil to fry the vegetables
1kg mixed vegetables (king oyster mushrooms, butternut squash, heritage carrots, heritage tomatoes, 2 courgettes)
1 large lemon, cut into wedges
1 large bunch of chervil or parsley
100g mixed salad

Method for the salad:

  • If you’re using wild rice, you’ll need to put this on first, as it takes 40-50 minutes to cook. The ratio for rice to water is usually 1 part rice, to just over 2 parts water or stock. My one cup of rice was more than sufficient for four portions of salad
  • Fry the soffritto in the olive oil, with the garlic and garam masala. If your using mushrooms, you can cut the stalks into dice or matchsticks, and add them to the soffritto, as I have done
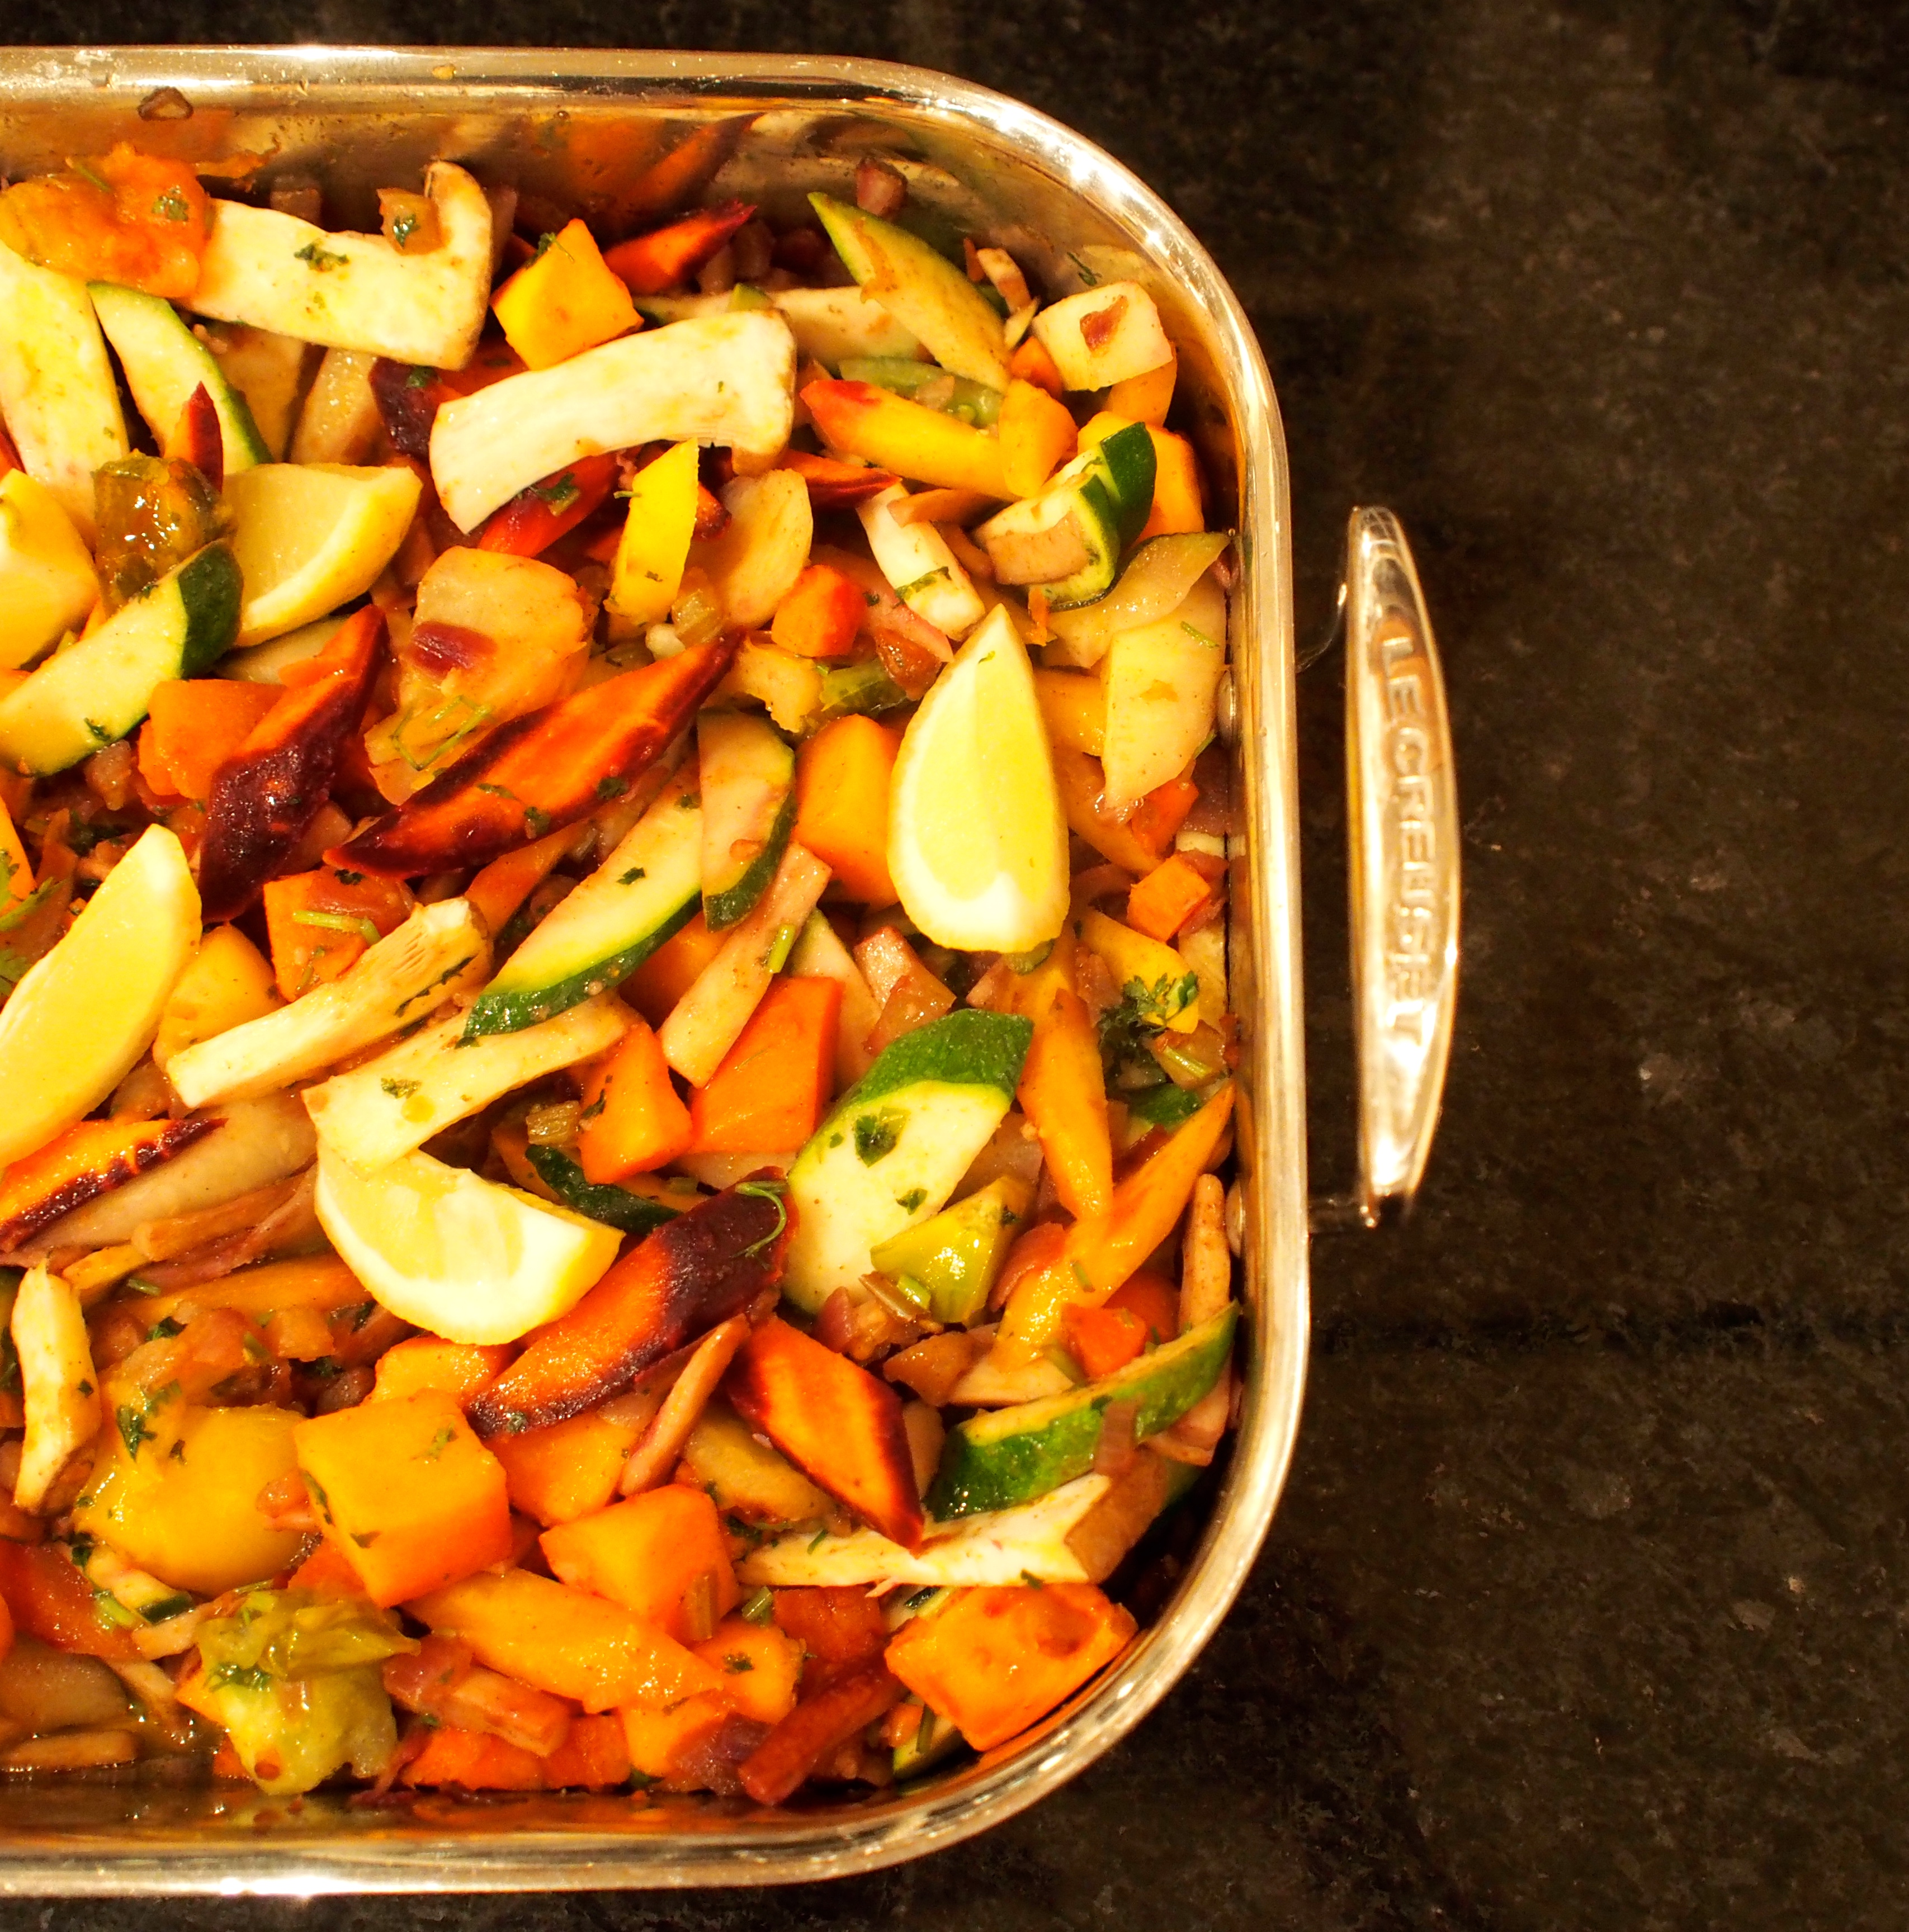
  • Prepare your vegetables into quills, or a shape of your choosing. For quills, cut your carrot, for example, into a slanted wedge, then cut that into half
  • Incorporate your vegetables with the fried mixture, and pop them into a 180ºC oven for around 30 minutes – you’re not looking to roast the colour or flavour out of them, just to add some additional flavour through caramelisation. I also added the stalks of the chervil, finely chopped, and lemon wedges
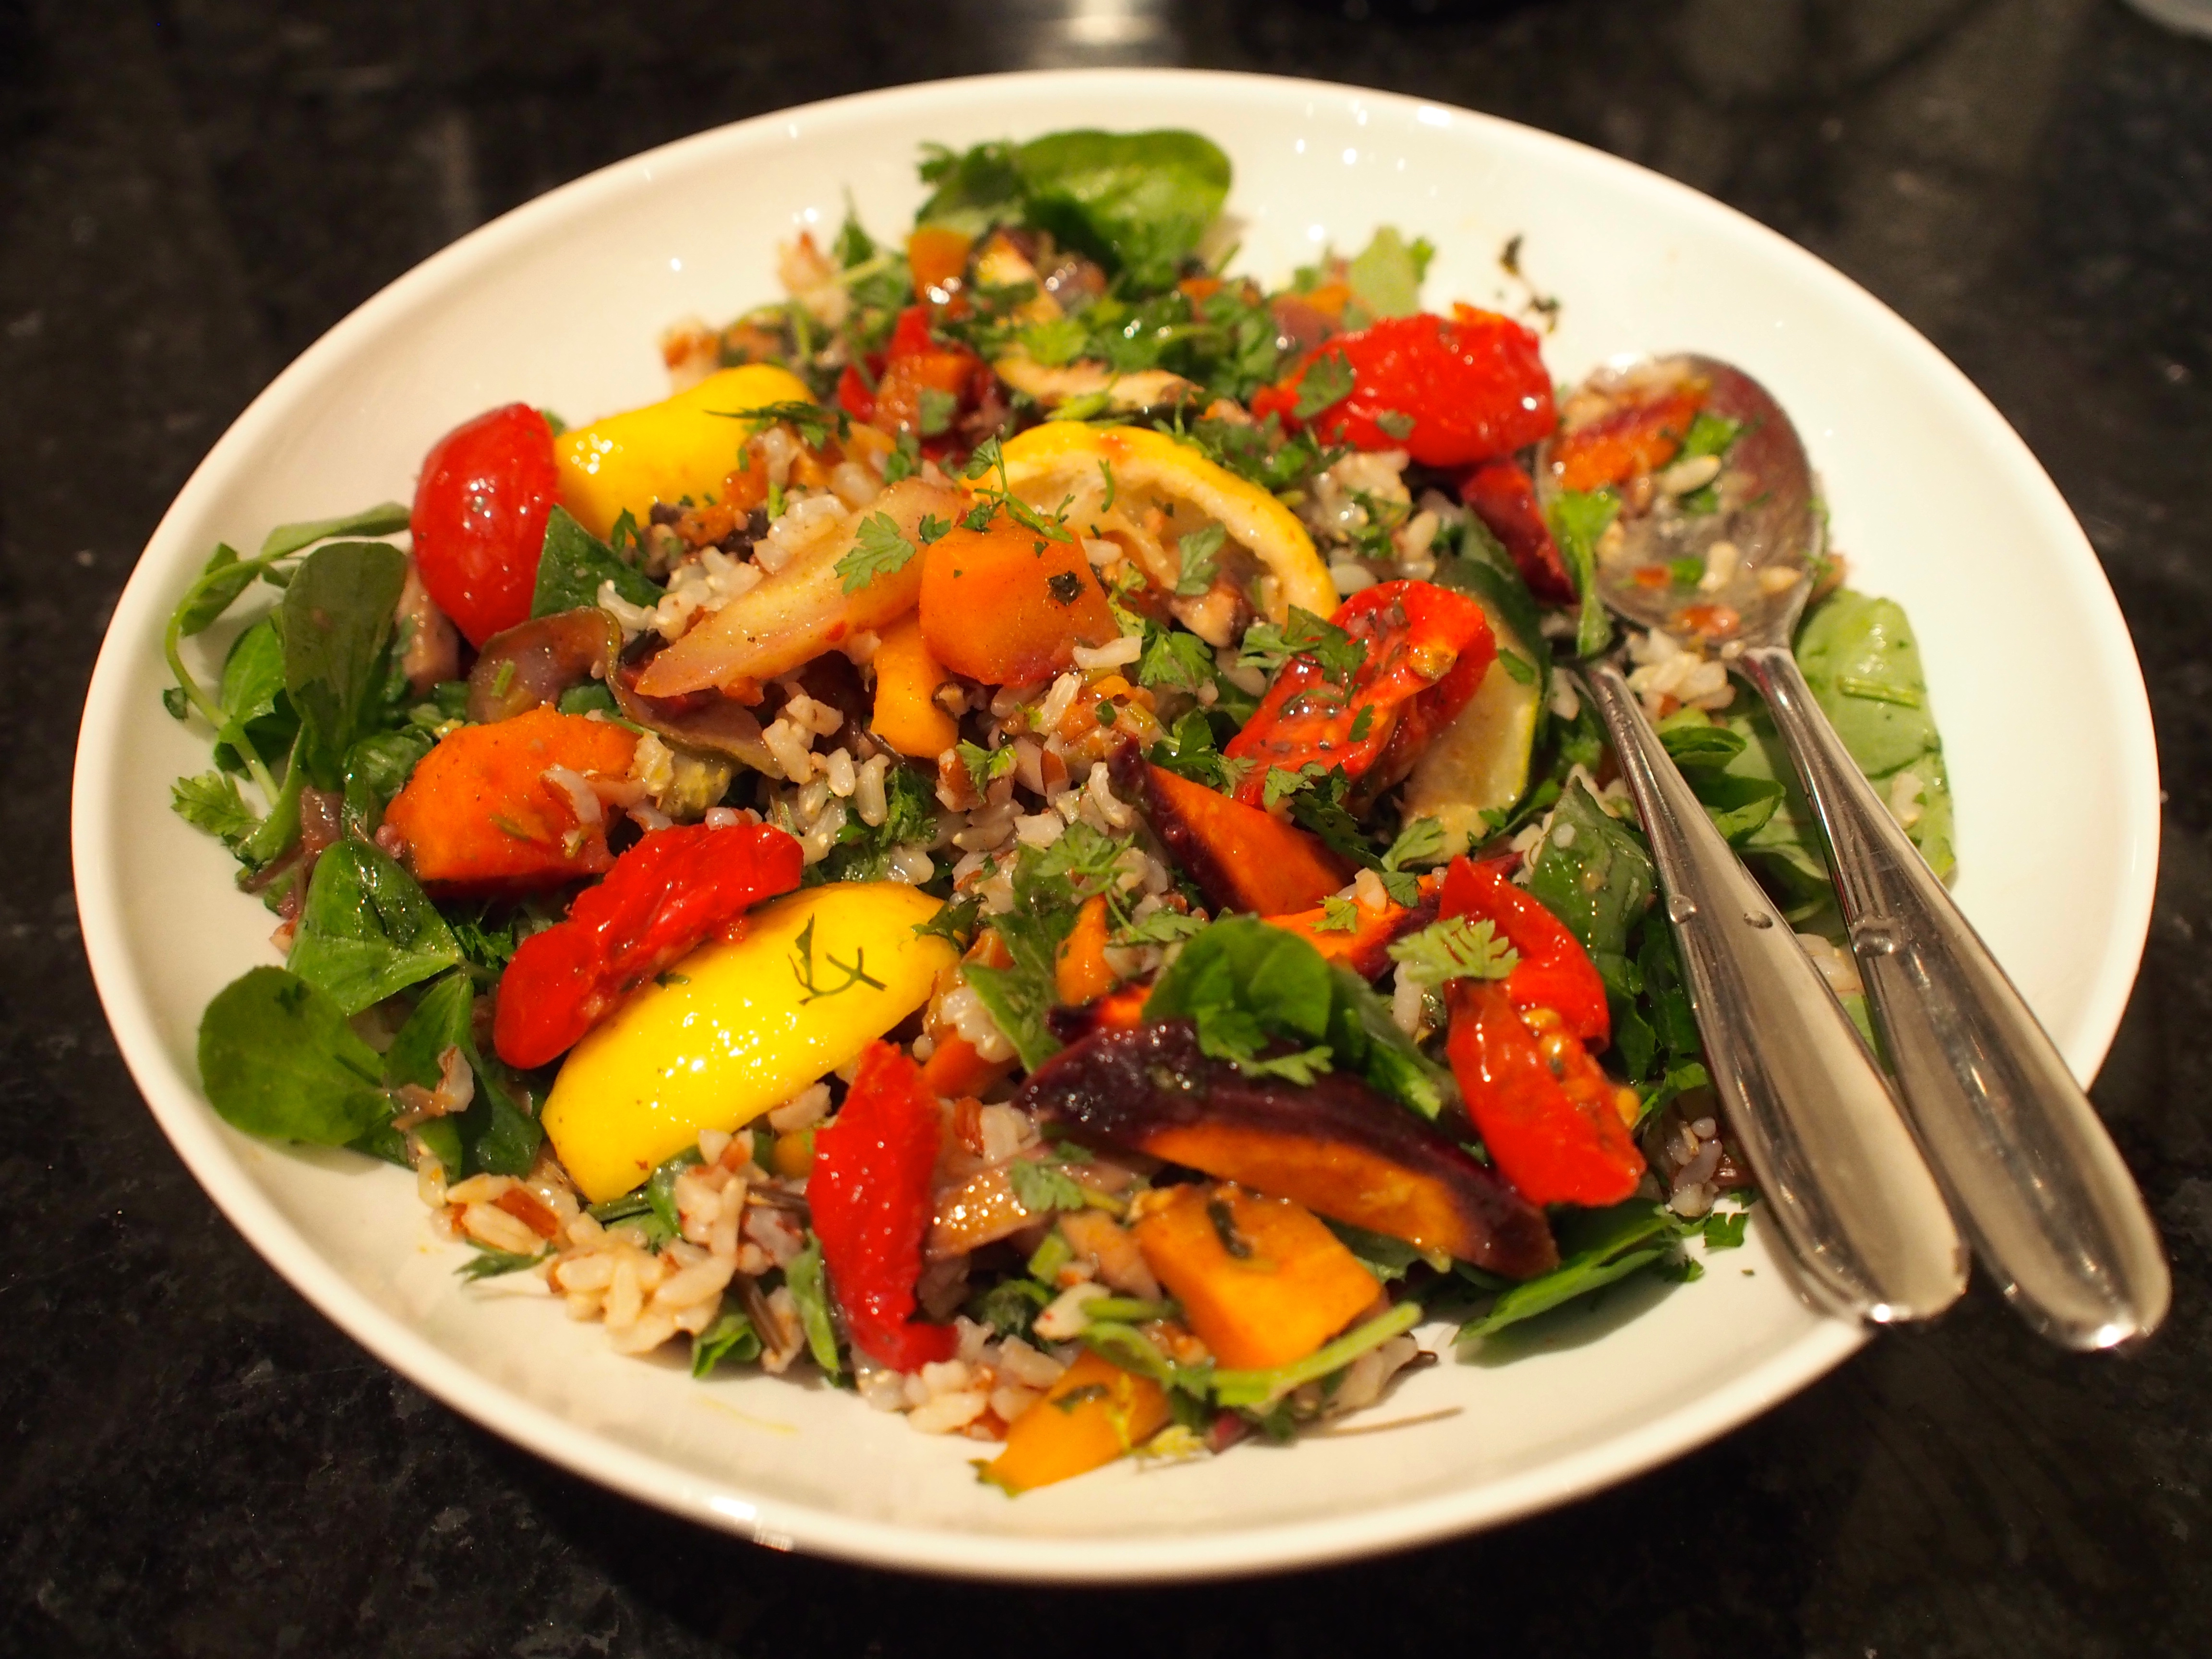
  • When the rice is ready, combine the salad, roasted vegetables and rice into a bowl, and dress with a little more chervil.  You may need to rinse the rice in a little water, if it looks as though it is going to become too starchy

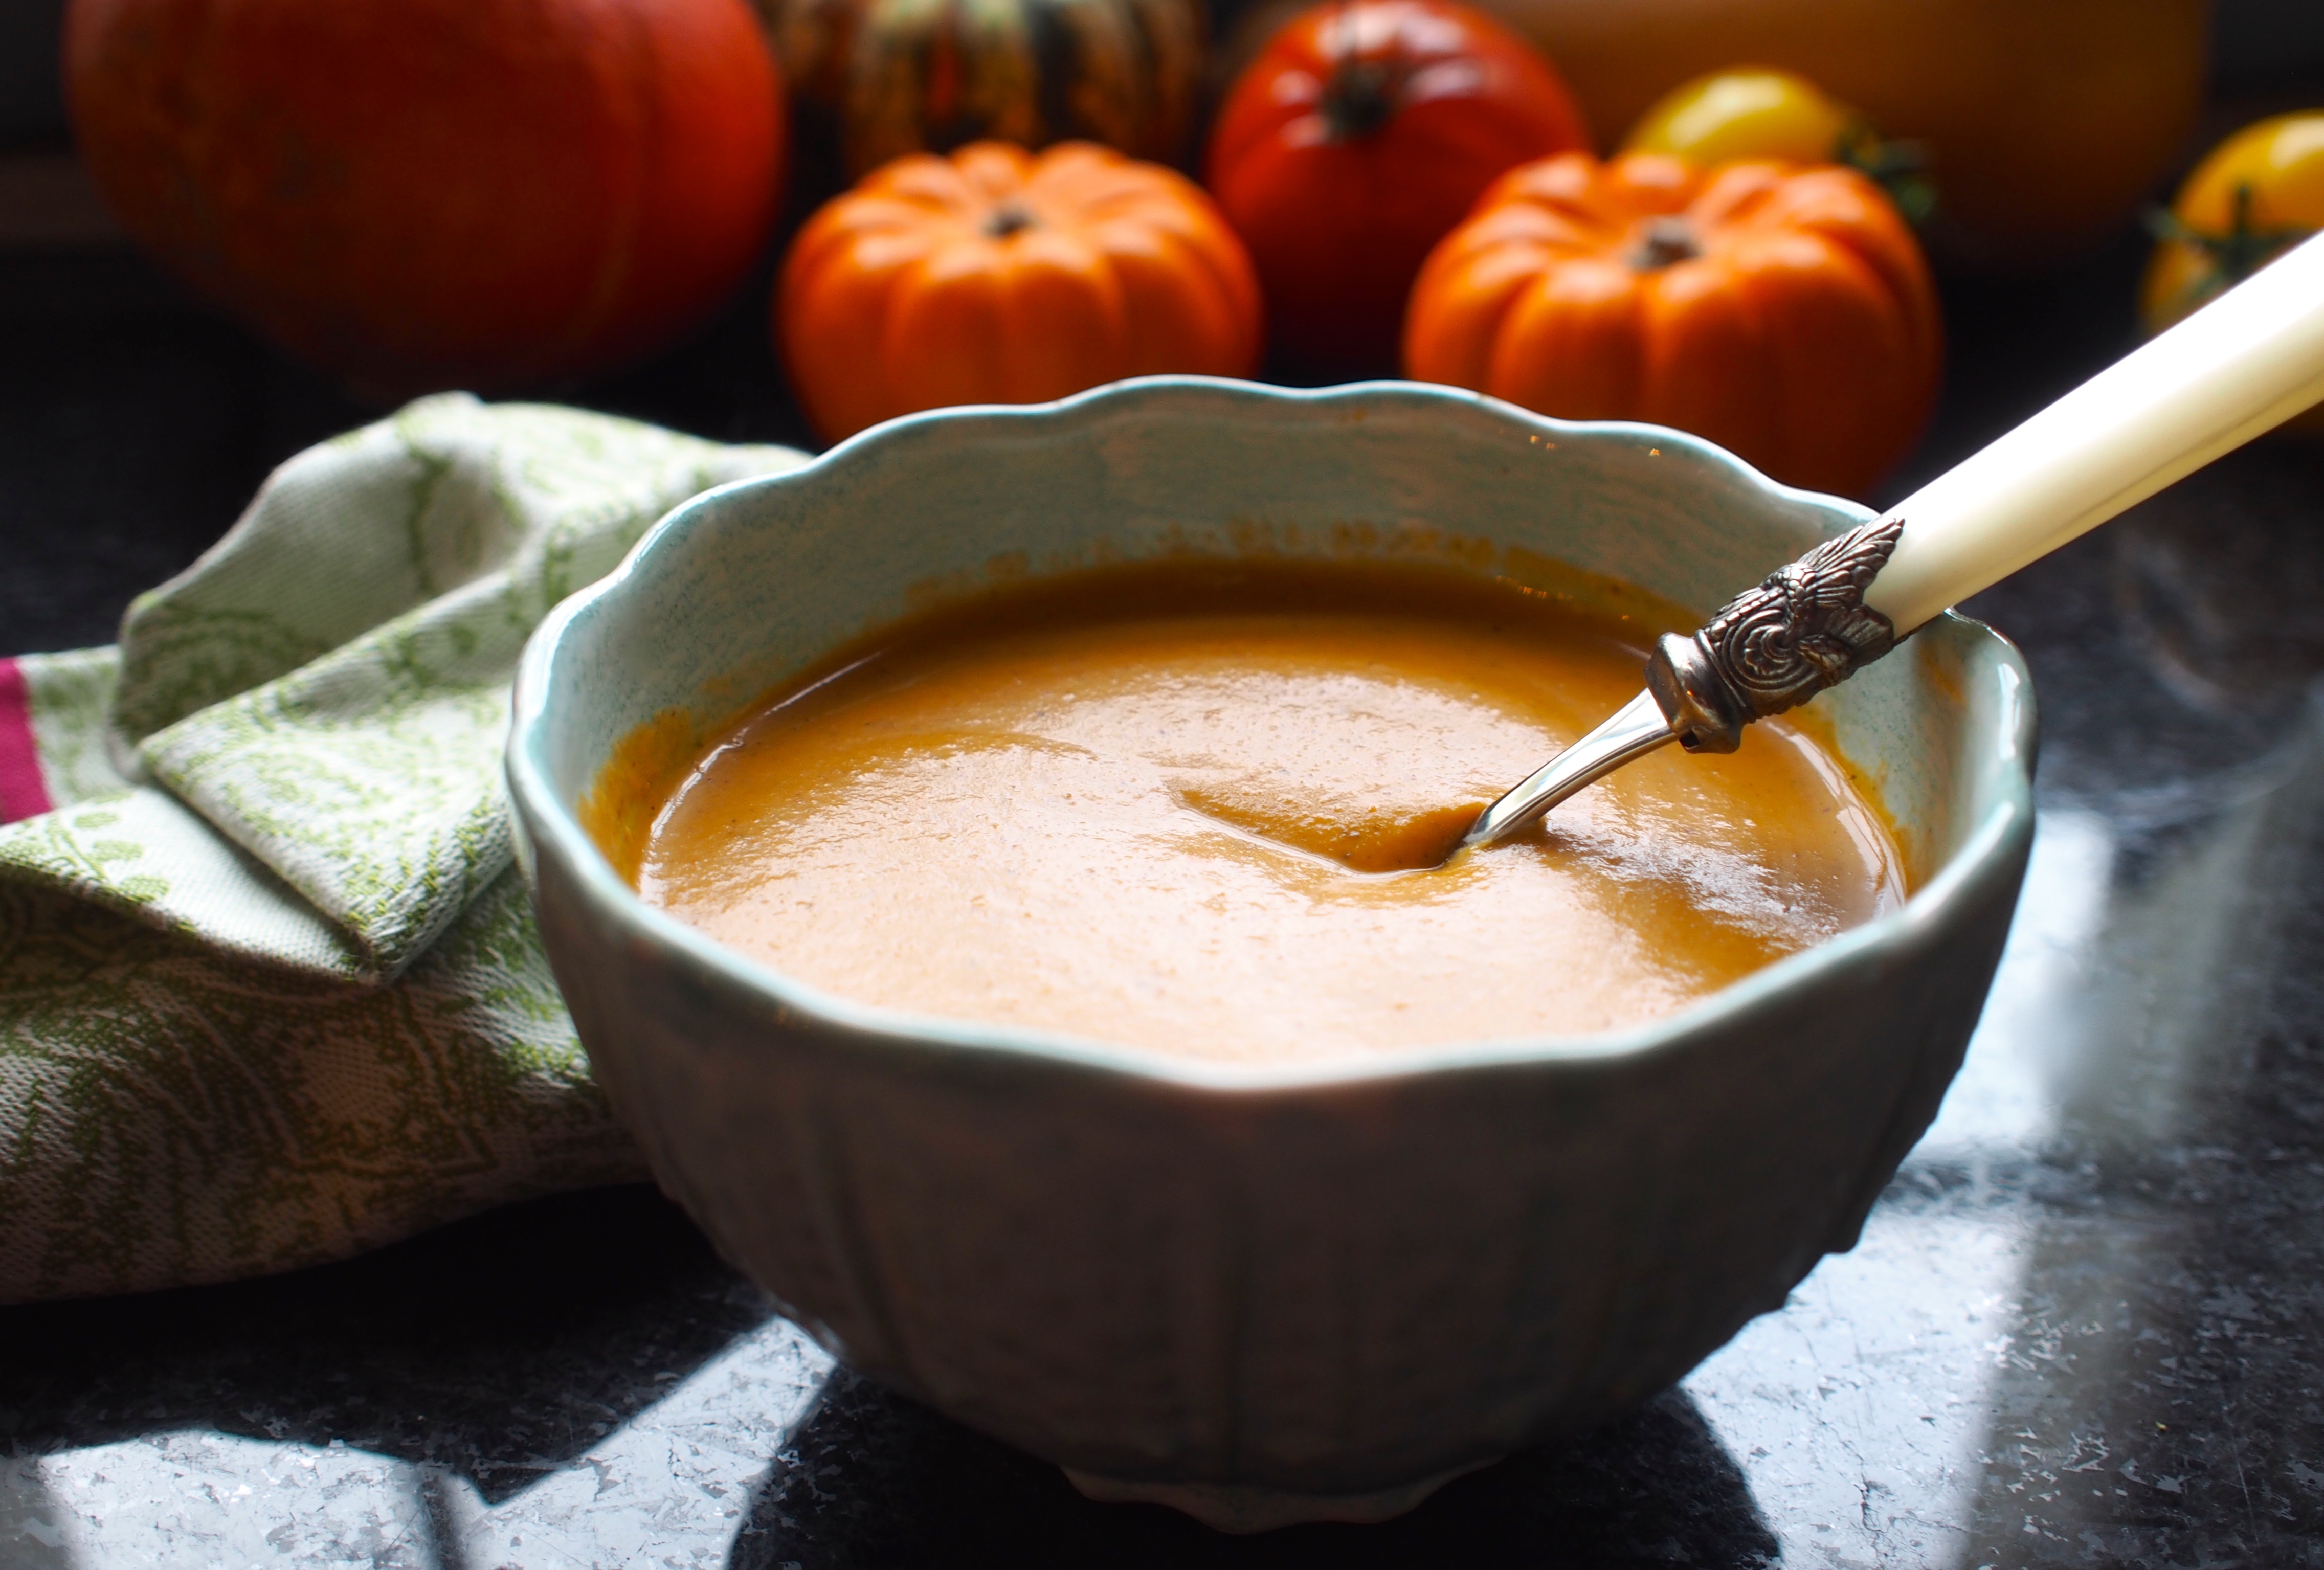
Although I was eating the salad on my own (Hubby having cooked meat for the others), I made a full portion so that I could make soup the following day. You do have to be careful using pre-cooked rice, as it can contain bacteria.  I  blended mine in my Thermomix for 10 minutes, 100C, initially at speed 10, but then reducing it to speed 4.  If you’re blending it normally, you will need to bring it back to the boil as a precaution.  Swirl a little creme fraiche onto the top and snuggle up!

Roast Vegetable Soup

A mixture of heritage tomatoes, carrots, and quash.

OLYMPUS DIGITAL CAMERA

OLYMPUS DIGITAL CAMERA

September 13, 2014 Baking

Pain Perdu, Pineapple and Coconut

We haven’t been to Marcus Wareing’s eponymous restaurant since it was re-branded.  It’s a little art-deco jewel-box of a restaurant, but the atmosphere seemed just as hushed at lunchtime as before… Still.  The food was good, and I was particularly enamoured with this dish – a little chef’s joke…  The pineapple tastes of coconut, which initially confuses the senses, especially as you try to work out how… I pressed the waitress, it’s clearly compressed, because of the texture, but what with? And then of course it struck me – Malibu – the scent led me by my nose to my teenage years.  Malibu.  When was the last time you tasted Malibu?  Well, rest assured, in this dish it’s absolutely delicious, as long as you like coconut and pineapple.

The plate comprised Malibu compressed pineapple, a coconut ice-cream, coconut curd, toasted brioche cubes, and coconut meringue.  I wasn’t terribly fond of the coconut curd, so I thought I would experiment with a coconut-milk creme patisserie (in the Thermomix)…  For the coconut meringues I used the Meringue Girls recipe, which I’ve made often before. It’s a very clever little dessert – you can prepare all the elements well in advance (perhaps with the exception of toasting the brioche), and then assemble when you’re ready.  You see.  I make sweeping statements like that.  Yes, it’s a clever dessert, and easy,  if you own a chamber vacuum sealer and a Thermomix.  I’m still posting it, because someone out there will…

As the recipes are quite long, you can find them listed in the Plating section.  The pineapple was cubed (as accurately as your patience will allow), and popped into a vacuum pack bag – I included 40ml of Malibu, and compressed under full pressure.  I left it in the fridge for 48 hours to absorb the flavour.  The compression will also change the texture of the pineapple, making it denser, and less fibrous (it effectively changes the cell structure of the fruit – it’s also an amazing technique to use on watermelon, for example).

To Plate:

Malibu compressed pineapple
Coconut meringues
Coconut-milk creme patisserie
Coconut cream ice-cream
Brioche cubes, dipped in egg and fried in a little butter

Notes:

  • The coconut version of the creme patisserie worked incredibly well – I used 300g of coconut milk, and upped the flour to 45g, but that was because I included 20g of Malibu, and also wanted to be able to pipe the cream into quite firm ‘peaks’…  The coconut flavour was subtle, but discernible, and the texture was exactly like the normal version.  I didn’t refrigerate it, but did whisk through some more malibu before piping onto the plates.

OLYMPUS DIGITAL CAMERA

January 13, 2013 Baking

Pecan and Salted Caramel Brownies

1241c-p1130670
Just lately I’ve been craving Gower Cottage’s chocolate brownies, but my secret stash in the freezer was sorely depleted over Christmas!  However serendipity has struck again, as I spotted Ed Kimber‘s brownie recipe in my in-box this morning.  There’s definitely something about salted caramel… It’s my favourite filling in Laduree Macaron’s, my favourite combination in chocolate bars, there’s something about the salty sweetness that becomes utterly addictive!

It was a given then that I’d have to try these, but I thought I’d adapt the brownie recipe for the Thermomix, to see how they’d turn out.  You can find the original recipe on Ed’s site.

Salted Caramel Filling
175g caster sugar
150ml double cream
10g unsalted butter
large pinch of flaked sea salt OR
1/2 jar of Bonne Maman Confiture de Caramel

Fudge Brownies
180g plain flour
3 tbsp cocoa powder (preferably Green and Blacks, which uses the ‘Dutch’ process)
1/4 tsp salt
300g dark chocolate, around 65-75% cocoa solids
150g unsalted butter
220g light brown sugar
150g caster sugar
4 large eggs
1 tsp vanilla extract
100g pecans, chopped (optional extra, half inside the brownie, half on top)

Method

  • I’m not going to make caramel today, and instead I’m using the jar – okay, stop shouting at me – I’m baking with the 4 year old and I don’t like making caramel when he’s climbing up the counters!  If you want more information on the cooking temperatures for caramel, please have a look at my fudge post…
  • For the brownies preheat the oven to 180°C/160°C fan. Grease a 9×9 inch pan and line with a strip of parchment.  Leave a ‘handle’ over the pan’s edge to ease removal. [The Lakeland foiled parchment is perfect for this!]
  • Pulse the butter and chocolate in the Thermomix bowl for 5 seconds / Speed 5, and scrape down the bowl.
  • Melt the butter and chocolate together for 4 mins / Speed 1 / 70° C
  • Add the eggs, vanilla, salt and sugar and mix for 10 seconds / Speed 3
  • Add the flour and cocoa powder and mix for 10 seconds / Speed 4.  Scrape down the bowl (inevitably some of the flour will have been thrown up), and repeat for a further 10 seconds.
  • Pour half of the mixture into your prepared tin, and then pour the caramel over the batter, leaving a 1 1/2 cm border.  Scatter the chopped pecans over the caramel if using… [I like the combination of pecans and salted chocolate, and I wanted some additional texture in the brownie.]  Pour the remaining batter over the caramel mixture to cover it.  Ed does this by piping it over, otherwise when you spread the second layer of batter you inevitably push the caramel out to the edge, where it can boil over the batter.  Until I’ve perfected a cheats way, I suggest you pipe too…
  • Bake in the preheated oven for 35-40 minutes, until a cake tester or skewer (just) comes out cleanly (you don’t want them overdone).  Don’t forget, the caramel will be scalding hot, so allow the brownies to cool fully before cutting into squares.
Alternatives:
  • Scatter chocolate chips in on top of the caramel, and again over the surface before baking
  • If like me you have thousands of blood oranges in your kitchen – don’t waste the skin and oils – zest the oranges into the batter before using them.
  • You can use chopped salted Brindisa’s salted almonds – quite a grownup taste, but absolutely amazing.  Pulse them for the briefest of moments in the thermo and set aside, before melting the chocolate and butter
  • If you’re a complete salt addict, you can use salted butter, but in that case, please remember to take the salt out of the other ingredients.
A couple of little brownie tips:
  • If you’ve managed not to scoff the lot straight away, you can revive your brownies for around 20 seconds in the microwave; and
  • A great little tip I spotted on the lovely Azelia’s blog, if you have any type of cake which hasn’t quite cooked through, you can finish them off for a few seconds in the microwave… As Azelia points out in her recent doughnut post, the microwave cooks from the inside out… Clever eh?
Now fend off your children and friends with a rolling pin…
Melting the chocolate and butter together
This is the batter once mixing is completed – it’s quite a thick batter
Spoon the caramel over the batter, and scatter with pecans
Cover with the remaining batter and bake
Yummy! And I like the pecans in it!
Heston Blumenthal's perfectly poached egg

December 30, 2012 Eggs

Eggs Benedict and Heston Blumenthal’s Perfectly Poached Eggs

Hubby is mildy addicted to eggs Benedict – he frequently orders it for working breakfasts, and you can see from some of his comments that he has many, many criteria he applies to the dish.  Consequently I’m often reluctant to cook it at home – but hey, it’s Christmas – the man deserves his favourite breakfast at Christmas surely?!

I’ve been working on Thermomix versions of Bearnaise and Hollandaise, made with home-made tarragon vinegar, and a reduction base for both sauces…

I’ve also been obsessing about Heston Blumenthal’s How to Cook Like Heston, and was watching his episode on eggs again.  It seemed like the perfect excuse to combine techniques…

There are many variations on eggs Benedict – instead of the ham you can use blanched spinach for eggs Florentine, Eggs Mornay uses a Mornay cheese sauce instead of Hollandaise – you can play around with your favourite combination.  Here I’m using Pata Negra, that perfect ham from Spain – made from the blackfooted pig who’s been fed a diet of acorns – amazing stuff!

The freshest possible eggs make the best poached eggs – the white is firmer, less watery, and holds together better in the pan.  I had originally preferred Marcus Wareing’s method of poaching eggs, but having tried Heston’s, I think it just has the edge.  In his method you drain off the watery bit of the white, before poaching at 80oC for four minutes.  Reaching exactly 80oC on an induction hob was perhaps the most challenging aspect of the task – everything else worked exactly as he said…

Ingredients: 
2 tsp salt
large eggs, as many as you require
Salt and black pepper

Method:

  • Fill a saucepan with approximately 15-20cm of water then add the salt. Place a plate upside down in the bottom of the pan then place the pan over a medium heat and bring the water up to 80ºC.
  • One at a time, crack each egg into a ramekin dish and pour it into a slotted spoon with small holes. Allow to drain any residual white for approximately 1–2 minutes.
  • Lower the slotted spoon into the warm water and slide the spoon out. Allow to poach for 4 minutes.
  • Remove with the slotted spoon and place on kitchen paper to drain the excess water. Season with salt and freshly ground black pepper.
  •  

    It’s important to toast your muffins to some semblance of brown – you need them to form a crisp and tasty base for your eggs, not a soggy waterlogged layer

    Jamon Ibérico di Bellotta, or Pata Negra – no matter what you want to call it, the ham of the Spanish Black-Footed pig, fed on acorns, is silky, pack full of flavour and melt-in-the-mouth texture
    Mid-way through assembly – you can see I have less white than normal – this is because my eggs were a few days old… However the yolks are perfect.
    I’m not massively keen on eggs Benedict, but I’m not going to miss the opportunity to put some of that Bellotta ham under my poached eggs 

    Eggs Benedict, with Hollandaise sauce

    December 30, 2012 Baking

    Thermomix Sauces: Béarnaise

    There are conventionally five mother sauces, of which hollandaise is the probably the richest, with it’s combination of egg yolks and melted butter.  I’m not always massively fond of hollandaise, as it often lacks flavour beyond the butter.  However I absolutely adore a number of variations, especially blood orange hollandaise (Maltaise sauce), beurre blanc, and most particularly béarnaise sauce, with its fragrant addition of tarragon.

    Béarnaise is generally made by reducing down a number of key ingredients common to Hollandaise (shallots, white wine vinegar, and tarragon stalks).  However most restaurants make much better Béarnaise than we can at home, because they have the time to increase the intensity over a longer period of time.  Where we’re reducing down those three key ingredients, most chefs I know actually use their own reduction which is made in batches in advance, and it often includes their own home-made tarragon vinegar – this really ups the flavour of the reduction.

    With that in mind, I made some tarragon vinegar a couple of weeks ago, simply by heating some white wine vinegar and storing in a dark place with several sprigs of tarragon in the jar.  After a couple of weeks, strain the liquid, and insert some nice new sprigs of tarragon.

    A second consideration for me in developing this recipe is that I’m determined to make it in my Thermomix, as this is precisely what it’s so good at making!

    One of my favourite chefs gave me his reduction recipe for beurre blanc, and this forms the basis of my Bearnaise recipe.

    Reduction for Buerre Blanc, Béarnaise and Hollandaise
    1 bottle of decent white wine (750ml)
    500ml tarragon vinegar
    1 bunches of tarragon stalks
    1/2 bay leaf
    Sprig of thyme
    Peppercorns
    7 sliced shallots

    When you’re ready to make the relevant sauce, use approximately 200g of the reduction for six servings.

    Thermomix Béarnaise Sauce
    200g of the reduction
    pinch salt
    pinch black pepper
    400 g butter
    5 egg yolks

    Preparation

    • Put the shallot reduction into the Thermo and pulse for a few seconds
    • Insert the butterfly and add remaining ingredients.
    • Process at 80C, speed 3 for 6 minutes.
    • Press through a fine sieve and serve.
    You can keep the sauce at 60oC for over an hour on speed 2/3.

    I prefer my Béarnaise a little acidic – if you prefer a more buttery version, just keep adding butter until you reach a suitable flavour – and don’t forget to season the sauce!

    November 23, 2012 Baking

    Creme Patisserie [Thermomix]

    Whenever people ask me what I make in my Thermomix, the first thing that springs to mind is flawless, effortless creme patisserie.  It’s just ridiculously easy in a Thermo, and rather time consuming when made in the conventional way.  Once you have creme patisserie, you can make perfect fruit tarts, glorious soufflés and immaculate pain au raisin!

    Ingredients:

    300ml full fat milk
    60g unrefined caster sugar
    30g unsalted good quality butter
    30g plain flour
    3 free range egg yolks
    the seeds from 1 vanilla pod
    pinch of salt


    Method:

    • Put all the ingredients into the Thermomix bowl and cook for 7 minutes at 90C, speed 4.
    • Give it a quick whizz at the end to ensure it’s smooth, then pour into a bowl and cover with cling film until it’s cool.   There’s also a pistachio creme patisserie on my PK Pistachio Souffle recipe.
    • Yes – that’s it!  Keep it in your fridge until you require it.
    Oh. And if you’re stupid enough to stick in a block of quite cool butter, do put the lid on properly and start the machine quite slowly.

    July 8, 2012 Heston Blumenthal

    Heston Blumenthal’s Meat Fruit

    I recently had dinner at Dinner, by Heston Blumenthal. For various reasons the Hubby and I weren’t actually going to order “Meat Fruit”, but the kitchen sent us one, and we were completely blown away by the texture of the parfait, and the contrasting acidity of the jelly.  The dish is light, but rich, moreish, very slightly palate cleansing – and yes – I accept that those are complete contradictions.  It’s the mandarin jelly – it really does release something in the palate that allows the very rich parfait to not become overly cloying.

    When I wrote my restaurant review I searched for the recipe, intrigued about how it was made – everyone knows I’m a complete sucker for a culinary challenge :0)

    Not only did I found the actual recipe given to the Guardian by Heston, but I also found a tiny bit of video clip which showed it being dipped, a video blog by a Thermomix blogger, and a variation by the Cumbrian Foodie on his blog.  I suggest you look at them all. If you’re serious about making this at home, it’s worth making the parfait a week or so before you need it, and perhaps doubling the quantify to allow you time to play with the jelly dipping.  All of the procedures up to the jelly are incredibly easy – do give it a go – it’s much easier than it might seem.

    Key stages and timings:

    • Put the marinade ingredients together, leave for 24 hours
    • Make the chicken liver parfait, leave for 24 hours
    • Put the parfait into the moulds, and freeze until solid (6 hours maybe?)
    • Assemble the two halves of the parfait ‘sphere’, and refreeze (1 hour maybe?)
    • Dip the spheres into the mandarin jelly, then leave to defrost in the fridge for 6+ hours
    There are some additional photos of the key stages at the end of this post
    For the chicken liver parfait:
    100g shallots, finely sliced
    3g minced garlic
    15g sprigs of thyme, tied with string
    150g dry Madeira
    150g ruby port
    75g white port
    50g brandy
    18g table salt
    400g chicken livers (trimmed weight)
    240g eggs
    300g unsalted butter, melted

    1. Place the shallots, garlic and thyme in a saucepan with the Madeira, ruby port, white port and brandy. Set aside to marinate for 24 hours.
    2. Heat the marinated mixture until nearly all the liquid has evaporated, stirring regularly to prevent the shallots and garlic from burning. Remove from the heat and discard the thyme.
    3. Preheat the oven to 100C/gas mark ¼. Fill a bain-marie with 5cm water and place in the oven.
    4. Preheat a water bath to 50C.
    5. Sprinkle the table salt over the livers and put them in a sous-vide bag. Put the eggs and the alcohol reduction in a second sous-vide bag, and the butter in a third. Seal all the bags under full pressure, then place in the water bath for 20 minutes. Remove the bags from the water bath.
    6. Combine the eggs, alcohol reduction and meat in a Thermomix and blend until smooth at 50C. Slowly blitz in the butter and blend until smooth. Pass the mix through a fine sieve using the back of a small ladle.
    7. Pour into a terrine dish and place in a bain-marie and cover the bain-marie with aluminium foil. Cook the parfait until the temperature in the centre reaches 64C.
    8. Remove from the oven and allow to cool. Refrigerate for 24 hours before serving.

    For the mandarin jelly: 

    45g leaf gelatine
    500g mandarin purée (I used half a pack of Boiron’s mandarin purée)
    80g glucose
    0.4g mandarin oil
    1.5g paprika extract (the paprika is to colour the gel – instead I used a specialist cake decorating gel, in egg yolk yellow)

    1. Place the gelatine in cold water to soften.
    2. Gently heat the mandarin purée and glucose in a pan to combine.
    3. Add the softened gelatine and stir well until dissolved.
    4. Remove from the heat and add the mandarin oil and paprika extract and stir well.
    5. Pass the mix through a fine sieve and reserve in the fridge until required.

    To make the fruits:

    1. Using a spoon, fill dome moulds with parfait, ensuring there is enough pressure to create a completely smooth surface. Level off the tops so that they are flat, and cover with cling-film. Gently press the clingfilm directly onto the surface of the parfait. Place in the freezer until completely frozen. (if you put half the moulds onto a flat tray, you can achieve a slightly inverted dip on top of the fruit – see my photograph below)
    2. Gently de-mould the parfait domes. Place on a board with the flat sides facing upwards. Very briefly run the flame of a blow torch over the flat side, being careful only to just melt the surface of the parfait. Join two halves together and compress using a square of cling-film. Wrap well in cling-film and place back in the freezer until required.
    3. Gently push a wooden cocktail stick into the middle of the rounded surface and re-wrap until all the parfaits are complete.
    4. Gently melt the mandarin jelly in a saucepan and allow to cool to room temperature. Remove the cling-film and dip each ball of parfait into the jelly and stand the sticks, covered in cling-film, into a piece of Oasis (the green material you get in florist shops to help the flowers stand up). Place in the fridge for a minute, then repeat the dipping process.
    5. Dip three times, then gently remove the cocktail stick and place the balls onto a tray covered in cling-film. Place a lid over the tray and leave in the fridge to defrost for at least six hours.
    6. Once defrosted, gently push the top of the ball using your thumb to create the shape of a mandarin. Place a stalk and leaf in the top centre of the indent to complete the fruit.

    Not this is the point where I show you a perfect meat fruit, the one I prepared earlier… But I don’t want to do that just yet :0) Instead here are the things I’ve learnt, which you might like to consider, with photo’s to illustrate the points.  After all what’s the point of blogging if we don’t share our experiences?

    So, example 1.  If the parfait ball is too smooth to start off with, the resulting mandarin looks somehow quite fake. I took to roughing up the parfait slightly in the cling-film with my hands before dipping it. Also in this example, the jelly was definitely too warm – I thought it was room temperature, it wasn’t. At this point I decided to take one parfait and dip it every ten minutes. As a result this parfait sat on the side for over half an hour, and you can see that effectively defrosting it at room temperature causes the shape to slump.  There’s still not quite enough colour in the gel to cover all the flaws (you can’t see it as well here, because I re-dipped it), but I had to boost the colour to a practically fluorescent orange colour – you’re not looking for natural – you really are looking for an unnatural intensity.  You can see all of the above in the photograph.

    “Too Smooth” Meat Fruit

    In this next example the jelly was far too cool, and it set around the parfait instantly in a slightly monstrous and lumpy version of the skin! Amusing though – we thought this one was great fun.  It may look as though you can get away with this, but bear in mind it will have a very thick jelly coating!

    “Monster” Meat Fruit

    In the next example we whisked the jelly until it was smooth again and a fraction warmer, and then repeated… This was among the better examples.

    Meat Fruit

    I didn’t make many, but I think you can see that it’s the dipping that requires the work – everything else was easy. I have seen other examples where people just went with the smooth jelly, and if this is your preference, stick to it all the way through to ensure consistency.

    The one good thing is that you can keep the parfait balls in the freezer until your ready – I think in future I’ll make everything up to that point at least a week in advance (and make more than I need), and then just keep them in the freezer until they’re required. Pate can be stored for up to a month in the freezer, so you could keep a batch on the go, as long as you date them appropriately.

    Does it taste like the real thing? Well, it’s chicken liver and doesn’t have the fois gras included in the restaurant version, but I think it’s a pretty accurate recipe.

    As a quick aside, I do have a water bath, sous vide equipment and thermomix, so I followed the recipe on that basis – you can adapt the recipe easily if you don’t have them.  Like everyone else, my silicone moulds were too large – you really would be better off trying smaller moulds, and next time I shall try these…

    Update: I spoke to Ashley Palmer-Watts on twitter about the dipping process, and this was his advice:

    @APWChef Not bad, just need to not rush at the end, let them re freeze between dips and keep the gel at a steady temp pic.twitter.com/aYfFe7cD

    @Bebejax Ah, of course, hadn’t occurred to keep it constant! Don’t suppose you’d care to reveal the magic number?

    @APWChef 28c but you must not over heat the gel much more than 50

    @Bebejax Thanks! Will try it again and post pics! And yes, took the gel above 50, but was using gold
    @APWChef bronze gelatine is the one we use

    Now that you’re a Heston expert, don’t forget I have his lemon tart recipe on the blog, and for the more adventurous, I’ve just come across his snail porridge recipe!  Yes.  Good luck with that…

    May 13, 2012 Baking

    Heston Blumenthal’s Lemon Tart [Thermomix]

    Without doubt the best lemon tart I’ve had, light, just set and vibrant with citrus flavours.

    I’ve actually made this recipe several times now, and have gradually refined the process so that now the 11yo actually makes it on her own! The first time I ignored all of the instructions about sticking it into the freezer, and I paid the price. Firstly the dough was far too soft to handle, and broke as I was transferring it to the case. Secondly it went golden far too quickly, and lastly it absolutely fell apart when I mis-handled the tin. Make sure you follow the instructions exactly, use an oven thermometer, your digital thermometer, and if you have one, your laser thermometer too!

    Ingredients:

    For the pastry:
    300g plain flour
    150g unsalted butter
    ½ tsp salt
    120g icing sugar
    3 large egg yolks
    Seeds from ½ vanilla pod
    Finely grated zest of ½ lemon
    1 egg for the egg wash

    Method:

    1. Using a mixer fitted with a paddle attachment, mix the flour, butter and salt on low speed until it becomes a sand like texture (approximately 2-3 minutes). [Actually, I did this by hand]
    2. In the meantime, in a tall container blitz together the icing sugar and egg yolks with a hand blender.
    3. Add the vanilla seeds and lemon zest to the egg yolk mixture and then add to the bowl in the mixer and continue to mix on low speed until fully combined and a very soft dough has formed (approximately 3-5 minutes).
    4. Mould the dough into a flat rectangle and wrap it in clingfilm before placing in the fridge for at least 1 hour. [Did mine overnight, was pretty firm when I rolled it out]
    5. Roll the pastry between two sheets of baking paper to a thickness of 2mm, using two stacked 2 pence coins as guides, then place in the freezer for 30 minutes.
    6. Pre-heat the oven to 190ºC/gas mark 5. Line a 26cm tart tin (2.5cm deep) with the pastry making sure to press it into the edges and leaving the pastry hanging over the edge.
    7. Take a sheet of baking paper and scrunch it up several times to eliminate any sharp edges. Prick the dough with a fork all over the surface. Place the baking paper on top and add enough coins (or baking beans) to fill the casing ¼ of the way up. Place in the preheated oven to bake for approximately 20 minutes or until fully cooked. [Be careful with the coins – once nearly put a watch battery in the oven which someone had dumped in the coin pot – check them!]
    8. In the meantime, mix some of the leftover dough with an egg using a hand blender.
    9. After 20 minutes, remove the baking paper and coins and, using a pastry brush, brush the entire surface of the tart with the dough and egg mixture. This ‘liquid pastry’ will ensure that any holes will be sealed. Return the tart to the oven for an additional 10 minutes.
    10. Remove the tart from the oven and allow to cool completely.
    11. When ready to bake, preheat the oven to 120ºC/gas mark ½. Place the baked pastry case in the oven to warm up.

    [If you’re in a massive hurry, you can use this pastry, it comes in a pre-cut disc and is the best commercial pastry I’ve found to date.  This is what the 11yo uses when we’re in a hurry, and it’s pre-rolled to a very suitable thickness]


    For the filling:
    Finely grated zest and juice of 5 lemons
    300ml double cream
    390g white caster sugar
    9 large eggs
    1 large egg yolk
    Method:
    1. Put all the filling ingredients into the thermomix and cook for 10 minutes, speed five, at 60ºC – keep a close eye on the temperature, you want to stop it at 60º – do not rely on the thermomix, check it with a digital thermometer!  At this point, strain the mixture through a fine sieve into a jug. With a spoon, remove the bubbles from the surface of the liquid.
    2. Slide the oven rack out a bit, then pour the mixture into the warm pastry case inside the oven. Fill the case to the top, slide the rack carefully back in, and bake the tart for approximately 25 minutes or until the temperature of the filling reaches 70ºC. Allow to cool completely at room temperature.  [Now. You’re supposed to check the temperature with a thermometer – DO NOT TEST THE TEMPERATURE AT THE EDGE OF THE TART! It’s cooked further than the rest of it, and will mark your custard! I’ve now made this tart several times and I actually now test it with a laser thermometer, basing the reading on the centre of the tart – you can also use the ‘wobble test’ – there should still be a noticeable wobble in the centre.]
    3. Just before serving, trim the overhanging pastry by running a sharp knife round the top of the tart tin and discard.
    Notes:
    The tart had the perfect amount of wobble, and stood upright, but it was still a little too loose for me, in terms of mouth feel.  Unless you’re going to practice it before you make it for something big, do take it a little beyond 70ºC if you want to make sure it’s more firmly set.  Also, Heston says to trim the pastry just before you serve? No, think that’s a bad idea… Firstly, I ended up with little crumbs on my tart, not matter how I held it, because the pastry is so brittle.  Secondly, I managed to break a chunk off mine at the last minute, which then meant that I was unwilling to really trim it up to the fluted edge for fear of a repeat…  Also, the pastry was still too thick… I rolled it much thinner after that.
    Make sure your sheet will cover your tin entirely


    Rolled to the thickness of two 2p pieces… Eventually…


    Remember to test your tart in the centre, not at the edge!


    Tart, with nibbled edge and that blooming crack!…
    This recipe is in Heston Blumenthal at home cookbook.  You can find it here >

    Primary Sidebar

    Categories

    • ▼Recipe
      • Baking
      • Breakfast
      • Cheese
      • Dessert
      • Eggs
      • Fish
      • Heston Blumenthal
      • Italian
      • Jamie Oliver
      • Marcus Wareing
      • Mediterranean
      • Pasta
      • Patisserie
      • Risotto
      • Smoothie
      • Sous Vide
      • Squash
      • Thermomix
      • Vegan
      • Vegetarian
      • Yotam Ottolenghi

    Categories

    • ▼Book Review
      • ⭐️⭐️⭐️⭐️
      • ⭐️⭐️⭐️⭐️⭐️
      • Baking
      • Meat
      • Patisserie
      • Restaurant Cookbook
      • Vegetarian
      • Yotam Ottolenghi

    Categories

    • ▼Restaurant
      • 1 Michelin Star
      • 2 Michelin Stars
      • 3 Michelin Stars
      • British
      • Fish
      • French
      • Italian
      • Japanese
      • Peruvian

    Categories

    • 101 Cookbooks (1)
    • 3 Michelin Stars (1)
    • Advert (1)
    • Alan Murchison (2)
    • Alba Truffle (1)
    • Almond (1)
    • Angela Hartnett (1)
    • Angler (2)
    • Art Journal (2)
    • Artichokes (1)
    • Axis (1)
    • Azelia’s Kitchen (1)
    • Baking (9)
    • Baldwin (1)
    • Bara Brith (1)
    • Basics (1)
    • Beef (1)
    • Beetroot (2)
    • Ben Spalding (2)
    • Blackberry Soufflé (1)
    • Blackening Spice (1)
    • Blood Oranges (4)
    • ►Book Review (75)
      • Baking (10)
      • Meat (1)
      • Patisserie (6)
      • Restaurant Cookbook (3)
      • Vegetarian (3)
      • Yotam Ottolenghi (2)
      • ⭐️⭐️⭐️⭐️ (16)
      • ⭐️⭐️⭐️⭐️⭐️ (8)
    • Bread (3)
    • Breakfast (1)
    • Breakfast Tart (1)
    • brioche (1)
    • Brockhall Farm (1)
    • Bruschetta (1)
    • Bryn Williams (1)
    • Burrata (1)
    • Butter (1)
    • Buttercream (1)
    • Camembert (1)
    • Canapes (1)
    • caraway (2)
    • Casserole (2)
    • Chelsea Buns (1)
    • Chestnuts (1)
    • Chicken (3)
    • Chickpea (1)
    • Chocolate (4)
    • Chocolate Fondant (1)
    • Christmas (1)
    • Ciabatta (1)
    • Cinnamon (1)
    • Citrus (1)
    • Citrus Drizzle Cake (1)
    • Clams (1)
    • Coconut (2)
    • Coconut Milk (1)
    • Confectionary (1)
    • Creme Patisserie (1)
    • Dan Lepard (1)
    • Dessert (1)
    • detox (1)
    • Doughnuts (1)
    • Dried Fruit (1)
    • Drop Scones (1)
    • Ducasse (1)
    • Duck Egg (1)
    • Eggs (3)
    • El Bulli (1)
    • en Cocotte (1)
    • Epi (1)
    • Eric Treuille (1)
    • fennel (2)
    • Fettuccini (1)
    • Fish (1)
    • FrontPage (28)
    • Fruit Tea (1)
    • Glutamate (1)
    • Goat’s Cheese (1)
    • Gỏi Cuốn (1)
    • Granita (1)
    • Herbs (1)
    • Heritage Tomato (1)
    • Hibiscus Flower (1)
    • Hope and Greenwood (1)
    • Ice-Cream (3)
    • Iced Berry Souffle (1)
    • Icing (1)
    • Italian (1)
    • James Martin (1)
    • Jelly (1)
    • Journal (9)
    • Karen Scott (1)
    • King Oyster Mushroom (3)
    • Kummel (1)
    • L’Ortolan (1)
    • Lamb (1)
    • Lavender (1)
    • Laverstoke Park (1)
    • Lemon (3)
    • Lemon Drizzle Cake (1)
    • Lemon Grass (1)
    • Lemon Meringue Tart (1)
    • Lemon Poppy Seed Muffins (1)
    • Lentils (1)
    • Limewood (1)
    • Liquorice (1)
    • Liquorice Ice-Cream (1)
    • Lobster (3)
    • Lucas Hollweg (1)
    • Luke Holder (1)
    • Macarons (1)
    • Mango (1)
    • Marcus Wareing (1)
    • Mark Lloyd (1)
    • Market (1)
    • Mary Berry (1)
    • Meringue (1)
    • Michael Moore (1)
    • Michel Roux (3)
    • Mint (1)
    • Mister Truffle (2)
    • Modernist Cuisine at Home (1)
    • Moroccan (1)
    • Muffins (3)
    • Murano (1)
    • Mushroom (1)
    • Ollie Dabbous (1)
    • Ollie Fararr (1)
    • Ox cheek (1)
    • Palourde Clams (1)
    • Pancetta (1)
    • Panna Cotta (1)
    • Parmesan (1)
    • Passion Fruit (3)
    • Pasta (1)
    • Patisserie (1)
    • Paul Heathcote (1)
    • Pea (1)
    • Peter Reinhart (1)
    • Petit Fours (1)
    • Philip Howard (1)
    • Pierre Koffman (1)
    • Pierre Koffmann (1)
    • Pimms (1)
    • Pistachio (1)
    • Pistachio Soufflé (2)
    • Pistacho (1)
    • Pork (1)
    • Prawn (1)
    • Quiche (1)
    • Rachel Allen’s 30 Day Muffins (1)
    • Raspberry (2)
    • Ravioli (1)
    • Raymond Blanc (1)
    • ►Recipe (192)
      • Baking (17)
      • Breakfast (2)
      • Cheese (1)
      • Dessert (7)
      • Eggs (3)
      • Fish (2)
      • Heston Blumenthal (5)
      • Italian (3)
      • Jamie Oliver (1)
      • Marcus Wareing (2)
      • Mediterranean (3)
      • Pasta (3)
      • Patisserie (7)
      • Risotto (1)
      • Smoothie (1)
      • Sous Vide (1)
      • Squash (1)
      • Thermomix (19)
      • Vegan (1)
      • Vegetarian (20)
      • Yotam Ottolenghi (2)
    • ►Restaurant (124)
      • 1 Michelin Star (17)
      • 2 Michelin Stars (9)
      • 3 Michelin Stars (3)
      • British (19)
      • Fish (4)
      • French (4)
      • Italian (3)
      • Japanese (1)
      • Peruvian (1)
    • Richard Bertinet (1)
    • Risotto (1)
    • Roganic (1)
    • Rolls (1)
    • Roux (3)
    • salad (2)
    • Salmon (2)
    • Sardinian Cookery (1)
    • Scandiliscious (1)
    • Sea Trout (1)
    • Sherbet Dab (1)
    • Signe Johansen (1)
    • Silvana de Soissons (1)
    • Simon Rogan (1)
    • Snail Caviar (1)
    • Soda Bread (1)
    • Sorbet (1)
    • Soufflé (11)
    • Soup (1)
    • Sous Vide (2)
    • Spice (1)
    • Stew (1)
    • Stuffing (1)
    • Sugar Baby (1)
    • Sugarwork (1)
    • Sumosan (1)
    • Supper (1)
    • Sweetcorn (1)
    • Sweetcorn Fritters (1)
    • Tamarillo’s (1)
    • Texturas Fizzy (1)
    • Thai (2)
    • The Bertinet Kitchen (1)
    • The Square (1)
    • Thermomix (10)
    • Toffe Fudge Muffins (1)
    • Tom Kitchin (1)
    • Tomato Bread (1)
    • Tony Fleming (4)
    • Tribute Dish (2)
    • Truffle (1)
    • Truffles (6)
    • Umami (1)
    • Uncategorized (1)
    • Vanilla (2)
    • Vegan (1)
    • Vegetables (1)
    • Vegetarian (3)
    • Verveine (1)
    • Vietname Summer Roll (1)
    • Watermelon (1)
    • William Curley (1)
    • yeasted dough (1)

    I’m passionate about food, its provenance and its sustainability. As a technical cook, I like to see what’s happening in the kitchens of Michelin starred restaurants, but you’re just as likely to find me at home making sourdough. You can find some of my recipes in In The Mix 2, an award-winning Thermomix cookbook.

    I’m also truly blessed – I can open my fridge at any time and know it’s crammed with all manner of loveliness – but that’s not the case for everyone. There are people all around me in the UK who rely on food banks to feed their kids, and themselves, and every box of cereal or teabag makes a difference. You can donate food to your local food bank, or time, or money, and if you want more information the best starting place is http://www.trusselltrust.org.

    You can also find me here:

    Foodies100 Index of UK Food BlogsFoodies100
    The Renaissance Epicurean... London restaurants
    Top Food BlogsUK Food Bloggers Association

    The Eleven Madison Park Granola

    Copyright © 2025 · Cookd Pro Theme On Genesis Framework · WordPress · Log in

    Nourished
    • Home
    • Recipes
    • Book Reviews
    • Restaurants
    • Journal
    • About